- Catalogs
- Smith & Nephew
- SALTO TALARIS
- Products
- Catalogs
- News & Trends
- Exhibitions
SALTO TALARIS
1 /48Pages

SALTO TALARIS
1 /48Pages
Catalog excerpts

SALTO TALARIS◊ Total Ankle Prosthesis Primary Ankle Replacement Surgical Technique
Open the catalog to page 1
SALTO TALARIS◊ Total Ankle Prosthesis Table of contents Instrumentation concept Preoperative planning Additional information Surgical Technique Step 1 • Surgical Approach and Exostosectomy of the Distal Tibia Step 2 • Positioning the Tibial Alignment Guide Step 3 • Adjusting the Alignment Guide Step 4 • Final Adjustment of Cutting Height, Rotation, and Lateral Position Height Adjustment 11 Step 5 • Preselection of Talar Implant Size Step 6 • Placing the Cut Guide Step 7 • Preparation for Tibial Bone Cut Step 9 • Preparing the Posterior Talar Cut and Inserting the Talar Guide Pin Step 10 • Setting...
Open the catalog to page 2
Surgical Technique Step 22-3 • Alternate Primary Technique – Cutting the Talus before the Tibia Step 22-3b • Alternate Primary Technique– Cutting the Talus before the Tibia (continued) Step 22-3c • Alternate Primary Technique–Cutting the Talus before the Tibia (continued) Step 23 • Finishing Touches on the Tibial Keel Step 24 • Placing Final Implants Step 25 • Revising or Removing Implants Nota Bene The following technique is for informational and educational purposes only. It is not intended to serve as medical advice. It is the responsibility of treating physicians to determine and utilize...
Open the catalog to page 3
SALTO TALARIS◊ Total Ankle Prosthesis Instrumentation Concept The instrumentation is designed to achieve accurate and reproducible tibiotalar alignment while adapting to various anatomical conditions, depending on the lesions encountered in the ankle or a particular morphotype. The broad steps of this Primary operative technique can be summarized as follows. 1) Patient Positioning The patient is placed in a supine position with a bump under ipsilateral hip to reduce external rotation of the extremity. The heel is placed near the end of the table. A bump under the calf should be used throughout...
Open the catalog to page 4
Surgical Technique Preoperative Planning The preoperative planning for the SALTO TALARIS◊ prosthesis is carried out using three standard weight-bearing radiological views: • Anterior view; • Anterior view with 30° internal rotation to expose the tibial-fibular joint space. • Straight lateral. Examination of the healthy side should be used for comparison. Complementary imaging may be requested to: • Confirm or reject the indication (CT scan examination for talar necrosis, a relative contraindication for prosthetic replacement); • Discuss the need for an associated procedure (CT scan of the subtalar...
Open the catalog to page 5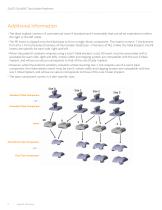
SALTO TALARIS◊ Total Ankle Prosthesis Additional Information • The tibial implant comes in 8 symmetrical sizes (4 standard and 4 extended) that can all be implanted on either the right or the left ankle. • The PE insert is clipped onto the tibial base to form a single-block component. The inserts come in 7 thicknesses, from 8 to 17mm (includes thickness of the metallic tibial base + thickness of PE). Unlike the tibial implant, the PE inserts are specific for each side, right and left. • When the patient’s anatomy requires using a size 0 tibial implant, a size 00 insert must be associated with...
Open the catalog to page 6
Surgical Technique Surgical technique Step 1 • Surgical Approach and Exostosectomy of the Distal Tibia 1-1 The ankle is opened with a longitudinal anterior incision, lateral to the anterior tibialis. This allows for an anterior release and broad arthrolysis with resection of all the osteophytes (Figure 1). The top of the dome as well as the angles between the pilon and each of the malleoli can be identified precisely using this incision. Figure 1 Anterior approach Figure 1a After gaining exposure to the joint, visualize the level of the tibial plafound If necessary, release of any malleolar attachments...
Open the catalog to page 7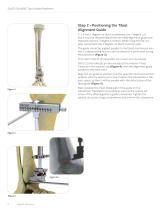
SALTO TALARIS◊ Total Ankle Prosthesis Step 2 • Positioning the Tibial Alignment Guide 2-1 If the 3 degree cut block is preferred, the 7 degree cut block must be disassembled from the tibial alignment guide and replaced with the 3 degree cut block. While using the flat cut talar component the 3 degree cut block must be used. The guide should be aligned parallel to the tibia’s mechanical axis; this is a determining factor in all the resections performed during the procedure (Figure 3). First check that all of the guide’s set screws are unscrewed. Drill a 110mm drill tip pin bicortically at the...
Open the catalog to page 8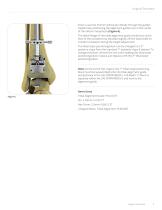
Surgical Technique Insert a second 110mm drill tip pin distally through the guide’s medial hole, positioning the alignment guide’s axis in the center of the inferior metaphysis (Figure 6). The distal flange of the tibial alignment guide should rest at the level of the exostectomy, elevated slightly off the tibial shaft for smooth translation during the height adjustment The tibial slope positioning block can be changed to a 3° posterior slope from the standard 7° posterior slope if desired. To change the block, remove the set screw holding the tibial slope positioning block in place and replace...
Open the catalog to page 9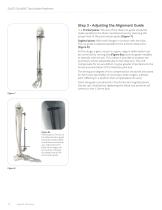
SALTO TALARIS◊ Total Ankle Prosthesis Step 3 • Adjusting the Alignment Guide 3-1 Frontal plane: The axis of the tibial cut guide should be made parallel to the tibia’s mechanical axis by choosing the proper hole of the proximal pin guide (Figure 7). Sagittal plane: With both flanges in contact with the tibia, the cut guide is adjusted parallel to the anterior tibial crest (Figure 8). At this stage, a genu varum or a genu valgum deformation can be corrected by moving the (Figure 8a) proximal guide medially or laterally over the pin. This makes it possible to implant the prosthesis strictly perpendicular...
Open the catalog to page 10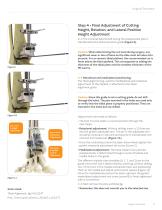
Surgical Technique Step 4 • Final Adjustment of Cutting Height, Rotation, and Lateral Position Height Adjustment 4-1 The cut level determined during the preoperative plan is transferred to the distal resection guide (Figure 9). Caution: When determining the cut level during surgery, any significant wear or loss of bone on the tibia must be taken into account. For an unworn tibial plafond, the recommended cut is 9mm above the tibial plafond. This corresponds to adding the thickness of the tibial plate and the smallest thickness of the PE inserts. 4-2 Rotational and mediolateral positioning: The...
Open the catalog to page 11All Smith & Nephew catalogs and technical brochures
 ANTHEM 2024
40 Pages
 BIRMINGHAM HIP
32 Pages
 FREEDOM
16 Pages
 polarstem
28 Pages
Archived catalogs
 Locking Large Fragment Overview
32 Pages
 Locking Small Fragment Overview
68 Pages
 Rediscover normal
4 Pages
 TWINFIX ULTRA HA and PK
2 Pages
 TRIGEN™ INTERTAN
12 Pages
 EVOS SMALL Resources
12 Pages
 NAVIO Message Brochure
8 Pages
 Small footprint, big impact
8 Pages
 TAYLOR SPATIAL FRAME◊
8 Pages
 Recertification Program
8 Pages
 anthem
4 Pages
 Ordering information
1 Page
 BST-CarGel ®
20 Pages
 RAPID RHINO™ NASASTENT™
6 Pages
 clancy anatomic cruiciate
2 Pages
 Electrosurgery
20 Pages
 Powered Instruments
11 Pages
 Shaver Systems
7 Pages
 Knee
Knee73 Pages
 HIP
HIP21 Pages


- Bone plate
- Compression plate
- Metallic compression plate
- Locking compression plate
- Wound care
- Medical kit
- Surgery electrode
- Electrosurgical electrode
- Surgical system
- Reusable electrode
- Cutting electrosurgical system
- Coagulation electrosurgical unit
- Endoscopy forceps
- Monopolar electrode
- Wound dressing
- Sealing forceps
- Straight electrode
- Bandage
- Proximal compression plate
- Coagulation electrode