ACCOLADE® II
1 /20Pages

ACCOLADE® II
1 /20Pages
Catalog excerpts

Surgical Technique
Open the catalog to page 1
INDICATIONS The indications for use of the total hip replacement prostheses include: • Noninflammatory degenerative joint disease, including osteoarthritis and avascular necrosis; • Rheumatoid arthritis; • Correction of functional deformity; • Revision procedures where other treatments or devices have failed; and, • Nonunions, femoral neck fractures, and trochanteric fractures of the proximal femur with head involvement that are unmanageable using other techniques. Additional indication specific to use of ACCOLADE II Femoral Stems with compatible Howmedica Osteonics Constrained Liners: • When...
Open the catalog to page 2
ACCOLADE II Femoral Hip System The ACCOLADE II Femoral Hip System is a femoral stem that is intended for cementless, press-fit application. The proximal region of the stem is coated with PureFix HA over a commercially pure titanium plasma spray substrate. The Morphometric Wedge — an evolution of the tapered wedge — is characterized by its variable, size-specific medial curvature. The ACCOLADE II Femoral Hip System is suitable for various surgical approaches, including direct anterior. The total system includes: • 12 body sizes ranging from size 0 to size 11 • Two anatomic offset options for each...
Open the catalog to page 3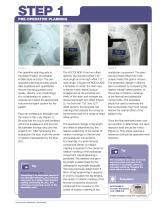
PRE-OPERATIVE PLANNING Pre-operative planning aids in the determination of probable implant style and size. The preoperative planning process should take qualitative and quantitative factors (including patient bone quality, density, and morphology) into consideration in order to evaluate and select the appropriate instrument/implant system for the patient. The ACCOLADE II has two offset options: the standard offset 132° neck angle and the high offset 127° neck angle. Choose the ACCOLADE II template for which the stem size achieves medio-lateral cortical engagement at the proximal twothirds of...
Open the catalog to page 4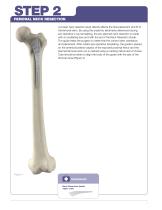
FEMORAL NECK RESECTION A proper neck resection level directly affects the final placement and fit of the femoral stem. By using the anatomic landmarks referenced during pre-operative x-ray templating, the pre-planned neck resection is made with an oscillating saw and with the aid of the Neck Resection Guide. The guide helps the surgeon to determine the correct stem orientation and placement. After careful pre-operative templating, the guide is placed on the anterior/posterior aspect of the exposed proximal femur and the planned femoral neck cut is marked using a marking instrument of choice....
Open the catalog to page 5
PREPARING THE FEMORAL CANAL To help ensure proper final orientation of the stem, lateral bias during implant preparation is preferred. Retraction of the gluteus medius and removal of the lateral cortical bone at the piriformis insertion will permit true axial introduction of the instruments and implant. The Modular Box Osteotome or a rongeur can be used to remove bone from this area (Figure 5). Tip Art Malkani, M.D. Remove the lateral cortical bone at the piriformis fossa to obtain ideal proximal fit and to minimize the risk of undersizing and/or varus placement of the femoral component. Instruments...
Open the catalog to page 6
The ACCOLADE II Hip System is a broach only system. While use of an axial starter reamer is needed, use of cylindrical reamers is not necessary to prepare the femoral canal. The Axial Starter Reamer is used with the T-Handle to open the femoral canal and to aid in determining the orientation of the femoral axis. The tapered design allows for access to the canal and is graduated along the flutes, which helps provide a reference during insertion into the canal. Advance the Axial Starter Reamer into the femoral canal to a depth at which the first graduation mark is aligned with the medial aspect...
Open the catalog to page 7
Note ACCOLADE II broaches can be properly identified in several ways. 1) The broach size is engraved into a square pocket on both the anterior and posterior sides of the broach. 2) The size is marked on the top of the broach post. 3) The distal lateral tip of the broach is polished. 4) 1020-52xx part number Broaching is then performed beginning with the size 0 broach. The broach should be oriented to the long axis of the oblong shape created by the neck resection (Figure 7). Note Accolade and ACCOLADE II broaches cannot be used interchangeably. Tip Art Malkani, M.D. During broaching, place lateral...
Open the catalog to page 8
OPTIONAL STEP Relying only on the neck resection height alone for final seating height may lead to improper sizing and inadequate component fixation. The final broach should seat firmly against medial and lateral cortical bone (Figure 9). Tip Frank Kolisek, M.D. If the broach and/or stem stops above or below the original neck resection, leg length and soft-tissue tensioning must be re-assessed during intraoperative trialing. Do not force the broach and/or stem to the resection level. This will increase the risk of proximal femur fracture. Generally, if a broach sinks below the level of the neck...
Open the catalog to page 9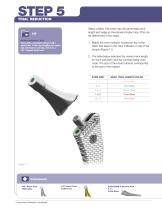
TRIAL REDUCTION Select a Neck Trial which has the same base neck length and angle as the planned implant size. This can be determined in two ways. TIP Richard Rothman, M.D. Start with a standard offset (132°) neck trial. If the leg lengths are equal, but soft tissues are lax, move to a 127° degree neck trial. 1. Match the color indicator located on top of the Neck Trial taper to the color indicator on top of the broach (Figure 11). 2. The table below indicates the correct neck length for each size stem and the corresponding color code. The size of the broach directly corresponds to the size of...
Open the catalog to page 10
Tip Richard Rothman, M.D. Remember, pre-operative templating serves as only a guide. Final sizing, leg length, and offset are determined intra-operatively. Tip Dermot Collopy, M.D. After trial reduction and prior to removing the broach, tap on the broach a few more times to see if it will advance. Due to the viscoelastic properties of the bone, the bone could relax during the trialing process. If the broach does advance, retrial and make adjustments accordingly. Assemble the Neck Trial onto the broach. Next, assemble a V40 Head Trial onto the Neck Trial (Figure 12). Femoral heads come in multiple...
Open the catalog to page 11All Stryker catalogs and technical brochures
 Hoffmann® 3
2 Pages
 Gamma3
2 Pages
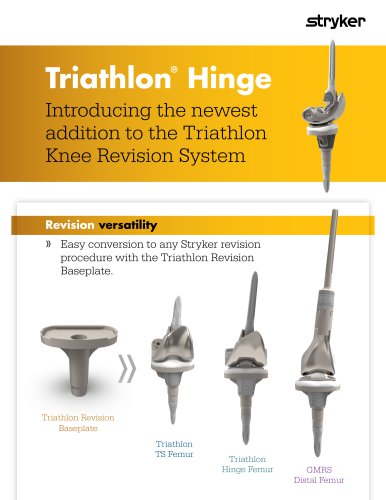 Triathlon Hinge Sell Sheet
2 Pages
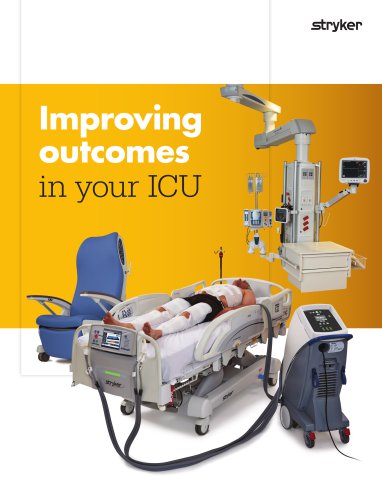 ICU Brochure
6 Pages
Archived catalogs
 C-Arm T racking System
2 Pages
 ACL Instrumentation Brochure
6 Pages
 System 7
7 Pages
 System 7 Precision
2 Pages
 System 7 Battery
2 Pages
 System 7 Sterilization Case
2 Pages
 CD4 & SABO2 Family
5 Pages
 Gamma3 Trochanteric Nail 180
48 Pages
 Gamma3 Long Nail R2.0
48 Pages
 Gamma3 Fragment Control Clip
6 Pages
 Gamma3 U-Blade Lag Screw
18 Pages
 trident
12 Pages
 GMRS
GMRS13 Pages
 Scorpio ®Knee TS
6 Pages
 CBC II
2 Pages
 the Mill
2 Pages
 Gamma3 T
6 Pages
 Label Changes
2 Pages
 SmartTip ™
3 Pages
 SDC 3
SDC 32 Pages
 System 7 Family
7 Pages
 Mixevac III
2 Pages
 InterPulse - Orthopaedics
4 Pages
 Neptune 2
2 Pages
 Neptune E-SEP
2 Pages
 Right Angled Screwdriver
8 Pages
 Universal Neuro III
10 Pages
 EasyClip
2 Pages
 Asnis ® Micro Xpress
2 Pages
 S3 MedSurg Bed
8 Pages
 Stryker NAV3i
4 Pages
 Cast Cutter
2 Pages
 Cast Vac
2 Pages
 Revolution
6 Pages
 SmartPump
2 Pages
 Disposable Cuff
2 Pages
 Patient Education
2 Pages
 Reusable Cuff
2 Pages
 SurgiCount
4 Pages
 OASYS®
44 Pages
 Reflex®
24 Pages
 Escalate®
16 Pages
 Stryker Biologics
46 Pages
 Aero® -C
6 Pages
 Dynatran
13 Pages
 Aviator™
2 Pages
 AVS Anchor® -C
2 Pages
 Humeral Nailing System
44 Pages
 Luxor
Luxor4 Pages
 OrthoMap®
4 Pages
 ENT navigation system
7 Pages
 AxSOS 3® Titanium
36 Pages
 Smart Equipment Management
3 Pages
 Prime TC®
4 Pages
 TruRize™ Clinical Chair
4 Pages
 TruRize® Clinical Chair
2 Pages
 VariAx® 2
20 Pages
 VariAx® DistalFibula
20 Pages
 company overview
12 Pages


- Hospital bed
- Bone plate
- Compression plate
- Catheter
- Metallic compression plate
- Locking compression plate
- Inclinable bed
- Surgical table
- Universal operating table
- Adjustable height operating table
- Surgical system
- Electric operating table
- Tilting surgical table
- Cutting electrosurgical system
- Distal compression plate
- Coagulation electrosurgical unit
- Agitator
- Surgical table with legrest
- Interbody fusion cage
- Drill