Escalate®

Escalate®
The Escalate™ Laminoplasty System is designed for cervical laminoplasty procedures, featuring components such as the Expandable Laminoplasty Plate, Base Laminoplasty Plate, and Bone Screws. It includes instruments for both implantation and removal.
This plate attaches to the open lamina and lateral mass, expanding from 8-12mm in 2mm increments. Made from titanium alloy, it is adaptable for various patient situations without the need for trialing.
This plate reinforces an unstable hinge by attaching to the lamina and lateral mass, ensuring secure placement with screw holes.
The system includes 2.0mm self-drilling screws and 2.4mm self-tapping rescue screws, both featuring a square drive for secure attachment.
Patient Positioning and Exposure
The patient is positioned prone, with a midline incision exposing the spinous processes and lamina. A vertical trough is created on one side and a unicortical trough on the opposite side.
Two techniques are available: expanding all levels together or one level at a time, based on surgeon preference.
After preparing the lamina, the Lamina Elevator is used to lift it. The plate is placed using a Plate Holder, and screw holes are prepared with an Awl or Drill Bit. Screws are inserted using a self-retaining Screwdriver.
The Expander adjusts the plate height, with stops to prevent over-expansion. An alternate technique involves using the Lamina Elevator.
This plate provides additional support for a loose hinge, with screws inserted on the lateral mass and lamina sides.
Removal follows the implantation procedure in reverse, using the Plate Holder and Screwdriver.
Details of implants and instruments, including part numbers, are provided for reference.
The STRYKER Spine Escalate™ Laminoplasty System is a comprehensive set of implants and instruments designed for laminoplasty procedures in the cervical spine. It includes expandable and hinge plates, bone screws, and various instruments for implantation and removal. The screws are available in different sizes to match anatomical requirements.
This system is intended for use in the lower cervical and upper thoracic spine (C3-T3) to maintain the lamina open post-laminoplasty.
The system should not be used in cases of severe osteoporosis, active infections, open wounds, neuromuscular deficits, unnecessary laminoplasty, morbid obesity, pregnancy, mental illness, substance abuse, or material sensitivity. Other medical conditions that could negate the benefits of spinal implant surgery are also contraindications.
Surgeons must be familiar with the surgical techniques and trained in their application. Instruments should not exert undue stress on the spine or implants. Care is required to avoid damaging the implants, especially near vital organs. Instruments can be reused after proper decontamination and sterilization.
Implants are temporary and should be removed after healing. Removal may also be necessary due to corrosion, migration, pain, infection, or implant failure. Special instruments may be required for removal, and postoperative management is crucial to prevent fractures.
The system has not been evaluated for MR environment safety. Federal law restricts device sales to licensed physicians. Surgeons should rely on their clinical judgment and be trained in product use.
The document includes legal disclaimers about product availability and trademarks owned by Stryker Corporation.
Catalog excerpts

Escalate Laminoplasty System Surgical Technique TM • Expandable Laminoplasty Plate • Streamlined Procedur
Open the catalog to page 1
Escalate Laminoplasty System TM Surgical Technique Table of Contents System Overview. . . . . . . . . . . . . . . . . . . . . . . . . . . . . . . . . . . . . . . . . . . . . . . . . . . . 3-4 Surgical Procedure. . . . . . . . . . . . . . . . . . . . . . . . . . . . . . . . . . . . . . . . . . . . . . . . . . 5-12 Expandable Laminoplasty Plate Technique. . . . . . . . . . . . . . . . . . . . . . . . . . . 6-11 Base Laminoplasty Plate Technique. . . . . . . . . . . . . . . . . . . . . . . . . . . . . . . . . . 12 Implant Removal. . . . . . . . . . . . . . . . . . . . . . . . . . . . . . . . . ....
Open the catalog to page 2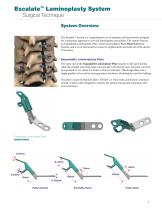
Escalate Laminoplasty System TM Surgical Technique System Overview The Escalate™ System is a comprehensive set of implants and instruments designed for a systematic approach to cervical laminoplasty procedures. The system features an Expandable Laminoplasty Plate, a Base Laminoplasty Plate, Bone Screws for fixation, and a set of instruments to assist in implantation and removal of the device, if necessary. Expandable Laminoplasty Plate The open end of the Expandable Laminoplasty Plate attaches to the open lamina while the straight end of the plate corresponds to the lateral mass. The plate can...
Open the catalog to page 3
Escalate Laminoplasty System TM Surgical Technique Base Laminoplasty Plate The Base Laminoplasty Plate can be used to reinforce an unstable hinge after a laminoplasty procedure. It can be attached directly to the lamina above and to the lateral mass beneath the hinge. Base Laminoplasty Plate (48570301) The Base Laminoplasty Plate features two screw holes which can be used to secure the plate to the laminar hinge and two holes which can be used to attach the plate to the lateral mass. Bone Screws The Escalate™ Laminoplasty System features a 2.0mm diameter self-drilling screw in lengths of 4-10mm...
Open the catalog to page 4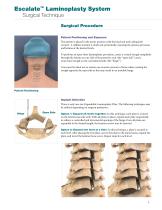
Escalate Laminoplasty System TM Surgical Technique Surgical Procedure Patient Positioning and Exposure The patient is placed in the prone position with the head and neck adequately secured. A midline incision is made sub-periosteally, exposing the spinous processes and lamina at the desired levels. To perform an open-door laminoplasty procedure, create a vertical trough completely through the lamina on one side of the posterior arch (the “open side”) and a unicortical trough on the contralateral side (the “hinge”). Care must be taken not to remove an excessive amount of bone when creating the...
Open the catalog to page 5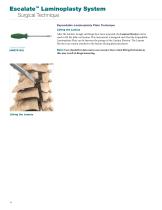
Escalate Laminoplasty System TM Surgical Technique Expandable Laminoplasty Plate Technique Lifting the Lamina After the laminar trough and hinge have been prepared, the Lamina Elevator can be used to lift the fully-cut lamina. This instrument is designed such that the Expandable Laminoplasty Plate can fit between the prongs of the Lamina Elevator. The Lamina Elevator can remain attached to the lamina during plate placement. Lamina Elevator (48570100) Note: Care should be taken not to use excessive force when lifting the lamina as this may result in hinge loosening.
Open the catalog to page 6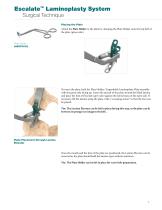
Escalate Laminoplasty System TM Surgical Technique Attach the Plate Holder to the plate by clamping the Plate Holder onto the top half of the plate (green side). To insert the plate, hold the Plate Holder / Expandable Laminoplasty Plate assembly with the green side facing up. Insert the mouth of the plate around the lifted lamina and place the foot of the plate (grey side) against the lateral mass of the open side. If necessary, lift the lamina using the plate, with a “scooping action” so that the foot can be placed. Tip: The Lamina Elevator can be left in place during this step, as the plate...
Open the catalog to page 7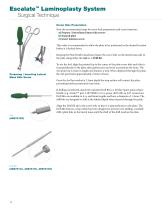
Escalate Laminoplasty System TM Surgical Technique Screw Hole Preparation Note the recommended steps for screw hole preparation and screw insertion: a) Prepare / insert lateral mass side screws b) Expand plate c) Insert laminar screw This order is recommended to allow the plate to be positioned in the desired location before it is locked down. Keeping the Plate Holder attached, prepare the screw hole on the lateral mass side of the plate using either the Awl or a Drill Bit. Preparing / Inserting Lateral Mass Side Screw To use the Awl, align the pointed tip in the center of the plate screw hole...
Open the catalog to page 8
Escalate Laminoplasty System TM Surgical Technique Screw Insertion The self-retaining Screwdriver features a square split tip to hold the screw head securely. To load bone screws, fully insert the tip of the Screwdriver into a screw head while the screw is in the screw caddy. Use the gauge in the screw caddy to confirm screw length. Screwdriver (48570104) Note: Following either technique for screw preparation (Awl or Drill), use the 2.0mm self-drilling screws (magenta). The 2.4mm self-tapping screws should only be used as a rescue screw after a 2.0mm screw has been inserted into (and removed...
Open the catalog to page 9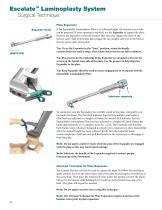
Escalate Laminoplasty System TM Surgical Technique Plate Expansion Expander Knob If the Expandable Laminoplasty Plate is at a desired height, the laminar screw hole can be prepared. If more opening is required, use the Expander to expand the plate. Position the Expander so that the bottom (flat side) pin engages the hole on the bottom (grey) half of the plate, then engage the top (angled side) pin in the hole at the top (green side) of the plate. Tip: To set the Expander in the “Start” position, rotate the handle counterclockwise until it stops. Then rotate clockwise for one full revolution....
Open the catalog to page 10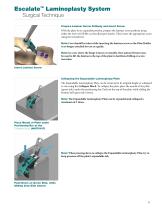
Escalate Laminoplasty System TM Surgical Technique Prepare Laminar Screw Pathway and Insert Screw With the plate in its expanded position, prepare the laminar screw pathway using either the Awl or Drill Bit (as described previously). Then insert the appropriate screw using the Screwdriver. Note: Care should be taken while inserting the laminar screw as the Plate Holder is no longer attached for use as a guide. Note: In cases where the hinge is loose or unstable, the Lamina Elevator may be used to lift the lamina to the top of the plate to facilitate drilling or screw insertion. Insert Laminar...
Open the catalog to page 11All Stryker catalogs and technical brochures
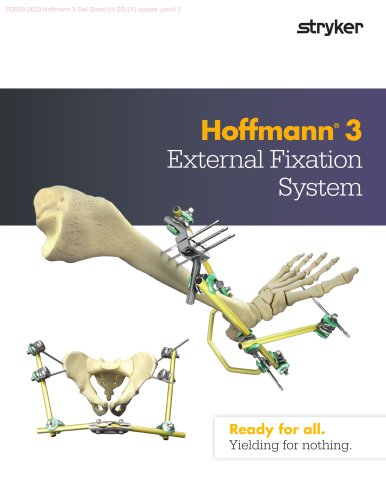 Hoffmann® 3
2 Pages
 Gamma3
2 Pages
 Triathlon Hinge Sell Sheet
2 Pages
 ICU Brochure
6 Pages
Archived catalogs
 C-Arm T racking System
2 Pages
 ACL Instrumentation Brochure
6 Pages
 System 7
7 Pages
 System 7 Precision
2 Pages
 System 7 Battery
2 Pages
 System 7 Sterilization Case
2 Pages
 CD4 & SABO2 Family
5 Pages
 Gamma3 Trochanteric Nail 180
48 Pages
 Gamma3 Long Nail R2.0
48 Pages
 Gamma3 Fragment Control Clip
6 Pages
 Gamma3 U-Blade Lag Screw
18 Pages
 trident
12 Pages
 GMRS
GMRS13 Pages
 Scorpio ®Knee TS
6 Pages
 CBC II
2 Pages
 the Mill
2 Pages
 Gamma3 T
6 Pages
 Label Changes
2 Pages
 SmartTip ™
3 Pages
 SDC 3
SDC 32 Pages
 System 7 Family
7 Pages
 Mixevac III
2 Pages
 InterPulse - Orthopaedics
4 Pages
 Neptune 2
2 Pages
 Neptune E-SEP
2 Pages
 Right Angled Screwdriver
8 Pages
 Universal Neuro III
10 Pages
 EasyClip
2 Pages
 Asnis ® Micro Xpress
2 Pages
 S3 MedSurg Bed
8 Pages
 Stryker NAV3i
4 Pages
 Cast Cutter
2 Pages
 Cast Vac
2 Pages
 Revolution
6 Pages
 SmartPump
2 Pages
 Disposable Cuff
2 Pages
 Patient Education
2 Pages
 Reusable Cuff
2 Pages
 SurgiCount
4 Pages
 OASYS®
44 Pages
 Reflex®
24 Pages
 Stryker Biologics
46 Pages
 Aero® -C
6 Pages
 Dynatran
13 Pages
 Aviator™
2 Pages
 AVS Anchor® -C
2 Pages
 Humeral Nailing System
44 Pages
 Luxor
Luxor4 Pages
 OrthoMap®
4 Pages
 ENT navigation system
7 Pages
 AxSOS 3® Titanium
36 Pages
 Smart Equipment Management
3 Pages
 Prime TC®
4 Pages
 TruRize™ Clinical Chair
4 Pages
 TruRize® Clinical Chair
2 Pages
 VariAx® 2
20 Pages
 ACCOLADE® II
20 Pages
 VariAx® DistalFibula
20 Pages
 company overview
12 Pages


- Hospital bed
- Bone plate
- Compression plate
- Catheter
- Metallic compression plate
- Locking compression plate
- Inclinable bed
- Surgical table
- Universal operating table
- Adjustable height operating table
- Surgical system
- Electric operating table
- Cutting electrosurgical system
- Distal compression plate
- Tilting surgical table
- Coagulation electrosurgical unit
- Agitator
- Surgical table with legrest
- Interbody fusion cage
- Benchtop agitator