


Humeral Nailing System

Humeral Nailing System
- Antegrade Technique: Details patient positioning, incision, entry point preparation, and nail insertion, including unreamed and reamed methods.
- Locking Options: Offers static, dynamic, and advanced locking modes with detailed steps for each using the Target Device.
- Static Locking Mode: Involves drilling through the first cortex and reading screw length directly from the drill.
- Static Oblique Locking Mode: Utilizes the Tissue Protection Sleeve assembly for screw insertion.
- Freehand Distal Locking: Requires visualization of a perfectly round locking hole with the C-Arm.
- Dynamic Locking Mode: Allows for controlled dynamic locking for stable fractures.
- Apposition/Compression Locking Mode: Provides active mechanical apposition/compression.
- Advanced Locking Mode: Offers additional fixation by inserting a Fully Threaded Locking Screw.
- Nail Removal: Describes the elective procedure for nail removal, emphasizing the sequence of screw extraction.
- Patients are positioned on a radiolucent table in either prone or lateral decubitus position.
- A posterior approach is used for incision, with detailed steps for accessing the distal humerus.
- Unreamed Technique: Involves the use of a Smooth Tip Guide Wire for nail insertion without reaming.
- Reamed Technique: Utilizes a Ball Tip Guide Wire and reaming in increments for precise nail placement.
- Ensure the Tissue Protection Sleeve is flush with the cortex to maintain screw measurement accuracy.
- Avoid drilling through the far cortex to prevent joint penetration.
- Use image intensification to confirm screw position and length.
- Handle Elastosil components with care to prevent blockage and bending.
- Carefully select End Cap length to avoid impingement.
- The final reamer should be 1mm−1.5mm larger than the diameter of the nail.
- The driving end of the 7mm nail is always 8mm.
- X-Ray Templates should be used pre-operatively to determine the canal size radiographically.
- Guide Wire Management: Use the Guide Wire Pusher to maintain the Guide Wire position during reamer shaft extraction.
- Nail Selection and Insertion: The diameter of the selected nail should be 1mm smaller than the last reamer used.
- Locking Modes: Includes Static Oblique, Static Transverse, Controlled Dynamic, and Advanced Locking Modes.
- Use image intensification to confirm screw position and length.
- Ensure the Tissue Protection Sleeve is flush with the cortex to maintain screw measurement accuracy.
- Insertion and Fixation: Designed to allow for additional fixation by inserting a Fully Threaded Locking Screw.
- Advanced Locking Mode: Follow the static locking procedure for inserting the second transverse Fully Threaded Locking Screw.
- Nail Removal: Typically elective, with specific steps for removing the End Cap and Compression Screw.
Catalog excerpts

stryker Trauma & Extremities Operative Technique
Open the catalog to page 1
Contributing Rupert Beickert, M. D. Senior Trauma Surgeon Murnau Trauma Center Murnau Germany Rosemary Buckle, M. D. Orthopaedic Associates, L. L. P. Clinical Instructor University of Texas Medical School Houston, Texas USA Prof. Dr. med.Volker Buhren Chief of Surgical Services Medical Director of Murnau Trauma Center Murnau Germany Michael D. Mason, D. O. Assistant Professor of Orthopaedic Surgery Tufts University School of Medicine New England Baptist Bone & Joint Institute Boston, Massachusetts USA This publication sets forth detailed recommended procedures for using Stryker Osteosynthesis...
Open the catalog to page 2
6. Operative Technique - Antegrade Technique 9 Patient Positioning and Fracture Reduction 9 Guided Locking Mode (via Target Device) 15 Static Locking Mode 16 Freehand Distal Locking 19 Dynamic Locking Mode 21 Apposition/Compression Locking Mode 22 Advanced Locking Mode 24 7. Operative Technique - Antegrade Technique 26 Guided Locking Mode (via Target Device) 32 Static Locking Mode 33 Freehand Proximal Locking 36 Dynamic Locking Mode 37 Apposition/Compression Locking Mode 38 Advanced Locking Mode 40
Open the catalog to page 3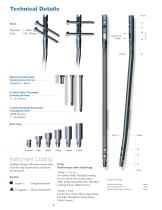
Humerus Advanced Compression Screw (Diameter = 6mm) 4.0mm Fully Threaded Locking Screws L = 20−60mm 4.0mm Partially Threaded Locking Screws (Shaft Screws) L = 20−60mm End Caps Instrument Coding Symbol coding on the instruments indicates the type of procedure, and must not be mixed. Symbol Long instruments Triangular = Short instruments 3.5mm = Orange For 4.0mm Fully Threaded Locking Screws and for the second cortex when using 4.0mm Partially Threaded Locking Screws (Shaft Screws). 4.0mm = Grey For the first cortex when using 4.0mm Partially Threaded Locking Screws (Shaft Screws). Drills feature...
Open the catalog to page 4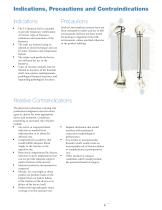
Indications ' The T2 Humeral Nail is intended to provide temporary stabilization of various types of fractures, malunions and nonunions of the humerus. ' The nails are inserted using an opened or closed technique and can be static, dynamic and compression locked. ' The subject and predicate devices are indicated for use in the humerus. ' Types of fractures include, but not limited to fractures of the humeral shaft, non-unions, malalignments, pathological humeral fractures, and impending pathological fractures. Precautions Stryker Osteosynthesis systems have not been evaluated for safety and use...
Open the catalog to page 5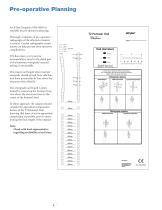
An X-Ray Template (1806-0003) is available for pre-operative planning. Thorough evaluation of pre-operative radiographs of the affected extremity is critical. Careful radiographic examination can help prevent intra-operative complications. If X-Rays show a very narrow intramedullary canal in the distal part of the humerus, retrograde humeral nailing is not possible. The proper nail length when inserted antegrade should extend from subchondral bone proximally, to 1cm above the olecranon fossa distally. The retrograde nail length is determined by measuring the distance from 1cm above the olecranon...
Open the catalog to page 6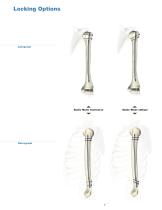
Locking Options Static Mode oblique Static Mode transverse
Open the catalog to page 7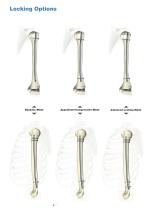
Locking Options Dynamic Mode Apposition/Compression Mode Advanced Locking Mode
Open the catalog to page 8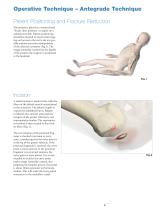
Operative Technique – Antegrade Technique Patient Positioning and Fracture Reduction The patient is placed in a semireclined “beach chair position” or supine on a radiolucent table. Patient positioning should be checked to ensure that imag ing and access to the entry site are possible without excessive manipulation of the affected extremity (Fig. ). The 1 image intensifier is placed at the legside of the patient the surgeon is positioned ; at the headside. Incision A small incision is made in line with the fibers of the deltoid muscle anterolateral to the acromion. The deltoid is split to...
Open the catalog to page 9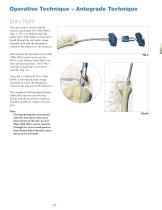
Operative Technique – Antegrade Technique Entry Point The entry point is made with the Curved, cannulated Awl (1806-0040) (Fig. 3). The 2.5 × 800mm Ball Tip Guide Wire (1806-0083S) is then introduced through the awl under image intensification into the metaphysis, central to the long axis of the humerus. Alternatively, the optional Crown Drill (1806-2020) may be used over the K-Wire with Washer (1806-0051S) for entry point preparation. The K-Wire will help to guide the Crown Drill centrally (Fig. 3a). Then, the 3 × 285mm K-Wire (18060050S) is introduced under image intensification into the metaphysis,...
Open the catalog to page 10
Operative Technique – Antegrade Technique Unreamed Technique If an unreamed technique is preferred, the nail may be inserted over the 2.2 × 800mm Smooth Tip Guide Wire (1806-0093S) (Fig. 4). Reamed Technique For reamed techniques, the 2.5 × 800mm Ball Tip Guide Wire (1806-0083S) is inserted across the fracture site. The Reduction Rod (1806-0363) may be used as a fracture reduction tool to facilitate Guide Wire insertion across the fracture site (Fig. 5). Reaming is commenced in 0.5mm increments until cortical contact is appreciated. Final reaming should be 1mm−1.5mm larger than the diameter of...
Open the catalog to page 11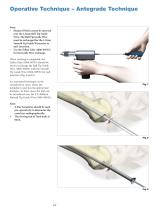
Note: • Humeral Nails cannot be inserted over the 2.5mm Ball Tip Guide Wire. The Ball Tip Guide Wire must be exchanged for the 2.2mm Smooth Tip Guide Wire prior to nail insertion. • Use the Teflon Tube (1806-0073S) for the Guide Wire exchange. When reaming is completed, the Teflon Tube (1806-0073S) should be used to exchange the Ball Tip Guide Wire (1806-0083S) with the Smooth Tip Guide Wire (1806-0093S) for nail insertion (Fig. 8 and 9). An unreamed technique can be considered in cases, where the medullary canal has the appropriate diameter. In these cases, the nail can be introduced over the...
Open the catalog to page 12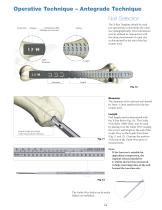
Operative Technique – Antegrade Technique Nail Selection Transverse Compression Slot (Oblique or Dynamic) Hole Positions The X-Ray Template should be used pre-operatively to determine the canal size radiographically. This information may be utilized in conjunction with the clinical assessment of canal size as determined by the size of the last reamer used. The diameter of the selected nail should be 1mm−1.5mm smaller than the last reamer used. Length End of Guide Wire Ruler is the measurement reference Fig. 11 Nail length may be determined with the X-Ray Ruler (Fig. 10). The Guide Wire Ruler...
Open the catalog to page 13All Stryker catalogs and technical brochures
 Hoffmann® 3
2 Pages
 Gamma3
2 Pages
 Triathlon Hinge Sell Sheet
2 Pages
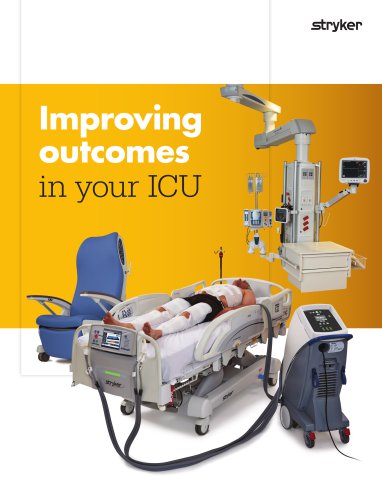 ICU Brochure
6 Pages
Archived catalogs
 C-Arm T racking System
2 Pages
 ACL Instrumentation Brochure
6 Pages
 System 7
7 Pages
 System 7 Precision
2 Pages
 System 7 Battery
2 Pages
 System 7 Sterilization Case
2 Pages
 CD4 & SABO2 Family
5 Pages
 Gamma3 Trochanteric Nail 180
48 Pages
 Gamma3 Long Nail R2.0
48 Pages
 Gamma3 Fragment Control Clip
6 Pages
 Gamma3 U-Blade Lag Screw
18 Pages
 trident
12 Pages
 GMRS
GMRS13 Pages
 Scorpio ®Knee TS
6 Pages
 CBC II
2 Pages
 the Mill
2 Pages
 Gamma3 T
6 Pages
 Label Changes
2 Pages
 SmartTip ™
3 Pages
 SDC 3
SDC 32 Pages
 System 7 Family
7 Pages
 Mixevac III
2 Pages
 InterPulse - Orthopaedics
4 Pages
 Neptune 2
2 Pages
 Neptune E-SEP
2 Pages
 Right Angled Screwdriver
8 Pages
 Universal Neuro III
10 Pages
 EasyClip
2 Pages
 Asnis ® Micro Xpress
2 Pages
 S3 MedSurg Bed
8 Pages
 Stryker NAV3i
4 Pages
 Cast Cutter
2 Pages
 Cast Vac
2 Pages
 Revolution
6 Pages
 SmartPump
2 Pages
 Disposable Cuff
2 Pages
 Patient Education
2 Pages
 Reusable Cuff
2 Pages
 SurgiCount
4 Pages
 OASYS®
44 Pages
 Reflex®
24 Pages
 Escalate®
16 Pages
 Stryker Biologics
46 Pages
 Aero® -C
6 Pages
 Dynatran
13 Pages
 Aviator™
2 Pages
 AVS Anchor® -C
2 Pages
 Luxor
Luxor4 Pages
 OrthoMap®
4 Pages
 ENT navigation system
7 Pages
 AxSOS 3® Titanium
36 Pages
 Smart Equipment Management
3 Pages
 Prime TC®
4 Pages
 TruRize™ Clinical Chair
4 Pages
 TruRize® Clinical Chair
2 Pages
 VariAx® 2
20 Pages
 ACCOLADE® II
20 Pages
 VariAx® DistalFibula
20 Pages
 company overview
12 Pages


- Hospital bed
- Bone plate
- Compression plate
- Catheter
- Metallic compression plate
- Locking compression plate
- Inclinable bed
- Surgical table
- Universal operating table
- Adjustable height operating table
- Surgical system
- Electric operating table
- Cutting electrosurgical system
- Tilting surgical table
- Distal compression plate
- Coagulation surgical system
- Surgical table with legrest
- Agitator
- Interbody fusion cage
- Drill