- Catalogs
- SunTech Medical
- CT40 Spot-Check Vital Signs Device Advanced Configuration Application
CT40 Spot-Check Vital Signs Device Advanced Configuration Application
1 /33Pages

CT40 Spot-Check Vital Signs Device Advanced Configuration Application
1 /33Pages
Catalog excerpts
SunTech’ CT40 VITAL SIGNS
Open the catalog to page 1
Changes This manual is identified as Part number: 80-0072-00. The most recent is available for download from the SunTech Medical website. Should you notice errors or omissions in this manual, please notify us at: SunTech Medical, Inc. 507 Airport Boulevard, Suite 117 Morrisville, NC 27560 USA Tel: 800.421.8626 Email: [email protected] Web: www.SunTechMed.com User Responsibility Your SunTech CT40 is designed to perform in conformity with the description contained in this operation manual and accompanying labels and inserts, when assembled, operated, maintained and repaired in accordance...
Open the catalog to page 2
Welcome to the SunTech CT40 Thank you for choosing this SunTech CT40 for accurate spot checking of vital signs. The SunTech CT40 is designed to be very easy and efficient to use. The mobile device provides a lot of functionality in a compact, cost-effective package. The device can perform automatic blood pressure checks, including averaging of multiple blood pressure readings. It also offers an option to use a stethoscope for traditional auscultatory blood pressure measurement. The SunTech CT40 offers robust memory and also can connect to your EMR system. In addition, there are options for pulse...
Open the catalog to page 3
SunTech CT40 Advanced Configuration Application | 4
Open the catalog to page 4
1. Introduction While the SunTech CT40 Spot Vital Signs Device can be used out of the box without any additional programming, the CT40 also has an Advanced Configuration Application that can be used to make changes to the device’s advanced settings if necessary. The Advanced Configuration Application is a web-server application inside the CT40, and does not require the installation of any external software programs. This document explains these advanced settings and functions, including how to upgrade the CT40 firmware, and how to configure the device to connect to an EMR. System Requirements...
Open the catalog to page 5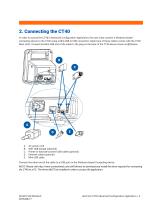
2. Connecting the CT40 In order to access the CT40’s Advanced Configuration Application, the user must connect a Windows-based computing device to the CT40 using a Mini-USB to USB connection cable (one of these cables comes with the CT40 Main Unit). Connect the Mini-USB end of the cable to the plug on the back of the CT40 device shown in (E) below: AC power cord WIFI USB dongle (optional) Printer or barcode scanner USB cable (optional) Ethernet cable (optional) Mini USB cable Connect the other end of the cable to a USB port on the Windows-based Computing device. NOTE: Please visit http://www.suntechmed.com/ct40-drivers...
Open the catalog to page 6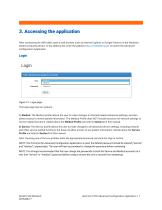
3. Accessing the application After connecting the USB cable, open a web browser such as Internet Explorer or Google Chrome on the Windowsbased computing device. In the address bar, enter the address http://model260.local/ to launch the Advanced Configuration Application. Figure 3.1: Login page The login page has two options: 1) Medical: The Medical profile allows the user to make changes to clinically-related advanced settings, and also allows access to review patient information. The Medical Profile does NOT include functions for network settings or service-related functions. Details about the...
Open the catalog to page 7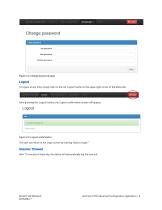
Figure 3.2: Change password page Logout To logout at any time, simply click on the red ‘Logout’ button in the upper right corner of the Menu Bar: After pressing the ‘Logout’ button, the Logout confirmation screen will appear: Figure 3.3: Logout confirmation The user can return to the Login screen by clicking “Back to login.” Session Timeout After 10 minutes of inactivity, the device will automatically log the user out. SunTech CT40 Advanced Configuration Applic
Open the catalog to page 8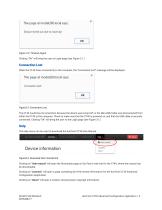
Figure 3.4: Timeout logout Clicking “OK” will bring the user to Login page (see Figure 3.1.) Connection Lost When the CT40 loses connectivity to the computer, the “Connection lost!” message will be displayed. Figure3.5: Connection Lost The CT40 could lose its connection because the device was turned off, or the Mini-USB Cable was disconnected from either the CT40 or the computer. Check to make sure that the CT40 is powered on, and that the USB cable is securely connected. Clicking “OK” will bring the user to the Login page (see Figure 3.1.) Help The Help menu can be used to download the SunTech...
Open the catalog to page 9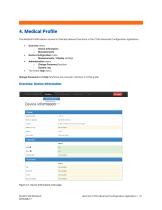
4. Medical Profile The Medical Profile allows access to clinically-relevant functions in the CT40 Advanced Configuration Application: • Overview menu o Device Information o Measurements Device Configuration menu o Measurements / Display settings Administration menu o Change Password function o System Log The entire Help menu Change Password and Help functions are covered in Section 3 of this guide. Overview: Device Information Figure 4.1: Device Information main page SunTech CT40 Advanced Configuration Application
Open the catalog to page 10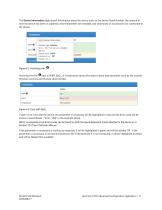
The Device Information page shows information about the device such as the device Serial Number, the amount of time the device has been on (Uptime), what Parameters are installed, and what kinds of Accessories are connected to the device. Figure 4.2: Hovering over Hovering over the next to NIBP, SpO2, or Temperature gives information about that parameter such as the module firmware versions and module serial number. Figure 4.3: Error with SpO2 If there is an error with the device, the parameter or accessory will be highlighted in red, and the Error Code will be shown in parentheses—“Error (150)”...
Open the catalog to page 11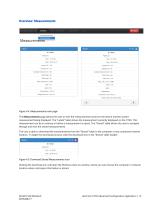
SunTech Model 260 Overview - Device Configuration - Administration » Help ■ Device Information Measuremenis Figure 4.4: Measurements main page The Measurements page allows the user to view the measurements saved on the device and the current measurement being displayed. The "Latest" table shows the measurement currently displayed on the CT40. This measurement can be in memory or before a measurement is saved. The "Stored" table allows the user to navigate through and view the stored measurements. The user is able to download the measurements from the "Stored" table to the computer or any connected...
Open the catalog to page 12All SunTech Medical catalogs and technical brochures
 Vet30 Rev G
6 Pages
 Tango M2 Rev H
5 Pages
 Vet20 Brochure
5 Pages
 Vet25 Brochure
5 Pages
 oscar-2
5 Pages
 Family of Blood Pressure Cuffs
12 Pages

Archived catalogs
 ct50 Vital Signs Monitor
16 Pages
 OEM NIBP Advantage Brochure
4 Pages
 OEM Solutions Brochure
4 Pages
 Tango
Tango1 Page
 Sun Tech Tango+ Stress BP
2 Pages
 Sun Tech Disposable BP Cuffs
2 Pages
 Sun Tech Durable BP Cuffs
2 Pages
 SunTech Oscar 2 24-HR ABP
3 Pages


- Analysis software
- Blood pressure monitor
- Automatic blood pressure monitor
- Patient monitor
- Tablet computer software
- Tablet PC software
- Reporting software
- Windows software
- Blood pressure patient monitor
- Monitoring software
- Blood pressure monitor with adult cuff
- Hospital software
- Automated software
- Oscillometric blood pressure monitor
- Clinical patient monitor
- Sunpex blood pressure cuff
- 1-tube cuff
- Blood pressure monitor with rechargeable battery
- Vitals monitor
- Sunpex latex-free cuff