
- Catalogs
- SuperHandy
- SuperHandy Wood Chipper Mini

SuperHandy Wood Chipper Mini
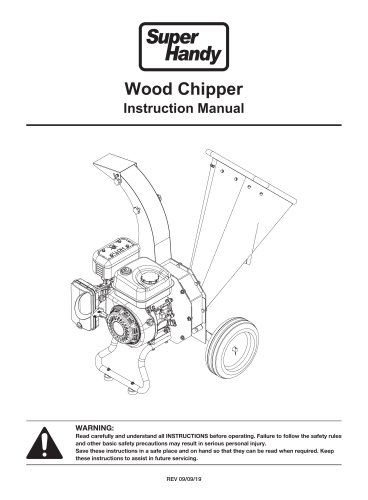
SuperHandy Wood Chipper Mini
This manual provides guidelines for the safe operation and maintenance of a petrol engine-powered wood chipper, emphasizing adherence to safety instructions to prevent injuries.
Warning Symbols and Definitions
The manual uses symbols to indicate hazard levels:
- Danger: Serious injury or fatality will result if instructions are not followed.
- Warning: Hazard could result in death or serious injury.
- Caution: Potential harm to user or equipment.
- Important: Helpful information for assembly, operation, or maintenance.
Features and Specifications
The wood chipper has a 3-inch chipping capacity, a 15:1 reduction rate, and CR12MoV chipper knives. It includes a Rato OHV engine with 7HP power and 212CC displacement.
General Operating Safety
Key safety measures include reading all instructions, operating on stable surfaces, wearing safety gear, and keeping hands away from moving parts.
Product Specific Safety
Precautions include using the debris bag, not leaving the machine unattended, standing to the side when feeding materials, and inspecting the discharge area.
Engine Specific Safety
Guidelines include preventing carbon monoxide poisoning, careful fuel handling, and allowing the engine to cool before refueling.
Maintenance and Troubleshooting
Instructions for regular maintenance and troubleshooting common issues are provided to ensure proper functioning.
Conclusion
Following safety and maintenance guidelines is crucial for safe operation. Keep the manual accessible for reference.
Keep children away during operation, turn off the machine if children are present, and never allow children to operate the machine.
Assembly Instructions
Install Stand: Secure the stand under the engine base with bolts and nuts. Attach the wheel bracket to the housing.
Install Wheels: Secure the wheel onto the axle with a cotter pin.
In-feed Bin Installation: Secure the in-feed bin with flange nuts.
Discharge Chute Installation: Align and secure the discharge chute with bolts.
General Operation
Familiarize with controls, check hardware tightness, and avoid overloading. Insert branches large-end first.
Fuel and Oil Handling
Add oil before starting, handle gasoline carefully, and avoid spills.
Starting and Stopping the Engine
Follow the engine manual for procedures.
Transporting and Storage
Follow safe refueling practices and store in ventilated areas. Use the hopper handle and wheels for moving.
Maintenance
Follow the engine manual for schedules, check oil levels, spark plugs, and clean debris.
Troubleshooting
Refer to the troubleshooting chart for common issues like engine not starting or slow chipping.
Chipping Knives Maintenance
Sharpen or replace knives when extra force is needed.
Parts Breakdown
A detailed list of parts and quantities is provided for reference.
Catalog excerpts
Wood Chipper Instruction Manual WARNING: Read carefully and understand all INSTRUCTIONS before operating. Failure to follow the safety rules and other basic safety precautions may result in serious personal injury. Save these instructions in a safe place and on hand so that they can be read when required. Keep these instructions to assist in future servicing.
Open the catalog to page 1
WARNING SYMBOL WARNING: This is the warning symbol to get your high attention for the instruction notice, which should be followed to avoid the potential serious personal injury. Anyone to use this equipment should read all the instructions of this manual. Keep this instruction manual for future reference. Do not allow children to operate this wood chipper. Keep small children away from the area while wood chipper is in use. Do not allow adults to operate the wood chipper without proper instruction. Foreseeable Misuse This is a petrol engine-powered wood chipper that breaks up leaves and wooded...
Open the catalog to page 2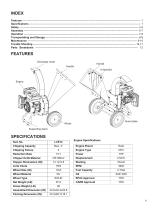
Engine Specifications
Open the catalog to page 3
GENERAL OPERATING SAFETY 1.Read, understand, and follow all instructions in the manual and on the unit before starting. 2. Locate the Chipper/Shredder on a flat, level, sturdy surface capable of supporting the weight of the Chipper / Shredder and any additional tools and equipment. 3. Do not attempt to use the machine on a slope or slick surface. 4. Dress appropriately when operating the chipper shredder. Always wear sturdy footwear and safety goggles.Never wear sandals, sneakers or open shoes, and never operate the chipper shredder with bare feet. Do not wear loose clothing that might get caught...
Open the catalog to page 4
8. Never attempt to reposition or move the chipper shredder unit while it is running. Doing so could cause the machine to tip over, and reaching to steady the unit could result in accidental insertion of your hands into the chipper cone or shredder hopper areas. 9. Never continue to operate the machine if it starts making unusual noise or vibration. Shut the engine off immedi-ately,allow the rotor to stop, disconnect the spark plug wire and secure the wire away from the spark plug.Inspect the unit for any signs of damage or foreign material in the chipping or shredding areas. Remove any solid...
Open the catalog to page 5
Gasoline Fires and Handling Fuel Safely Use extra care in handling gasoline and other fuels. They are flammable and vapors are explosive. 1. When storing extra fuel be sure that it is in an appropriate container and away from any fire hazards. 2. Prevent fire and explosion caused by static electric discharge. Use only nonmetal, portable fuel containers approved by the Underwriter’s Laboratory (U.L.) or the American Society for Testing &Materials. 3. Always fill fuel tank outside in a well ventilated area. Never fill your fuel tank with fuel indoors. (Examples include: basement, garage, barn,...
Open the catalog to page 6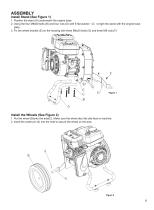
1. Position the stand (A) underneath the engine base 2. Using the four M8x60 bolts (B) and four nuts (D) with 8 flat washer (C) to tight the stand with the engine base plate. 3. Fix the wheel bracket (E) on the housing with three M8x20 bolts (G) and three M8 nuts.(F) 1. Put the wheel (B)onto the axle(C), Make sure the wheel disc flat side face to machine. 2. Insert the cotter pin (A) into the hole to secure the wheel on the axle.
Open the catalog to page 7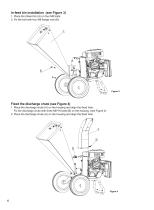
1. Place the Infeed bin (A) on four M8 bolts; 2. Fix the bolt with four M8 flange nuts (B). Fixed the discharge chute (see Figure 4) 1. Place the discharge chute (A) on the housing and align the fixed hole. Fix the discharge chute with three M8*16 bolts (B) on the housing. (see Figure 4) 2. Place the discharge chute (A) on the housing and align the fixed hole.
Open the catalog to page 8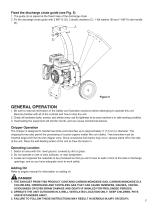
1. The guide (A) is placed at the fixed holes of the discharge chute 2 .Fix the discharge chute guide with 2 M6*12 (D), 2 elastic washers (C), 1 flat washer (B) and 1 M6*16 star handle (E) 1. Be sure to read all information in the Safety and Operation sections before attempting to operate this unit. Become familiar with all of the controls and how to stop the unit. 2. Check all hardware (bolts, screws, etc) before every use for tightness to be sure machine is in safe working condition. 3. Overloading the equipment will shorten its life, and can cause mechanical failures. The chipper is designed...
Open the catalog to page 9
A WARNING: TO AVOID SERIOUS PERSONAL INJURY FROM ROTATING CUTTING BLADES, KEEP HANDS OUT OF INLET WHILE MACHINE IS RUNNING. A WARNING: DO NOT USE GASOLINE CONTAINING METHANOL, GASOHOL CONTAINING MORE THAN 10% ETHANOL, GASOLINE ADDITIVES OR WHITE GAS BECAUSE ENGINE/FUEL SYSTEM DAMAGE COULD RESULT. IMPORTANT: ENGINE IS SHIPPED FROM FACTORY WITHOUT OIL. YOU MUST ADD ENGINE OIL BEFORE STARTING ENGINE. Adding Fuel 2. Fill the tank. Do not overfill. Leave room in the tank for fuel expansion. Refer to your engine manual for specific fuel recommendations. 3. Install and hand tighten the fuel cap. 1....
Open the catalog to page 10
Schedule & Procedures The following schedule should be followed for normal care of your unit. Refer to the engine manual included in your package for information on engine maintenance. Your engine manual provides information and a maintenance schedule for performing the following tasks: 1. Always check oil level before starting engine. Refer to engine manual for capacity and type of oil to use. 2. Change oil after first 5-8 hours of operation. Change oil while engine is warm. Refill with new oil of recommended grade. 4. Check spark plug yearly or every 50 hours of operation. 6. Keep engine and...
Open the catalog to page 11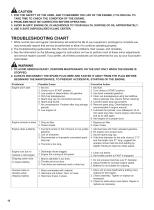
1. FOR THE SAFETY OF THE USER, AND TO MAXIMIZE THE LIFE OF THE ENGINE, IT IS CRUCIAL TO TAKE TIME TO CHECK THE CONDITION OF THE ENGINE. 2. PROBLEMS MUST BE CORRECTED BEFORE OPERATING. 3. AVOID INJURY! ENGINE OIL IS HAZARDOUS TO YOUR HEALTH. DISPOSE OF OIL APPROPRIATELY. 4. USE A SAFE DISPOSAL/RECYCLING CENTER. 1. While normal care and regular maintenance will extend the life of your equipment, prolonged or constant use may eventually require that service be performed to allow it to continue operating properly. 2. The troubleshooting guide below lists the most common problems, their causes, and...
Open the catalog to page 12All SuperHandy catalogs and technical brochures
 Vacuum Kit
2 Pages
 SuperHandy Electric Snow Thrower
12 Pages
 SuperHandy Electric Mini Chainsaw
12 Pages
 Superhandy Bath Lift Cushion
2 Pages
 Superhandy Mobility Scooter
9 Pages
 Passport Flex
2 Pages








- Wheelchair
- Outdoor wheelchair
- Indoor wheelchair
- Wheelchair with legrest
- Folding wheelchair
- Black wheelchair
- Patient lifter
- Electric wheelchair
- Electric patient lift
- Mobility scooter
- Electric mobility scooter
- Aluminium frame wheelchair
- Seat cushion
- Patient lift on casters
- Lifting patient lift
- 4-wheel mobility scooter
- Washable pad
- Anatomical pad
- Wheelchair with armrests
- Mobility scooter with basket