

- Company
- Products
- Catalogs
- News & Trends
- Exhibitions
DCF SURGICAL TECHNIQUE (FEMORAL) GENUTECH

DCF SURGICAL TECHNIQUE (FEMORAL) GENUTECH
The procedure involves an anterior midline incision with internal parapatellar arthrotomy and external patellar dislocation, extending from the quadriceps tendon to the tibial tuberosity.
The surgery can start with either tibial or femoral cuts. The sequence includes distal femoral cutting, anterior and posterior femoral cuttings, PS/NPS choice, intercondylar box cutting (if PS), trial femoral prosthesis placement, tibial cutting, checking flexion and extension spaces, tibial keel preparation, patella action, mobility and stability check with trial implants, and final prosthesis placement.
- Initial Perforation: Entry point is perforated using an awl or Ø 9 mm drill.
- Insertion of Intramedullary Alignment Rod: The rod is inserted to the maximum insertion limit mark.
- Adjustment of Distal Cutting Guide: Set to "0" for an 8 mm cut, adjustable from "-4" to "+8".
- Varus-Valgus Alignment: Positioned parallel to the transepicondylar line.
- Distal Cutting: Performed with optional tibial protection plate.
- Measurement of Femoral Size and Outward Rotation: Measured with knee at 90 degrees, typically set at 3°.
- Level of Resection: Determined for tibial cutting.
- Tibial Cutting: Prepares for prosthesis placement.
- Spacers in Flexion and Extension: Used to check joint space.
- Preparation of Tibial Keel: Ensures proper fit of the tibial component.
- Checking with Trial Components: Ensures proper alignment and fit.
- Thickness Measurement: Ensures proper patellar component fit.
- Patellar Cutting and Perforation: Prepares patella for prosthesis.
Placement of the final prosthesis and optional use of Redon suction drains.
Includes additional information on implants, instruments, and notes.
Ensure distal contact and secure with side pins. Perform femoral cuts and bevels using the cutting block.
After femoral cuts, remove the pins and disimpact the cutting block using the integrated diapason hammer.
If preserving the posterior cruciate ligament (NPS), drill two holes with a 6 mm NPS drill bit. For a PS prosthesis, use the saw guide to recut the intercondyle.
Instruments allow osteotomy with extramedullary or intramedullary guides. The tibial cutting template is mounted on the extramedullary rod, adjustable to the ankle. For intramedullary guidance, open the tibial canal with an awl and drill bit.
Use the probe to determine the resection level. Fix the cutting guide to the tibia with headless pins and lock it with a 2.5 mm hexagonal driver.
With the guide fixed, perform the osteotomy of the tibial epiphyseal area. Use 1.3 mm thick saw blades to avoid improper cuts.
Insert spacers to evaluate limb alignment and ligament tension. If excessive strain is observed, refer to Annex 3 for recuts.
With the trial femoral component installed, adjust the tibial tray rotation and check flexion-extension behavior. Mark the rotation position for later reference.
With trial components installed, verify knee mobility and stability. Adjust the central cylinder size for the tibial tray cup, considering standard or long options.
Maintain a minimum bone thickness of 12-14 mm to prevent fractures. The height of the prosthetic patella should not exceed the original to avoid excess pressure. Consider both the diameter and the height of the patellar component.
Remove osteophytes and synovial tissue to expose tendons. Use the patellar resection clamp to make the cut, ensuring the anterior cortex rests on the bolts. The perforation for the prosthetic pivot is slightly medialized. If increased tension is observed with the trial patella, a smaller component may be chosen.
After verifying the trial components, replace them with the final prostheses. Fix the tibial insert by screwing the anterior bolt to the tibial tray.
Used for positioning the gauge when hypoplasia is noted in posterior condyles.
Recommends using an impactor/extractor for proper placement and fixation.
Guidelines for additional cuts if spacers do not fit properly in flexion or extension.
Instructions for clipping and removing tibial inserts.
Designed to maintain pressure during cement curing for patella fixation.
Details on tools like the Hudson-Jacobs hybrid terminal and tibial protection plate.
Catalog excerpts
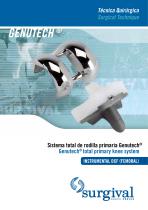
Tecnica Quirurgica Surgical Technique Sistema total de rodilla primaria Genutech® Genutech® total primary knee system
Open the catalog to page 1
ABORDAJE QUIRURGICO / SURGICAL APPROACH 4 SECUENCIA QUIRURGICA / SURGICAL SEQUENCE 4 TECNICA QUIRURGICA /SURGICAL TECHNIQUE 5 1. TIEMPO FEMORAL/FEMORAL TIME 5 1.1 Perforation inicial / Initial perforation 5 1.2 Introduce ion de la varilla de alineacion endomedular / Insertion of the intramedullary alignment rod 5 1.3 Ajuste, posicionamiento y fijacion de la gufa de corte distal / Adjustment, positioning and fixation of the distal cutting guide 6 1.3.1 Ajuste de la gufa de corte distal / Adjustment of the distal cutting guide 6 1.3.2 Alineacion del varo-valgo / Varus-valgus alignment 7 1.3.3 Posicionamiento...
Open the catalog to page 3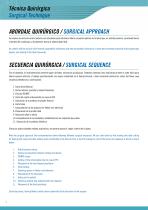
ABORDAJE QUIRÚRGICO / SURGICAL APPROACH Se emplea una incisión central anterior con artrotomía pararrotuliana interna y luxación externa de la rótula que, en sentido proximal, se extiende hasta el tendón del cuádriceps y, distalmente, hasta la tuberosidad tibial. An anterior midline incision with internal parapatellar arthrotomy and external patellar dislocation is made which extends proximally to the quadriceps tendon, and distally to the tibial tuberosity. SECUENCIA QUIRÚRGICA / SURGICAL SEQUENCE Tras el abordaje, la instrumentación permite seguir distintas secuencias quirúrgicas. Podemos comenzar...
Open the catalog to page 4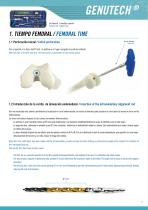
Set femoral 1. Bandeja superior Femoral set 1.Upper tray 1. TIEMPO FEMORAL / FEMORAL TIME 1.1 Perforación inicial / Initial perforation Punzón Iniciador Starter awl Con el punzón, o la fresa de Ø 9 mm, se perfora en el lugar escogido el punto de entrada. With the awl, or the Ø 9 mm drill, the entry point is perforated at the chosen place. 1.2 Introducción de la varilla de alineación endomedular / Insertion of the intramedullary alignment rod Una vez realizada esta primera perforación y localizado el canal endomedular, se realiza el brocado para preparar el canal para la inserción de la varilla...
Open the catalog to page 5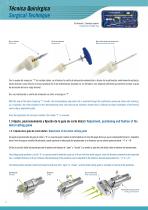
Set femoral 1. Bandeja superior Femoral set 1.Upper tray Broca iniciadora Starter drill Varilla de alineación Alignment rod Marca límite máximo de introducción Maximum insertion limit mark Con la ayuda del mango en “T” de anclaje rápido, se introduce la varilla de alineación endomedular a través de la perforación anteriormente realizada, hasta alcanzar como máximo la marca grabada en el eje endomedular, dejando así sin introducir una longitud suficiente que permita instalar la guía de alineación del varo-valgo femoral. Una vez introducida la varilla de alineación se retira el mango en “T”. With...
Open the catalog to page 6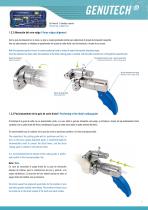
Set femoral 1. Bandeja superior Femoral set 1.Upper tray 1.3.2 Alineación del varo-valgo / Varus-valgus alignment Con la guía de alineación en la mano, se gira su cuerpo graduado central para seleccionar el ángulo de alineación requerido. Una vez seleccionado, se introduce el posicionador de la guía de corte distal, con ella montada, a través de su ranura. With the alignment guide in hand, its central graduated body is rotated to select the required alignment angle. Once the selection has been made, the positioner of the distal cutting guide is inserted, with the latter mounted on it, through...
Open the catalog to page 7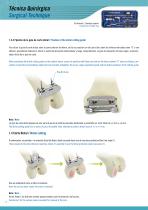
Set femoral 1. Bandeja superior Femoral set 1.Upper tray 1.3.4 Fijación de la guía de corte distal / Fixation of the distal cutting guide Tras situar la guía de corte distal sobre la parte anterior del fémur, se fija su posición con tres pins (dos sobre los orificios marcados como “0” y uno oblicuo), procediendo entonces a retirar la varilla de alineación endomedular y luego, conjuntamente, la guía de alineación del varo-valgo y el posicionador distal de la guía de corte. After positioning the distal cutting guide on the anterior femur, secure its position with three pins (two on the holes marked...
Open the catalog to page 8
Set femoral 1. Bandeja inferior Femoral set 1. Lower tray 1.5 Medición del tamaño femoral y giro externo / Measurement of femoral size and outward rotation Con la rodilla a 90º, se realiza la medición del tamaño femoral asegurando el contacto con el corte distal y los cóndilos posteriores del fémur. Se ajusta la profundidad en horizontal el estilete palpador haciendo coincidir la lectura grabada en éste con la talla mostrada en el eje de medición vertical del medidor. With the knee at 90 degrees, measure the femoral size while ensuring contact with the distal cut and the posterior condyles of...
Open the catalog to page 9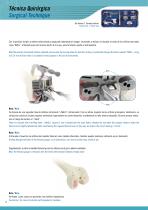
Tecnica Quirurgica Surgical Technique Set femoral 1. Bandeja inferior Femoral set 1. Lower tray Con la posicion del giro a externo seleccionado y asegurado (abatiendo el mango), se procede a realizar un brocado a traves de los orificios marcados como "DRILL", utilizando para ello la broca de 0 3.4 mm que, para tal efecto, aporta el instrumental. With the position of outward rotation selected and secured (by turning down the handle), drilling is performed through the holes marked "DRILL", using a 0 3.4 mm drill bit which is included for that purpose in the set of instruments. Se dispone de una...
Open the catalog to page 10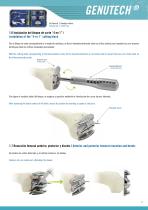
Set femoral 1. Bandeja inferior Femoral set 1. Lower tray 1.6 Instalación del bloque de corte “4 en 1” / Installation of the “4-in-1” cutting block Con el bloque de corte correspondiente a la medición realizada, se fija el introductor/extractor sobre su orificio central para impactar los pins traseros del bloque sobre los orificios realizados previamente. With the cutting block corresponding to the measurement made, fix the impactor/extractor on its central hole to impact the rear pins of the block on the holes previously made. Bloque de corte Cutting block Introductor/Extractor Impactor/Extractor...
Open the catalog to page 11All Surgival catalogs and technical brochures
 STAPLES RANGE
2 Pages
 STEINMANN PINS
1 Page
 BIARTICULAR HEAD
6 Pages
 FEMORAL HEADS
1 Page
 SURGIFEET SURGICAL TECHNIQUE
6 Pages
 KHA CUP
6 Pages
 SELF-LOCKING FEMORAL STEMS
8 Pages
 Primary knee
44 Pages
 CANNULATED SCREWS
8 Pages
 SHERPA SPINE SYSTEM
8 Pages
 GENUTECH CCK SURGICAL TECHNIQUE
16 Pages
 GENUTECH SURGICAL TECHNIQUE
44 Pages
 PULSE LAVAGE DRAINAGE SYSTEM
2 Pages
 HA BONE
4 Pages
 BIOMATERIALS
8 Pages
 LARGE FRAGMENTS SETS
5 Pages
 SURGIFEET WEIL TYPE SCREW
2 Pages
 LNS GT SURGICAL TECHNIQUE
6 Pages
 LNS GT
6 Pages
 INTERBODY CAGE
6 Pages
 SHERPA SURGICAL TECHNIQUE
24 Pages
 SHY CUP
8 Pages
 SHINE C FEMORAL STEM
6 Pages
 MÜLLER CUP
6 Pages
 THOMPSON PROSTHESIS
2 Pages
 KAREY C REVISION STEM
1 Page
 KAREY HA REVISION STEM
1 Page
 KAREY
KAREY6 Pages


- Bone plate
- Compression plate
- Metallic compression plate
- Locking compression plate
- Distal compression plate
- Compression bone screw
- Metallic compression bone screw
- Sample container
- Proximal compression plate
- Arthrodesis nail
- Forearm compression plate
- Bone substitute
- Tibia compression plate
- General purpose compression bone screw
- Metallic intramedullary nail
- Humerus compression plate
- Radius compression plate
- Femoral stem
- Cannulated compression bone screw
- Proximal fixation intramedullary nail