

- Company
- Products
- Catalogs
- News & Trends
- Exhibitions
Primary knee

Primary knee
The surgical procedure involves a central anterior incision with internal parapatellar arthrotomy and external dislocation of the patella. The incision extends from the middle third of the quadriceps tendon to the tibial tuberosity.
The recommended sequence includes tibial cutting, femoral cutting, measurement of flexion and extension spaces, femoral cuts completion, PS/NPS selection, intercondylar box cutting, placement of femoral testing prosthesis, tibial keel preparation, patella action, verification with testing implants, and final prosthesis placement. Closure is done in layers, with optional drainage points.
Osteotomy can be performed using extramedullary or intramedullary guides. The tibial cutting template is attached to the extramedullary rod, and the tibial canal is opened for intramedullary guides.
The probe identifies the least affected plateau and the most depressed tibial area, ensuring a 1 mm resection below the most worn area. The cutting guide is secured with headless and optional oblique pins.
After attaching the guide, osteotomy is performed using 1.3 mm thick saw blades. Peripheral osteophytes are removed, and the tibial tray is measured with templates.
Initial Perforation: The entry point is perforated with an awl or drill.
Introduction of Intramedullary Rod: The rod is inserted with a "T" handle.
Measurement of Femoral Size: The femur size is measured with the knee at 90º.
Placing of Front and Back Cutting Mask: The mask is mounted with an angle adaptor and external rotation system.
The procedure involves adjusting the "A" cutting mask height on the femoral component using an external rotation system. The tibial base is secured by turning the handle, and lugs are introduced for attachment.
The assembly is coupled to the intramedullary shaft using a varus-valgus adaptor, ensuring condyle contact with the skids.
The "A" mask is attached with pins after drilling a Ø3.2 mm hole, used for front and back cuts, and the "B" mask for distal cutting.
Spacers evaluate limb alignment and ligament tension. The "Bevel Cutting Mask" ensures proper distal support.
The "NPS" femoral testing component is inserted, and if a posterior stabilizer is chosen, it is coupled with a saw guide for recutting.
With the femoral test component installed, the tibial tray is adjusted for rotation, and the test insert is attached for verification.
The procedure emphasizes maintaining minimum bone thickness and ensuring the prosthetic patella does not exceed the original height.
Focuses on positioning and verifying components, recommending a smaller patella component if increased tension is observed.
After verifying test components, they are replaced with final prostheses, and proper function is re-verified.
Annex I: Alternative cutting mask placement with a 3º external rotation.
Annex II: Recommendations for recuts if excessive ligament tension is noted.
Annex III: Clipping and extracting tibial inserts.
Annex IV: Patellar compression clamps for cement hardening.
Annex V: Impactors for positioning and securing components.
The document lists various implant components and instrumental sets, including references for ordering and specific tools.
Specifications: Detailed with reference numbers and sizes for correct usage.
Organization: Instruments are organized into specific sets and trays for easy access.
Trial Components: Comprehensive details for pre-surgical planning and sizing.
This document serves as a comprehensive guide for orthopedic surgical instruments, providing essential details for the selection and use of tibial and femoral components in surgical procedures.
Catalog excerpts
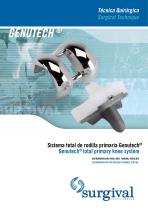
Tecnica Quirurgica Surgical Technique Sistema total de rodilla primaria Genutech® Genutech® total primary knee system INSTRUMENTACION PARA CORTE FEMORAL REDUCIDO INSTRUMENTATION FOR REDUCED FEMORAL CUTTING
Open the catalog to page 1
ABORDAJE QUIRURGICO / SURGICAL APPROACH 2 TECNICA QUIRURGICA /SURGICAL TECHNIQUE 2 1. TIEMPO TIBIAL (I) / TIBIAL TIME (I) 3 1.1 Nivel de reseccion / Resection level 4 1.2 Corte tibial/Tibial cutting 6 2. TIEMPO FEMORAL / FEMORAL TIME 8 2.1 Perforacion inicial / Initial perforation 8 2.2 Introduce ion varilla endomedular / Introduction of intramedullary rod 8 2.3 Medicion del tamano femoral / Measurement of femoral size 9 2.4 Colocacion de mascara de corte anteriory posterior/ Placing of front and back cutting mask 10 2.5 Cortes anteriory posterior/Front and back cuts 14 2.6 Colocacion de mascara...
Open the catalog to page 3
ABORDAJE QUIRÚRGICO / Surgical approach Se emplea una incisión central anterior con artrotomía pararotuliana interna y luxación externa de la rótula que, en sentido proximal, se extiende hasta el tercio medio del tendón del cuádriceps y, distalmente, hasta la tuberosidad tibial. A front central incision is used, with internal parapatellar arthrotomy, and external dislocation of the patella which, in the proximal direction, extends up to the middle third of the quadriceps tendon, and distally, to the tibial tuberosity. SECUENCIA QUIRÚRGICA / Surgical sequence Tras el abordaje se aconseja el siguiente...
Open the catalog to page 4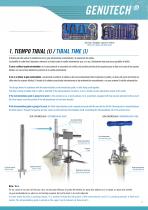
Set tibial. Bandejas superior e inferior Tibial set. Upper and lowe trays 1. TIEMPO TIBIAL (I) / TIBIAL TIME (I) El diseño permite realizar la osteotomía con la guía extramedular, endomedular o la asociación de ambas. La plantilla de corte tibial (izquierda o derecha) se instala sobre la varilla extramedular que, a su vez, distalmente aloja una pinza ajustable al tobillo. Si se va a utilizar la guía extramedular, en la zona proximal se ensambla una varilla corta auxiliar provista de dos espículas que se fijan en la zona de las espinas tibiales una vez se tiene decidida la posición de la varilla...
Open the catalog to page 5
1.1 Nivel de resección / Resection level Se instala el palpador en el alojamiento de la guía de corte y, con el extremo corto del palpador “10”, buscaremos el apoyo en el plato menos afectado, fijando provisionalmente la guía de corte a este nivel. Tras esto, con el extremo largo “0” del palpador localizaremos la zona tibial más deprimida del plato más afectado, pudiendo entonces presentarse estas dos situaciones: • Que el extremo “0” no contacte, con lo que deberemos descender la guía de corte tibial hasta propiciar el contacto. A esta altura de guía de corte aseguramos realizar una resección...
Open the catalog to page 6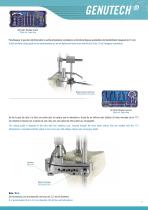
Set tibial. Bandeja inferior Tibial set. Lower tray Para bloquear la guía de corte tibial sobre la varilla extramedular, apretaremos el tornillo de bloqueo ayudándonos del destornillador hexagonal de 2,5 mm. To lock the tibial cutting guide on the extramedullary rod, we will tighten the block screw, with the aid of the 2.5 mm hexagonal screwdriver. Bloqueo de guía de corte tibial Blocking tibial cutting guide Set tibial. Bandeja superior Tibial set. Upper tray Se fija la guía de corte a la tibia con cuatro pins sin cabeza que se introducen a través de los orificios más distales (la línea marcada...
Open the catalog to page 7
1.2 Corte tibial / Tibial cutting Con la guía de corte sólidamente fijada a la tibia, se retira el sistema de guías endomedulares y/o extramedulares utilizado y se realiza la osteotomía de la zona epifisaria de la tibia. With the cutting guide firmly attached to the tibia, the intramedullary and/or extramedullary guide system is removed, and osteotomy of the tibia’s epiphyseal area is performed. Nota / Note: Se aconseja utilizar hojas de sierra de 1.3 mm de grosor. Una sierra de menor grosor puede combarse y producir cortes inadecuados. It is advised to use 1.3 mm thick saw blades. A saw which...
Open the catalog to page 8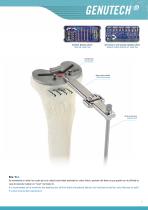
Set tibial. Bandeja inferior Tibial set. Lower tray Set femoral 1 corte reducido. Bandeja inferior Reduced cutting femoral set. Lower tray Plantilla tibial Tibial template Mango soporte plantilla Tibial template handle Varilla de alineación Alignment shaft Nota / Note: Se recomienda no retirar los cuatro pins sin cabeza hasta haber realizado los cortes distal y posterior del fémur ya que pueden ser de utilidad en caso de necesitar realizar un “recut” (ver Anexo 2). It is recommended not to remove the four headless pins until the distal and posterior femoral cuts have been carried out, since they...
Open the catalog to page 9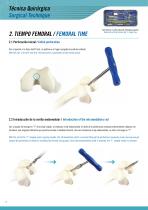
2. TIEMPO FEMORAL / FEMORAL TIME Set femoral 1 corte reducido. Bandeja superior Reduced cutting femoral set 1. Upper tray 2.1 Perforación inicial / Initial perforation Con el punzón, o la fresa de Ø 9 mm, se perfora en el lugar escogido el punto de entrada. With the awl, or the Ø 9 mm drill, the entry point is perforated at the chosen place. 2.2 Introducción de la varilla endomedular / Introduction of the intramedullary rod Con la ayuda del mango en “T” de anclaje rápido, se introduce el eje endomedular a través de la perforación realizada anteriormente, dejando sin introducir una longitud suficiente...
Open the catalog to page 10
Set femoral 1 corte reducido. Bandeja superior Reduced cutting femoral set 1. Upper tray 2.3 Medición del tamaño femoral / Measurement of femoral size Con la rodilla a 90º, se realiza la medición del tamaño femoral introduciendo el eje endomedular a través de la cánula del medidor femoral y desplazándolo hasta hacer contacto con los cóndilos distales del fémur. Esta posición, referenciada al eje endomedular, permite realizar una lectura del tamaño femoral sin errores debido a la colocación inadecuada del medidor. Se ajusta la profundidad del estilete palpador haciendo coincidir la lectura grabada...
Open the catalog to page 11All Surgival catalogs and technical brochures
 STAPLES RANGE
2 Pages
 STEINMANN PINS
1 Page
 BIARTICULAR HEAD
6 Pages
 FEMORAL HEADS
1 Page
 SURGIFEET SURGICAL TECHNIQUE
6 Pages
 KHA CUP
6 Pages
 SELF-LOCKING FEMORAL STEMS
8 Pages
 CANNULATED SCREWS
8 Pages
 SHERPA SPINE SYSTEM
8 Pages
 GENUTECH CCK SURGICAL TECHNIQUE
16 Pages
 GENUTECH SURGICAL TECHNIQUE
44 Pages
 PULSE LAVAGE DRAINAGE SYSTEM
2 Pages
 HA BONE
4 Pages
 BIOMATERIALS
8 Pages
 LARGE FRAGMENTS SETS
5 Pages
 SURGIFEET WEIL TYPE SCREW
2 Pages
 LNS GT SURGICAL TECHNIQUE
6 Pages
 LNS GT
6 Pages
 INTERBODY CAGE
6 Pages
 SHERPA SURGICAL TECHNIQUE
24 Pages
 SHY CUP
8 Pages
 SHINE C FEMORAL STEM
6 Pages
 MÜLLER CUP
6 Pages
 THOMPSON PROSTHESIS
2 Pages
 KAREY C REVISION STEM
1 Page
 KAREY HA REVISION STEM
1 Page
 KAREY
KAREY6 Pages


- Bone plate
- Compression plate
- Metallic compression plate
- Locking compression plate
- Distal compression plate
- Compression bone screw
- Sample container
- Metallic compression bone screw
- Proximal compression plate
- Bone substitute
- Arthrodesis nail
- Forearm compression plate
- Tibia compression plate
- Metallic intramedullary nail
- Femoral stem
- General purpose compression bone screw
- Humerus compression plate
- Radius compression plate
- Cannulated compression bone screw
- Proximal fixation intramedullary nail