

- Company
- Products
- Catalogs
- News & Trends
- Exhibitions
SHERPA SURGICAL TECHNIQUE

SHERPA SURGICAL TECHNIQUE
The SHERPA® Spine System document provides a comprehensive guide for spinal fusion surgery using pedicle screws and rods. The procedure includes key steps such as pedicle preparation, screw insertion, rod preparation and placement, system locking, and final tightening, each tailored to specific vertebrae: sacral, lumbar, or thoracic.
Pedicle Preparation
Pedicle preparation varies by vertebrae. For lumbar pedicles, the entry point is at the intersection of the transverse and articular processes. Sacral pedicle preparation requires an osteotomy for sacrum visualization, while thoracic preparation involves exposing the posterior arch to the transverse process's distal end. Instruments like awls, finders, and curettes are used to create the screw path.
Screw Insertion
The document details the use of different screws (monoaxial, polyaxial, and spondylolisthesis) based on vertebrae and condition. Correct screw length and diameter are crucial to avoid perforating the vertebral body's anterior cortex. The insertion process involves fitting the screw into a specific screwdriver and ensuring proper positioning.
Rod Preparation and Placement
Rods are selected and molded to fit the spinal curvature using rod holders and bending pliers. They must sit correctly in the screws' outer rings, with impactors or levers ensuring a snug fit.
System Locking and Final Tightening
After rod placement, the system is locked using specific tightening elements for each screw type. Monoaxial screws use a bevelled washer and cap, while polyaxial screws require a different cap. Final tightening ensures spinal construct stability.
Implants and Instruments
The document lists necessary implants and instruments, emphasizing precision and care in handling to ensure successful outcomes.
Specifications
Components such as polyaxial caps, spondylolisthesis caps, external washers, and rods are listed with specific dimensions and references. A comprehensive list of screws with various diameters and lengths is provided.
Procedures
The document describes the technique for fixing rods to screws using caps and washers, threading the polyaxial cap, positioning the external washer, and ensuring proper alignment and tightening. It also covers tool use for adjustments before final tightening.
Instruments
A detailed list of instruments, including starter awls, pedicle finders, screwdrivers, forceps, and rod holders, is provided with specific identification codes.
Implants
References for various implant sets, such as the Sherpa® implant set, are included with dimensions and product codes. Trial acetabular cups and sizes are also listed.
Recommendations
The document emphasizes aligning the outer ring parallel to the spinous process in the sagittal plane for proper anteroposterior displacement during traction. It suggests using an anti-turn key to prevent screw loosening during tightening.
Contact Information
Contact details for Surgival, including addresses, phone numbers, and email addresses for commercial and international departments, are provided.
Catalog excerpts

Tecnica Quirurgica Surgical Technique Sistema de Columna SHERPA SHERPA Spine System
Open the catalog to page 1
TECNICA QUIRURGICA / SURGICAL TECHNIQUE 2 1. Preparacion del pedfculo / Pedicle preparation 3 2. Insercion del tornillo / Screw insertion 6 3. Preparacion y colocacion de la barra / Rod preparation and placement 8 4. Cierre del sistema / System locking 10 5. Apriete final del sistema / Final system tightening 13 IMPLANTES E INSTRUMENTAL / IMPLANTS AND INSTRUMENTS 14
Open the catalog to page 3
Técnica Quirúrgica Surgical Technique Se aconseja realizar una incisión central posterior en sentido cráneocaudal, la cual se extenderá más o menos en función de los niveles a fusionar. It is advisable to make a central posterior craniocaudal incision, which can be made longer or shorter depending on the levels to be fused. Es importante esqueletizar meticulosamente los segmentos vertebrales a instrumentar, manteniendo el campo con la mínima hemorragia posible para identificar con facilidad los diferentes elementos anatómicos. It is important to skeletonise the vertebral segments that require...
Open the catalog to page 4
1. Preparación del pedículo Pedicle preparation Pedículo lumbar Lumbar pedicle Inicialmente, se debe esqueletizar la apófisis articular superior y la transversa del mismo nivel. El punto de entrada del pedículo suele coincidir con la intersección entre la línea media de la apófisis transversa y la base de la apófisis articular. Para evitar que el instrumento en uso resbale en la superficie de la apófisis articular, se aconseja retirar la cortical de esta zona mediante pinza gubia, escoplo o fresa motorizada. Se ha de tener especial cuidado con la vértebra inmediatamente superior para no dañarla...
Open the catalog to page 5
Técnica Quirúrgica Surgical Technique Pedículo sacro Sacral pedicle Se realiza una pequeña osteotomía oblicua del extremo distal de la apófisis articular inferior de L5, con un escoplo, para visualizar la apófisis articular del sacro. Se practica una puesta a plano de la misma o espongialización, mediante una pinza gubia o escoplo. En la base de la apófisis articular se encuentra una pequeña cresta ósea o apófisis accesoria, que se considera el mejor punto de entrada para el pedículo sacro. Para facilitar su localización se aconseja utilizar el punzón. A continuación, en dirección convergente...
Open the catalog to page 6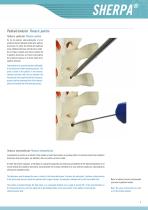
Pedículo torácico Thoracic pedicle Torácico pedicular Thoracic pedicle Se ha de exponer adecuadamente el arco posterior hasta el extremo distal de la apófisis transversa. El punto de entrada del pedículo en las vértebras torácicas coincide con la unión de las líneas trazadas en el tercio superior de la apófisis transversa y el tercio más externo de la lámina torácica en la línea media de la apófisis articular. The posterior arch must be exposed sufficiently to the distal end of the transverse process. The point of entry of the pedicle in the thoracic vertebra coincides with the join between the...
Open the catalog to page 7
Técnica Quirúrgica Surgical Technique 2. Inserción del tornillo Screw insertion Para insertar el tornillo transpedicular de la longitud y diámetro escogidos, se debe tener en cuenta los siguientes factores: When inserting the transpedicular screw, having previously chosen the required length and diameter, the following factors must be taken into consideration: · El diámetro del pedículo aumenta en dirección cráneo-caudal (L1-L5). · The diameter of the pedicle increases in the craniocaudal direction (L1-L5). · El ángulo de convergencia del pedículo lumbar va en aumento desde L1 hasta L5 (entre...
Open the catalog to page 8
Inserción tornillo poliaxial Polyaxial screw insertion Una vez localizado el trayecto del pedículo, se monta el tornillo en el destornillador específico. La parte interna de la llave se aloja en el hexágono de la cabeza y su parte externa se enrosca en la superficie interna de la tulipa. Se coloca el tornillo y, posteriormente, se retira la llave de inserción desenroscándola de la tulipa. Having located the path of the pedicle, the screw is fitted into the specific screwdriver. The internal part of the key fits into the hexagon on the head, and the external part threads into the internal surface...
Open the catalog to page 9
Técnica Quirúrgica Surgical Technique 3. Preparación y colocación de la barra Rod preparation and placement Con la ayuda de la pinza porta barras, se presenta la barra sobre los tornillos para seleccionar la longitud adecuada de la misma. Al mismo tiempo, se obtiene una imagen de la silueta necesaria para iniciar el moldeo de ésta. Dicha maniobra se realiza con el doblador francés, en la posición 6 equivalente a la barra de Ø 6 mm, y la pinza porta barras. Using the rod holders, offer the rod up to the screws to select the right length. At the same time, you will get an image of the outline required...
Open the catalog to page 10
A continuación, se comprueba que la barra se asienta sobre el fondo de todas las tulipas. Para ello, se puede utilizar el impactor para barra. En el caso de que los tornillos estén tan próximos que las tulipas se toquen y no quepa el impactor de la barra, puede usarse otro impactor en el interior de las tulipas. Si con el impactor no se consigue un contacto íntimo entre la barra y el fondo de la tulipa, puede ayudarse con el calzador de tulipas. Impactor de barra externo External rod pusher Next, make sure the rod is sitting right at the back of all the outer rings, using the rod pusher. If the...
Open the catalog to page 11
Técnica Quirúrgica Surgical Technique 4.Cierre del sistema System locking Una vez introducida la barra, se cierra el sistema mediante los diferentes elementos de apriete, según se trate de un tornillo monoaxial, poliaxial o de espondilolistesis. Having inserted the rod, lock the system in place using the various tightening elements, depending on whether you are locking a monoaxial, polyaxial or spondylolisthesis screw. Cierre del tornillo monoaxial Monoaxial screw locking Para fijar la barra al tornillo monoaxial, se utiliza la arandela biselada y el tapón del sistema monoaxial. La arandela biselada...
Open the catalog to page 12All Surgival catalogs and technical brochures
 STAPLES RANGE
2 Pages
 STEINMANN PINS
1 Page
 BIARTICULAR HEAD
6 Pages
 FEMORAL HEADS
1 Page
 SURGIFEET SURGICAL TECHNIQUE
6 Pages
 KHA CUP
6 Pages
 SELF-LOCKING FEMORAL STEMS
8 Pages
 Primary knee
44 Pages
 CANNULATED SCREWS
8 Pages
 SHERPA SPINE SYSTEM
8 Pages
 GENUTECH CCK SURGICAL TECHNIQUE
16 Pages
 GENUTECH SURGICAL TECHNIQUE
44 Pages
 PULSE LAVAGE DRAINAGE SYSTEM
2 Pages
 HA BONE
4 Pages
 BIOMATERIALS
8 Pages
 LARGE FRAGMENTS SETS
5 Pages
 SURGIFEET WEIL TYPE SCREW
2 Pages
 LNS GT SURGICAL TECHNIQUE
6 Pages
 LNS GT
6 Pages
 INTERBODY CAGE
6 Pages
 SHY CUP
8 Pages
 SHINE C FEMORAL STEM
6 Pages
 MÜLLER CUP
6 Pages
 THOMPSON PROSTHESIS
2 Pages
 KAREY C REVISION STEM
1 Page
 KAREY HA REVISION STEM
1 Page
 KAREY
KAREY6 Pages


- Bone plate
- Compression plate
- Metallic compression plate
- Locking compression plate
- Distal compression plate
- Compression bone screw
- Sample container
- Metallic compression bone screw
- Proximal compression plate
- Bone substitute
- Arthrodesis nail
- Forearm compression plate
- Tibia compression plate
- Metallic intramedullary nail
- Femoral stem
- General purpose compression bone screw
- Humerus compression plate
- Radius compression plate
- Cannulated compression bone screw
- Proximal fixation intramedullary nail