- Company
- Products
- Catalogs
- News & Trends
- Exhibitions
UMG-03H
1 /21Pages

UMG-03H
1 /21Pages
Catalog excerpts

Dental Unit Instruction Manual Please read this manual before operating
Open the catalog to page 1
Part 1 Security Information Please read this manual in order to use the dental unit correctly. If you have any special requirements, please contact our dealers. l. In order to reduce the possibility of fire and electric shock, please do not place the device in a humid place, and please do not open the box. If you need to repair the machine, please find a professional service person. 2. If smoke or other abnormal status occurs to the unit, it may lead to fire, please immediately cut off the power supply, and contact local dealer or after-sales service department. 3. If water entering into the...
Open the catalog to page 3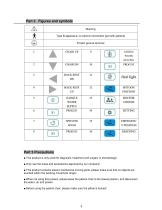
Part 2 . Figures and symbols Warning Type B apparatus: no electric connection part with patients Protect ground terminal Part 3 Precautions ■ This product is only used for diagnosis, treatment and surgery in stomatology! ■ Only use the fuses and accessories approved by our company! ■ This product contains electro-mechanical moving parts, please make sure that no objects are touched within the working movement range! ■ When not using this product, please lower the patient chair to the lowest position, and disconnect the water, air and power! ■ Before using the patient chair, please make sure the...
Open the catalog to page 4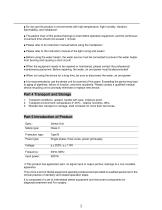
■ Do not use this product in environments with high temperature, high humidity, vibration, flammability, and imbalance! ■ The patient chair of this product belongs to intermittent operation equipment, and the continuous movement time should not exceed 1 minute! ■ Please refer to its instruction manual before using the handpiece! ■ Please refer to the instruction manual of the light curing and scaler! ■ Before using the water heater, the water source must be connected to prevent the water heater from burning and causing a short circuit! ■ When the equipment needs to be repaired or maintained,...
Open the catalog to page 5
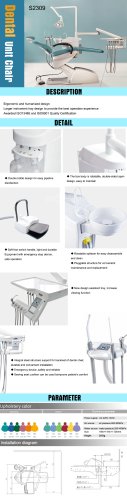
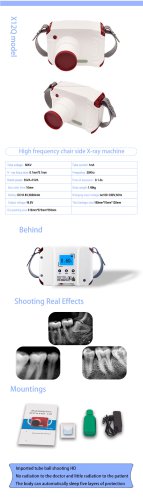
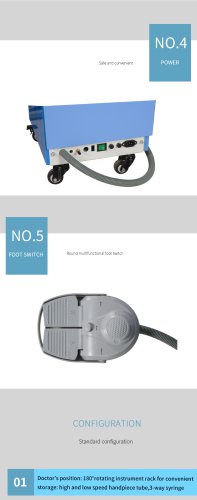
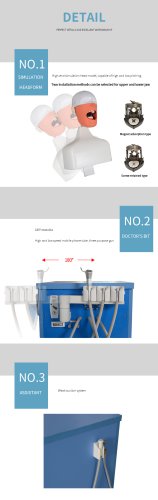
This product is mainly composed of dental patient chair, oral light, instrument tray, three way syringes, mouthwash dispensing device, saliva suction device, spittoon,led film viewer and foot switch. Part 6 Operation Conditions To ensure the normal use of the unit, the input water, air, electricity and working environmental parameters are as follows: Air source: air pressure 0.6MPa 〜0.8Mpa, flow >50L/ min, oil free Water source: water pressure 0.20MPa ~ 0.40MPa, flow > 10L/ min , hardness <25 degrees Power supply: a.c.220V/50Hz 10A Environment: temperature 5~40° relative humidity 20%-80% C, Part...
Open the catalog to page 6
Part 8 Structural Diagram
Open the catalog to page 7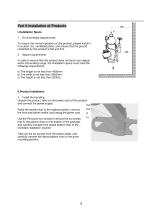
Part 9 Installation of Products I.Installation Space 1. Environmental requirements To ensure the normal operation of this product, please install it in a clean, dry, ventilated place, and ensure that the ground contacted by this product is flat and firm. 2. Space requirements In order to ensure that this product does not touch any objects within the working range, the installation space must meet the following requirements: a) The length is not less than 4000mm b) The width is not less than 2600mm c) The height is not less than 2000m; II.Product Installation 1. Install the handling Unpack the...
Open the catalog to page 8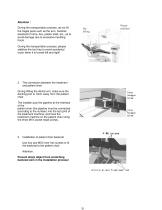
Attention : During the transportation process, do not lift the fragile parts such as the arm, handrail, assistant's frame, box, plastic shell, etc., as to avoid damage due to excessive handling force! During the transportation process, please stabilize the tool tray to avoid accidental touch when it is turned left and right! 2. The connection between the treatment and patient chair During liftting the dental unit, make sure the docking port is 10cm away from the patient chair. The installer puts the pipeline at the interface of the patient chair (the pipeline must be connected according to the...
Open the catalog to page 9
4. Installation of patient chair cushion Take out the three screws at the bottom of the seat cushion re-screw the seat cushion through the corresponding three holes in the patient chair, and tighten the hex screws. During the installation process, sharp objects should be avoided to cut the backrest skin. Attention: Prevent sharp object from scratching backrest skin in the installation process! Installation of cushion housing Take out the cushion housing, align it and then take four tapping screws and screw them in the seat cushion base. inner hexagon screw 6. Oral LED lamp installation Open the...
Open the catalog to page 10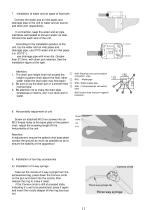
Installation of water and air pipes of floor tank Connect the water and air inlet pipes and drainage pipe of the unit to water and air source and drain port respectively; In connection, keep the water and air pipe interfaces well sealed to prevent water/ air leak. Connect the earth wire of the unit. According to the installation position of the unit, lay the water and air inlet pipes and drainage pipe, use (PVC water and air inlet pipes (i.e. ZG1/2” ); use drainage pipe with inner dia. Greater than 27.5mm, with drain port retained. See the installation figure at the right. Attention: 1. The drain...
Open the catalog to page 11
Installation of handpiece Before handpiece installation, turn on the water and air sources, draw out each handpiece hose and step down the foot switch to discharge the water and air residue inside the hoses.In installation, align with the hole positions and screw in the bolts. Attention: Refer to the User Manual of handpiece for its use, sterilization and maintenance! Part 10 Testing 1. The buzzer emits a "beep" sound, the power indicator lights on the tool tray and assistant's stand are on, and the device performs a self-test of the whole machine. 2. Check the water source connection to make...
Open the catalog to page 12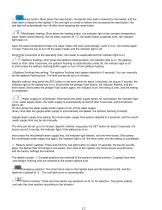
☆ Reset button: Short press the reset button, the dental chair seat is lowered to the lowest, and the chair back is raised to the highest. If the oral light is turned on before short-pressing the reset button, the oral light will automatically turn off after short-pressing the reset button. ☆ Mouthwash heating: Short press the heating button, the indicator light of the constant temperature water heater starts flashing, the hot water reaches 40 °C, the water heater suspends work, the indicator light stays on. when the water temperature drops, the water heater will work automatically, cycle in...
Open the catalog to page 13All Tangshan UMG Medical Instrument catalogs and technical brochures
 TT-2
TT-21 Page
 UM-C2
UM-C21 Page
 UM-C1
UM-C11 Page
 UM-S03
1 Page
 UM-S02
1 Page
 UM-S01
1 Page
 GH-3XX
3 Pages
 GH-2XX
3 Pages
 GH-1XX
3 Pages
 HDR600
1 Page
 HDR500
1 Page
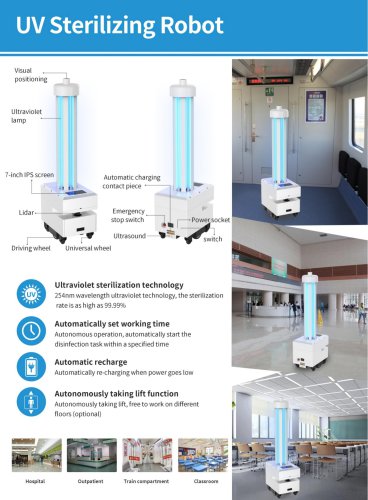
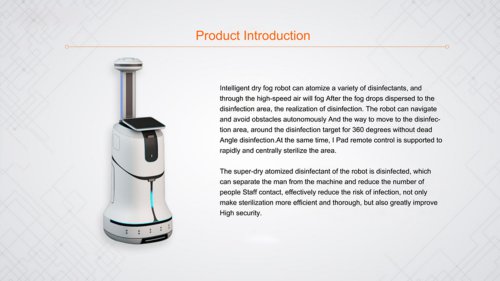
 UMG-YR0002
4 Pages
 UMG-YR0001
4 Pages
 UM-M400
2 Pages
 UM-M300
2 Pages
 UM-1612
1 Page
 UM-1610
1 Page
 UM-168
1 Page
 UM-166
1 Page
 UM-165
1 Page
 UM-164
1 Page
 UM-163
1 Page
 U8877
U88771 Page
 U9027
U90272 Pages
 PA-200
1 Page
 U9035
U90351 Page
 U8870
U88701 Page
 U880
U8801 Page
 U9001
U90011 Page
 UMG-04C
1 Page
 UMG-03C
1 Page
 UMG-02C
1 Page
 UMG-01C
1 Page
 UMG-01A
1 Page
 S2319
S23191 Page
 S2318
S23181 Page
 S2316
S23161 Page
 S2315
S23151 Page
 S2313
S23131 Page
 S2310
S23101 Page
 S2309
S23091 Page
 S2300
S23001 Page
 UM-2020-2
2 Pages
 UM-2020-3
10 Pages
 UM-2020-1
2 Pages
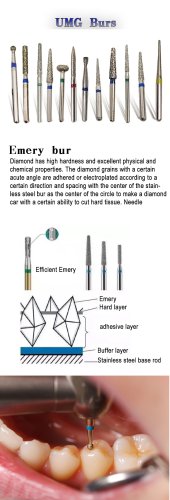 dental diamond bur
2 Pages
 Stamotology teaching system
3 Pages
 UMG-IX
3 Pages
 UMG-VI
3 Pages
 UMG-IV
3 Pages
 UMG-III
3 Pages
 UMG-03H
5 Pages
 UMG-02H
4 Pages
 Surgical masks
19 Pages
 alginate
1 Page
 UM-X12QS
1 Page
 UM-X12Q
1 Page
 UM-X12D
1 Page
 UM-WF502
14 Pages
 dental hygiene swab
1 Page
 UMG-II-PLUS Optional
1 Page
 UMG-II-PLUS Face mask
1 Page
 UMG-II Option
1 Page
 UMG-II NO.4 POWER
1 Page
 UMG-II DETAIL
1 Page
 UMG-II
1 Page
 UMG-I
UMG-I1 Page
 UMG-I FEATURES
1 Page
 S2308
S23081 Page
 Dental air compressor
7 Pages
 Portable Dental Unit
9 Pages
 UMG-02H
23 Pages
 Dental chair
21 Pages


- Medical dolly
- Dental material
- Anatomy model
- Training anatomy model
- Logistics trolley
- Sterilizer
- Dental restoration material
- Hospital wardrobe
- Teaching anatomical model
- Steam sterilizer
- Training medical simulator
- Grasping forceps
- Wound care
- Healthcare facility stool
- Instrument trolley
- Medical kit
- Human scissors
- Stainless steel cabinet
- Benchtop sterilizer