- Catalogs
- TBM Corporation
- Ora-Aid
Ora-Aid
1 /11Pages
Ora-Aid
1 /11Pages
Catalog excerpts

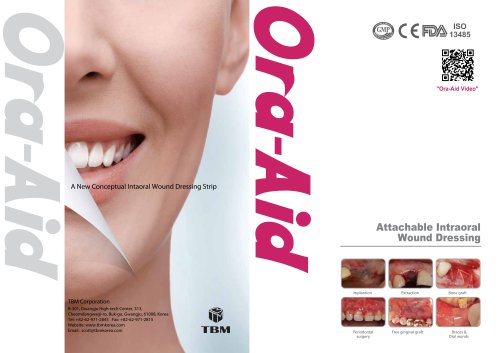
Attachable Intraoral Wound Dressing TBM Corporation B-301, Gwangju High-tech Center, 313, Cheomdangwagi-ro, Buk-gu, Gwangju, 61008, Korea Tel: +82-62-971-2845 Fax: +82-62-971-2815 Website: www.tbmkorea.com Email: [email protected]
Open the catalog to page 1
Safe, Easy, & Effective A New Paradigm for Intraoral Healing Features & Benefits 2 Principal of interaction 3 Instruction & Storage 4 Cautions & Product composition 5 Clinical data 6 Certificate 7 Clinical case 8
Open the catalog to page 2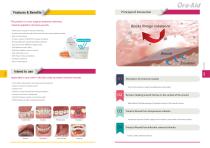
Features & Benefits This product is a non-eugenol protective dressing material applied to intraoral wounds. • Advanced concept in intraoral dressing - Protects intraoral wounds from food, bacteria and cigarette smoke • Protects suture thread from tongue irritation - Strong adhesion using hydrophilic polymer • Easy to cut into different shapes/sizes - Self adhesive with saliva • Reduces irritation sore in mouth - Safe and easy to use » Mint flavor reduces halitosis Intend to use Applicable to any cases in the oral cavity to protect intraoral wounds ■ Promotes healing after oral surgery and treatment...
Open the catalog to page 3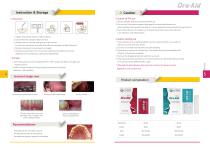
Instruction 1 Irrigate wound with sterile or saline solution 2 Cut Ora-Aid into a proper shape and size 3 Slightly remove moisture with gauze on the wound. An excessive exudation may reduce its adhesive strength and attaching time 4 Remove transparent release paper and apply 5 Gently press Ora-Aid for 5 to 10 seconds while Ora-Aid adheres to wound (Depends on circumstances, please press repeatedly) Storage 1 Store the product at room temperature(1 °C~35°C), away from direct sun light and heating sources. 2 Follow storage condition to keep proper performance of product (adhesion, absorbability)...
Open the catalog to page 4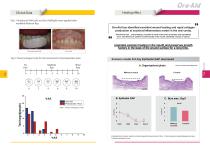
On-Aid Fig 1. Periodontal Pak(Left) and Ora-Aid(Right) were applied after modified Widman flap Ora-Aid has identified excellent wound healing and rapid collagen production at excision/inflammatory model in the oral cavity. (Preclinical trial _ animal testing / Curatick is made of the same principles and ingredients as an Ora-Aid and is used for small wounds in the mouth, stomatitis, braces or ulcers.) Fig 2. Visual analogue scale for the assessment of postoperative pain Pain Pain Pain Reference: CNU Btomaterial R&BD Center VAS : Visual analogue scale Without Curatick Curatick A. Organizational...
Open the catalog to page 5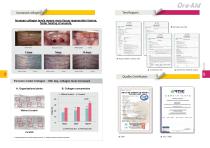
Ora-Aid Increase collagen levels means more tissue regeneration factors.faster healing of wounds. Excision model Collagen : 14th day, collagen level increased A. Organizational photo ▲ Acute systemic Toxicity Test Quality Certificates PlY-DJQ convtouriHr. sq/n*aij stfUffOIifl BMW rm Gsrt.ru (mHDBiinon rm rmfunawra rm rtmtmmk aCWTt** A. Organizational photos of 3rd day after surgery(mt chromosome) B. Collagen(%) measured and analyzed for each sample
Open the catalog to page 6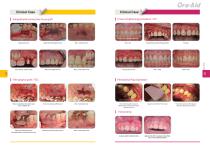
Subepithelial connective tissue graft Free gingiva graft: FGG Obtain subepithelial connective graft Donor site dressing with Ora-Aid After 1 week donor site tissue of palatal side #45 #46 no attached gingiva / free gingival graft Insertion and Suturing Clinical Case Ora-Aid Crown lengthening procedure: CLP Dressing with Ora-Aid Periodontal Flap Operation #14,15 Suturing after removed inflammatory tissue from the tooth cavity and mucosa Protect the donor site. Provide pain relaxation. Block external stimuli. Frenectomy Use laser to perform labial frenectomy Apply Ora-Aid which is transparent and...
Open the catalog to page 7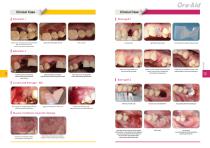
Clinical Case Ora-Aid | Extraction 1 Bone graft 1 palatal side impacted supernumerary tooth palatal side After apply Ora-Aid After 2 weeks After an incision of mucosa, remove the supernumerary tooth. | Extraction 2 Placement of Ora-Aid patch on the exposed Bond Apatite Fixation sutures to keep the Ora-Aid patch in place until soft tissue proliferation will bridge the exposed gap 10 days post op, complete closure of the exposed gap by soft tissue proliferation #12 After extraction, the blood dot Apply Ora-Aid above on the open After 7 days, you can see the growth is formed and hemolysis presented...
Open the catalog to page 8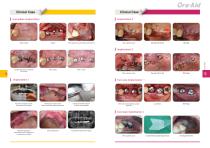
Clinical Case Immediate Implantation Clinical Case Implantation 2 Case by Good Morning Dental Clinic Case by Yedameun Dental Clinic Mb Panoramic shooting to check the location of the implant Wiping the surgical site and blood control after implant placement. Cutting the Ora-Aid to attach it on the wound suitably After two-step implantation surgery & Ora-AID Right side application Left side application Postoperative panoramic imaging (the retention time is depends on the attachment method) ■» aZ I CtSi^by Good Morning Dental Clinic After surgery & suture Cut Ora-Aid into a proper shape and size...
Open the catalog to page 9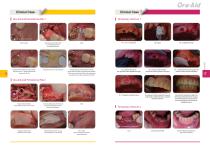
Ora-Aid | Ora-Aid and Periodontal Pak 1 | Temporary denture 1 Before surgery Apply the auto-tooth bone graft Suture Apply Ora-Aid for protection, pain relaxation, and blood control -> Apply Periodontal Pak aboveon the Ora-Aid 10 days later, remove Ora-Aid & Coe-pak Through applying Ora-Aid under the Cbe-pak, blocks plague formation and provides pain relaxation (When remove Periodontal Pakfrom the surgical sites, it usually causes pain because it adheres with silk) | Ora-Aid and Periodontal Pak 2 #22,23,24,25 implantation. Check width and cool to 7mm to 10mm Use bone grafting and synthetic bone...
Open the catalog to page 10
Q. Needs to remove protection layer? Ora-Aid is composed of two layers, protection layer and attachment layer. When the attachment layer dissolved completely with moisture/saliva in mouth,the protection layer will fall off automatically. So, no need to remove protection layer by force Usually it is caused by incorrect attachment on the surface of the wound and affected area. Cut Ora-Aid into a proper shape and size accordance with the wound. When attach Ora-Aid, it should be combined with some amount of moisture. If there are too much moisture, slightly remove with gauze on the wound and gently...
Open the catalog to page 11