
- Catalogs
- Truemed Group
- Intramedullary Nail tibia

Intramedullary Nail tibia

Intramedullary Nail tibia
This document provides guidelines for the use of the ARZZT intramedullary nail in treating tibial fractures. It emphasizes that these recommendations are meant to complement, not replace, the surgeon's expertise and patient-specific considerations.
Implant Design
The ARZZT intramedullary nail features multi-planar anteroposterior proximal locking for enhanced stability. It includes four orifices: two for fixed distal locking and two for proximal locking (one fixed, one dynamic). The nails are available in various sizes and are made from STEEL 316 LS and TITANIUM 6AI4V. They are designed for metaphyseal non-intraarticular fractures and diaphyseal fractures.
Preoperative Planning
Nail size is determined using x-rays of the healthy extremity, considering a 10-15% magnification. The patient is positioned supine with the knee flexed at 90 degrees. The surgical approach involves an incision from the patella to the tibial tuberosity.
Nail Placement and Insertion
The nail is placed in the insertion handle and calibrated. It is inserted into the tibial shaft using an image intensifier to ensure correct placement. Fracture reduction is performed, and the nail is aligned with the extremity.
Distal and Proximal Locking
Distal locking involves making incisions at locking points and inserting screws. Proximal locking is achieved by placing a target device and inserting screws through the cortical bone. The procedure concludes with suturing and placing an occlusion screw.
Postsurgical Care
A Jones-type bandage is applied, and the extremity is kept elevated. The patient may begin partial weight-bearing after two weeks, subject to radiological approval. Regular radiological checks are recommended, and the nail may be dynamized or removed based on fracture healing progress.
Catalog excerpts
Nail tibial Ins Hilden
Open the catalog to page 1
ARZZT Techniques Nail tibial Intramedullary locked nail to screw for femur fractures Introduction Implant design Preoperative planning Patient position Surgical approach Nail placement in the instrumental set Nail insertion Distal and proximal locking Postsurgical care This guide is made to expose the recommended techniques and applications for tibial ARZZT intramedullary nail by orthopaedic trauma surgeons in the treatment of fractures. The recommendations on its use don't seek to interfere with the surgeon's experience and each patient own needs, following basic rules for fractures treatment...
Open the catalog to page 2
ARZZT Techniques Surgical Technique for Femur Nail Introduction One of this implant favorite utilization feature is the multi-planar anteroposterior proximal locking, that generates a greater stability and distal locking security, since inside the technique use, practical and simple, a constant symmetry is maintained between instrumental set and implant, saving surgical time and reducing the use of images intensifier. These innovations result in the surgical procedure success, diminishing considerably locking time for patient´s benefit since ischemia short time reduces deep veined. Thrombosis...
Open the catalog to page 3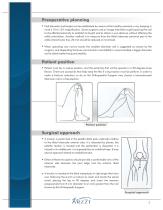
Preoperative planning Nail diameter and lenght can be established by means of the healthy extremity x-ray, keeping in mind a 10 to 15% magnification. Some surgeons use an image intensifier superimposing the nail to the affected extremity to establish its length and to obtain a sure distance without affecting the ankle articulation. Another method is to measure from the tibial tuberosity proximal part to the ankle interarticular line, 20 mm should be reduced or minimized. When operating very narrow bones the smallest diameter nail is suggested as chosen by the surgeon; and depending fractures...
Open the catalog to page 4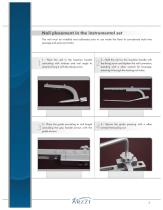
Nail placement in the instrumental set The nail must be installed and calibrated prior to use inside the tibial to corroborate bolts free passage and exact symmetry. 1.- Place the nail in the insertion handle coinciding with notches and nail angle to anterior fixing it with the clamp screw. 2.- Hold the nail on the insertion handle with the fixing screw and tighten the nail connector, assisting whit a allen wrench for leverage, entering it through the locking nut holes. 3.- Place the guide according to nail lenght coinciding the grip handle arrows with the guide arrows. 4.- Secure the guide pressing...
Open the catalog to page 5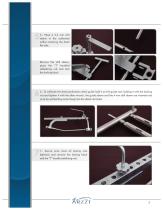
5.- Place a 5.2 mm drill sleeve in the calibrated orifice centering the distal flat side. Remove the drill sleeve, place the “T” handled stabalizing rod and lock the locking block. 6.- To calibrate the distal perforation distal guide hold it on the guide rod; holding it whit the locking nut and tighten it with the allen wrench, the guide sleeve and the 4 mm drill sleeve are inserted and must be verified they enter freely into the distal nail holes. 7.- Secure once more all locking nuts tightness and remove the locking block and the “T” handle stabilizing rod.
Open the catalog to page 6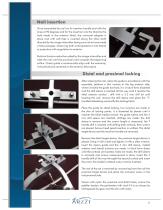
Nail insertion Once assembled the nail on th insertion handle and with the knee at 90 degrees and for the insertion into the tibial by the hole made in the anterior tibial, the universal adapter is place and with soft taps is inserted along the tibial shaft directed by the image intensifier being sure not to have made a false passage, observing both anteroposterior and lateral in projection with angulation to anterior. Perform fracture reduction aided by the image intensifier and slide the nail until the proximal mark exceeds the beginning orifice. Check guide is anatomically align with the extremity,...
Open the catalog to page 7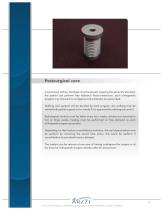
Postsurgical care A Jones type cottony bandage must be placed, keeping the extremity elevated, the patient can perform free tolerance flexion/extension, each orthopaedic surgeon may choose how analgesics and antibiotics are prescribed. Walking and support will be decided by each surgeon, but walking may be started with partial support in two weeks if it is approved by radiological control. Radiological controls must be taken every four weeks, stitches are removed in two or three weeks, healing must be performed on free demand as each orthopaedic surgeon prescribes. Depending on the fracture consolidation...
Open the catalog to page 8All Truemed Group catalogs and technical brochures
 Intramedullary Tibial Nail
2 Pages
 Intramedullary Humerus Naif
2 Pages
 Intramedullary Femoral Nail
2 Pages
 Pertrochanteric Hip Device
20 Pages
 Surgical Technique
24 Pages
 ZHS1 Cementless Hip System
13 Pages
 Bein System 5.0 mm
6 Pages
 Ins Hilden Humerus
15 Pages
 Ins Hilden Femoral
11 Pages
 Dohler System: Halses
9 Pages
 Dohler System: Spalte
16 Pages
 HALSES PLA TE
9 Pages
 Cementless Hip System
13 Pages
 LCP 5.0 mm Plates
6 Pages
 Intramedullary Nail for Humerus
15 Pages


- Bone plate
- Compression plate
- Metallic compression plate
- Locking compression plate
- Surgery forceps
- Orthopedic surgery instrument kit
- Distal compression plate
- Compression bone screw
- Metallic compression bone screw
- Proximal compression plate
- Forearm compression plate
- Lateral compression plate
- Medial compression plate
- Tibia compression plate
- Metallic intramedullary nail
- Humerus compression plate
- Radius compression plate
- Cannulated compression bone screw
- Toothed forceps