- Catalogs
- Truemed Group
- Pertrochanteric Hip Device
Pertrochanteric Hip Device
1 /20Pages

Pertrochanteric Hip Device
1 /20Pages
Catalog excerpts
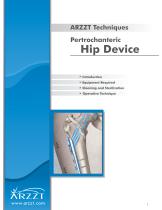
ARZZT Techniques Hip Device Introduction Equipment Required Cleaning and Sterilization Operative Technique
Open the catalog to page 2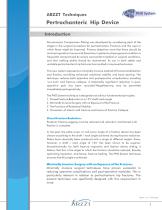
ARZZT Techniques Pertrochanteric Hip Device Introduction Percutaneous Compression Plating was developed by considering each of the stages in the surgical procedure for pertrochanteric fractures and the ways in which these might be improved. Primary objectives were that there should be minimal operative trauma and blood loss in patients whose general condition is frequently compromised by severe concomitant medical or surgical conditions, and that walking ability should be maintained. Its use in both stable and unstable pertrochanteric hip fractures has resulted in improved outcomes This new system...
Open the catalog to page 3
ARZZT Techniques Pertrochanteric Hip Device Introduction Provision of Rotational Stability: Single-axis fixation provides poor control of rotational stability. The PHD System provides double-axis telescoping fixation, which also increases the projection area within the femoral head. Biomechanical studies with the system have revealed a significant increase in rotational stability which is critical for providing “controlled fracture impaction”. This is the post-surgical compression, passively exerted by the patient, and is provided by a fixation device which has a sliding capability, as well as...
Open the catalog to page 4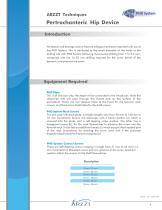
ARZZT Techniques Pertrochanteric Hip Device Introduction No lateral wall damage and no fracture collapse have been reported with use of the PHD System. This is attributed to the small diameter of the holes at the drilling site with PHD System following incremental drilling from 7 to 9.3 mm, compared with the 16-32 mm drilling required for the screw barrel of the dynamic/compression hip screw. Equipment Required PHD Plate This is of one size only; the head will be connected to the introducer, while the chisel-like end will pass through the tissues and on the surface of the periosteum. There are...
Open the catalog to page 5
ARZZT Techniques Supplementary Equipment - No. 10 Scalpel Blade - 18 Gauge Spinal Needle - Metzenbaum scissors - Mallet Cleaning and Sterilization Cleaning Cleaning should be performed immediately after each procedure, before blood, saline and debris are dry. Rinse with running hot water or immerse and agitate in a mild detergent bath with near neutral pH (7.0 to 8.0) and, whenever possible, distilled or demineralized water. Avoid the use of abrasive pads.Ultrasonic cleaning in a hot detergent bath with the same pH limits will provide the most efficient cleaning. After cleaning, rinse and dry...
Open the catalog to page 6
ARZZT Techniques Lubrication by dipping in water - soluble antimicrobial lubricant will help protect instruments against staining and corrosion. Follow lubricant manufacturer's instructions. These lubricants will not affect the sterilization process. After cleaning, disinfection may be performed by immersion in a disinfectant solution such as Activated Glutaraldehyde (CIDEX) followed by rinsing and drying. Note: As disinfection alone is not adequate, instruments should be sterilized before each procedure. Sterilization Prior to surgical use, the Instruments, Plates and Screws should be cleaned...
Open the catalog to page 7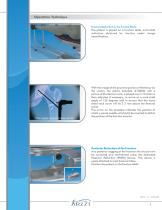
Operative Technique Fracture Reduction in the Frontal Plane The patient is placed on a fracture table, and initial reduction obtained by traction under image intensification. With the image of the proximal portion of the femur on the screen, the plastic template (210000) with a picture of the device in situ, is placed over it. Traction is then adjusted if necessary, to arrive at a neck-shaft angle of 135 degrees and to ensure that the more distal neck screw will lie 2-3 mm above the femoral calcar. The arrow on the template indicates the position at which a spinal needle will shortly be inserted...
Open the catalog to page 8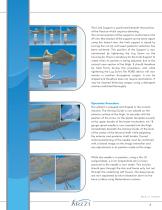
The Limb Support is positioned beneath that portion of the fracture which requires elevating. The correct position of the support is confirmed on the AP view (the shadow of the support can be seen).Again using the lateral view, the limb support is raised by turning the nut (a) until exact posterior reduction has been achieved. The position of the Support is now maintained by tightening the Lug Screw on the housing (b). There is tendency for the Limb Support to rotate when its position is being adjusted, due to the conical cross-section of the thigh. It should therefore be held firmly during this...
Open the catalog to page 9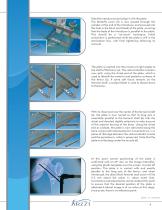
Take the introduce (a) and align it with the plate. The Butterfly screw (b) is now passed through the cylinder at the end of the Introducer, and screwed into the hole in the blunt end (head) of the plate, ensuring that the body of the Introducer is parallel to the plate. This should be a “no-touch” technique. Initial connection is performed while the plate is still in the sterilization box, with final tightening following its removal. The plate is inserted into the incision at right angles to the shaft of the femur (a). The vastus lateralis muscle is now split, using the chisel end of the plate,...
Open the catalog to page 10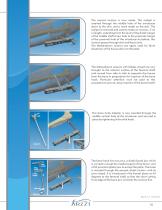
The second incision is now made. The scalpel is inserted through the middle hole of the introducer down to the skin, and a mark made on the skin. The scalpel is removed and used to make an incision, 2 cm in length, extending from the level of the distal margin of the middle shaft screw hole to the proximal margin of the proximal hole of the introducer.As before, this incision passes through skin and fascia only. The Metzenbaum scissors are again used for blunt dissection of the tissues down to the plate. The Metzenbaum scissors with blades closed are now brought to the anterior surface of the...
Open the catalog to page 11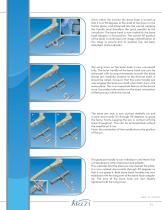
Once within the incision the bone hook is turned so that it is at 90 degrees to the shaft of the femur in the frontal plane, and advanced into the wound, keeping the handle (and therefore the jaws) parallel to the introducer. The bone hook is now locked to the bone hook adaptor in this position. The correct AP position of the plate is confirmed with image intensification at this stage to ensure that its position has not been disturbed. (Lock and look). The wing screw on the bone hook is now unscrewed fully. The outer handle of the bone hook can now be advanced with turning movements to push the...
Open the catalog to page 12All Truemed Group catalogs and technical brochures
 Intramedullary Tibial Nail
2 Pages
 Intramedullary Humerus Naif
2 Pages
 Intramedullary Femoral Nail
2 Pages
 Surgical Technique
24 Pages
 ZHS1 Cementless Hip System
13 Pages
 Bein System 5.0 mm
6 Pages
 Ins Hilden Humerus
15 Pages
 Ins Hilden Femoral
11 Pages
 Dohler System: Halses
9 Pages
 Dohler System: Spalte
16 Pages
 HALSES PLA TE
9 Pages
 Cementless Hip System
13 Pages
 LCP 5.0 mm Plates
6 Pages
 Intramedullary Nail tibia
8 Pages
 Intramedullary Nail for Humerus
15 Pages


- Bone plate
- Compression plate
- Metallic compression plate
- Locking compression plate
- Surgery forceps
- Distal compression plate
- Orthopedic surgery instrument kit
- Compression bone screw
- Metallic compression bone screw
- Proximal compression plate
- Arthrodesis nail
- Forearm compression plate
- Lateral compression plate
- Medial compression plate
- Tibia compression plate
- Metallic intramedullary nail
- Humerus compression plate
- Cannulated compression bone screw
- Radius compression plate
- Toothed forceps