- Catalogs
- Unomedical
- SUR-FIT Natura® Two-Piece Pouching System*
SUR-FIT Natura® Two-Piece Pouching System*
1 /2Pages

SUR-FIT Natura® Two-Piece Pouching System*
1 /2Pages
Catalog excerpts
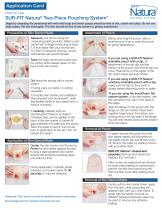
SUR-FIT Natura® Two-Piece Pouching System* OSTOMY SYSTEM Begin by cleansing the peristomal skin with mild soap and water (soaps should be free of oils, cream and aloe). Do not use baby wipes. Pat dry thoroughly. The skin should be free of any solvent or greasy substances. Preparation of Skin Barrier/Wafer Measure your stoma using the measuring guide provided. Select a skin barrier with a flange (white ring) at least 1/2 inch larger than your stoma size. For flush or retracted stomas, convex skin barriers are recommended. Before attaching the pouch, allow a small amount of air to enter the pouch by gently separating it. Trace the exact same stoma size onto the center white release paper on the back of the skin barrier. If you are using a SUR-FIT Natura® drainable pouch with a clip, for attachment of the tail clip, fold the bottom of the pouch over the tail clip only once. Press firmly on the center of the clip until it snaps securely closed. Cut along the tracing with a curved scissor. *If using a pre-cut wafer, no cutting necessary. *ConvaTec skin barriers are available in Stomahesive® and Durahesive®, solid and flexible (white or tan collars) with or without convexity. If you are using a SUR-FIT Natura® urostomy drainable pouch with a tap, make sure the tap on the pouch is closed before attaching pouch to wafer. A caulking material, such as Stomahesive® Paste or an Eakin® Cohesive Seal, can be applied to the back of the skin barrier to further fill gaps between the wafer and the stoma. Allow the paste to set for one minute prior to application to the skin. (Do not spread the paste.) Application of Skin Barrier/Wafer Center the skin barrier over the stoma. Press the skin barrier against the skin. If using a tape bordered skin barrier, remove the remaining backing paper one side at a time. During application, maintain gentle pressure on the skin barrier for 30 seconds to improve adhesion. Please see “Tips” section on back for additional product information. See package insert for complete Instructions for Use. *If you are using the InvisiClose® tail closure system, a clip-less system, see the instructions for use on the back of this page. Align the flange on the pouch with the flange on the skin barrier. Press them together beginning at the bottom and circling around the top side of the flange. You will hear several clicks as the system locks into place. Removal of Pouch To easily remove the pouch from the skin barrier, gently pull downward on the plastic pouch tab and lift the pouch off. Anchor the wafer by holding it down with your other hand. SUR-FIT Natura® closed-end pouches: Remove and discard as needed. (Do not flush.) Filter covers are waterproof and should be used when bathing or swimming to prevent the filter from becoming wet. Remove filter cover after patting pouch dry. Removal of Skin Barrier/Wafer Gently pull the skin barrier down, away from the skin, while supporting the adjacent skin with your other hand. To assist with the barrier removal, an AllKare® Adhesive Remover wipe may be used to remove any adhesi
Open the catalog to page 1
Application Card Tail Closure System InvisiClose® Tail Closure System* These instructions apply to the SUR-FIT Natura® ostomy system with InvisiClose® Tail Closure System. Directions to Close the Pouch Directions for Draining the Pouch The InvisiClose® Tail Closure System is comprised of a security flap (A), inter-locking closures (B), and outlet end-strips (C). Hold the security flap against the front of the pouch revealing the inter-locking closures. While holding the security flap up against the front of the pouch, unlock the inter-locking closure by lifting at the corner and unraveling the...
Open the catalog to page 2All Unomedical catalogs and technical brochures
 Esteem+ PC & CTF
2 Pages

- Catheter
- Wound care
- Infusion set
- Wound dressing
- Drainage catheter
- Peripheral catheter
- Sterile wound dressing
- Drainage set
- Urine drainage catheter
- Ostomy bag
- Breathable wound dressing
- 12 FR catheter
- 16 FR catheter
- 14 FR catheter
- 8 FR catheter
- 18 FR catheter
- Sterile wound dressing
- Access catheter
- 10 FR catheter
- Hydrophilic catheter