
Catalog excerpts
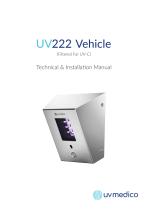
Technical & Installation Manual
Open the catalog to page 1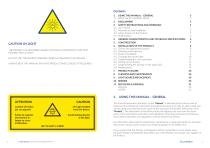
Contents 1. USING THIS MANUAL – GENERAL 1.1 BASIC SAFETY INSTRUCTIONS GENERAL CHARACTERISTICS AND TECHNICAL SPECIFICATIONS 3. SAFETY INSTRUCTIONS AND WARNINGS 3.1. User manual 3.2. Intended use and installation 3.3. Safety features of the Product 3.4. Modifications CONSTRUCTION ALWAYS KEEP THIS MANUAL WITH THE PRODUCT AND CONSULT IT REGULARLY. PRODUCT FAILURE DO NOT USE THE PRODUCT BEFORE CAREFULLY READING THIS MANUAL. THE PRODUCT AS DESCRIBED HEREIN CONTAINS COMPONENTS THAT EMIT FILTERED FAR UV LIGHT. 6. INSTALLATION OF THE PRODUCT 6.1. Choose the appropriate location 6.2. Unboxing and...
Open the catalog to page 2
1.1. BASIC SAFETY INSTRUCTIONS To minimise the risk of injury, the following basic safety precautions should be observed with each use of the Product: Only operate the Product if you have read and understood the Manual and are aware of the content of all current legal regulations (ISO 15858 and TLVs® and BEIs® from the ACGIH). Do not remove the sticker on the front of the unit until the Product is commissioned by a qualified installer. Do not put any object in close front of the surface of the Product. Do not put plastic or glass in front of the Product. It does not transmit UV. Make sure...
Open the catalog to page 3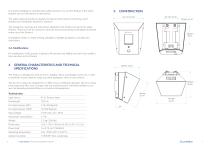
It is strictly forbidden to override these safety devices or to use the Product if the safety features are not fully present or disfunction. The safety features should be regularly checked for their proper functioning, and if required, be immediately repaired or replaced. The pictograms, warnings and instructions attached to the Product are part of its safety features. They must not be covered or removed and must be present and legible during the entire use of the Product. Immediately replace or repair missing, damaged or illegible pictograms, warnings and instructions. 3.4. Modifications...
Open the catalog to page 4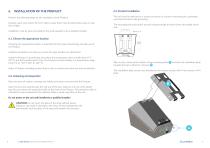
Perform the following steps for the installation of the Product. The unit must be attached to a surface by means of at least 4 mounting pins, preferably near electrical wires with grounding. Outside every room where Far UV-C light is used, there must be information signs in clear line of sight. The mounting pins and surface must be strong enough to hold 4 times the weight of the unit. Installation must be done according to the local regulations by a qualified installer. 6.1. Choose the appropriate location 100 mm [3.9 in] Choosing the appropriate location is important for the proper...
Open the catalog to page 5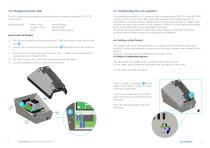
6.4. Changing the power cable 6.5. Understanding the unit’s operation Far UV-C lamps must be operated continuously from a separate, dedicated, 9-32 V DC power source. The maximum permissible UV-C exposure shall not exceed the ACGIH TLV and NIOSH REL of 22.0 mJ/cm² for an 8 h day, 40 h work week exposure to UV radiation at 222 nm. (UV Medico A/S expects positive changes into the ACGIH that will result in a higher exposure than allowed at this moment. If this changes, UV Medico A/S will update the software of the unit to align with the new threshold of exposure). To achieve the correct...
Open the catalog to page 6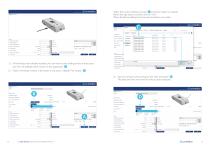
Select the correct software version C and press “Open” to upload. When the app asks to confirm, click on “Yes”. When finished installing, the firmware should be up to date. 1) If the Product was already installed, you can read out the setting of the unit by pressing “Get” all settings will be shown in the application. A 2) Check if firmware version is the latest. If not, press “Update FW” button. B 3) Set the correct hour by pressing “Set Time and Zone”. D The date and hour are now the same as your computer. UV222 Vehicle Technical & Instal
Open the catalog to page 7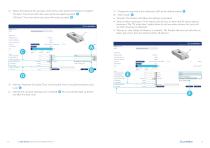
4) Define the timing of the use (duty cycle) of the room where the Product is installed: “On time”: Time from which the room will be occupied by people. A “Off time”: Time from which the room will not be occupied. B 7) Change the intensity of the multicolour LED to the desired output. E 8) Select mode. F • “Normal”: The Product will follow the settings as provided. • “Only on when movement”: The Product only will turn on when the Pir sensor detects movement. The “Pir active time” option allows to set how many minutes the cycle will run after movement is detected. • “Always on, only ‘Safety...
Open the catalog to page 8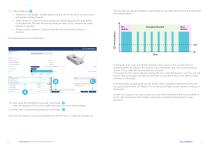
9) Add 3 distances: A a. “Distance to eye height”: Closest distance of the unit to the eye of a human (even with people walking around). The unit will calculate the radiation automatically to stay within the limits of the ACGIH like the example below: b. “Safety distance”: Closest distance people are allowed to get to the lamp before it turns itself off. The unit will turn itself back on after 10 sec. when/if the safety distance is regained. Occupied timeslot c. “Primary surface distance”: Distance from the unit to the main surface to disinfect. All measurements are in centimetres. Post...
Open the catalog to page 9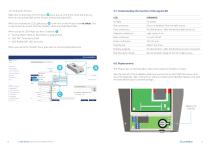
6.7. Understanding the function of the signal LED Right click on the photo of the Product A and a pop up of the test mode will show up. Here you can quickly light up the Product and test the signal LED. Error: no feedback from the light source. Cyan continuous Pre disinfection / after disinfection light source on. Magenta continuous Blue continuous Green continuous Flashing magenta Pre disinfection / after disinfection per seen movement. Red-blue-green (loop) Recommended change of Far UV-C light source. When you activate the 222 LightSource B , it will turn on the Product with no safety....
Open the catalog to page 10
7. PRODUCT FAILURE FAILURE Unit does not light up Check incoming power. Check cable damage. Replace fuse. Check if the Product is correctly installed. Unit flickers Check if the Product is correctly installed. If not, contact your local distributor. White flash Power cycle the unit. Does not hold settings Replace battery. Our products can be disassembled into separate materials of four recycling categories for minimal waste: metal, plastic, electronics, and light bulbs. If you have any problems to dispose of our products at the end of life, you are welcome to send them back to us for...
Open the catalog to page 11All UV Medico AS catalogs and technical brochures
-
UV222 Downlight
2 Pages
-
UV222 Industrial
2 Pages
-
UV222 Pendant
2 Pages
-
UV222 ™
2 Pages


