- Catalogs
- VATA, Inc.
- Peter PICC Line™
Peter PICC Line™
1 /12Pages

Peter PICC Line™
1 /12Pages
Catalog excerpts

Peter PICC Line™ – 0600 USER MANUAL 308 South Sequoia Parkway, Canby, Oregon 97013 USA ph. 503.651.5050 | fax 503.651.5052 | email [email protected] | www.vatainc.co
Open the catalog to page 1
Thank You For Your Purchase! Thank you for your purchase of VATA’s Peter PICC Line™ – 0600. Peter PICC Line™ – 0600 allows the teaching, practice and assessment of placing PICC lines. This model has a replaceable translucent arm skin that allows the visualization of the underlying cephalic, basilic and median basilic veins which are presented as barely visible blue veins. The superior vena cava, subclavian, axillary and jugular veins are also present, plus a movable chin that simulates the occlusion of the jugular to prevent the PICC line from traveling this route. The model features palpable...
Open the catalog to page 2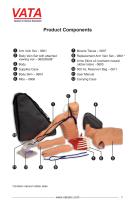
Product Components 1 Arm Vein Set – 0601 2 Body Vein Set with attached 3 4 5 6 Body Supplies Case Muscle Tissue – 0607 Replacement Arm Vein Set – 0601* Arms Skins x2 (contains natural rubber latex) - 0603 10 500 mL Reservoir Bag – 0611 11 User Manual 12 Carrying Case Body Skin – 0604 Ribs – 0606 *contains natural rubber latex
Open the catalog to page 3
Set-up Instructions 1. Add 400cc of distilled water to the fluid bag and place on an IV stand or similar device. Some customers have reported that adding a couple drops of clear dish soap to the water helps with the advancement of the PICC. Confirm roller clamp is closed. 2. Place the model in an upright position, with the partial chin in a superior orientation. Remove the white cap on the arm vein tubing which exits at the distal end of the arm. Attach the fluid bag tubing set to the distal end of the arm vein and elevate the bottom of the fluid bag approximately 2" above the model. 3. Remove...
Open the catalog to page 4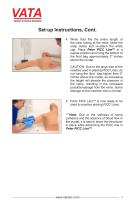
Set-up Instructions, Cont. 4. When fluid fills the entire length of the clear tubing at the neck, close the snap clamp and re-attach the white cap. Place Peter PICC Line™ in a supine position and hang the bottom of the fluid bag approximately 2" inches above the model. CAUTION: Due to the large size of the needles used in placing PICC Lines, do not hang the fluid bag higher than 2" inches above the model, as increasing the height will elevate the pressure in the veins, resulting in the increased possible leakage from the veins. Some leakage at the insertion site is normal. 5. Peter PICC Line™...
Open the catalog to page 5
Storing Instructions 1. After use, drain the model by closing the roller clamp on the fluid bag and emptying the bag. 2. Place the distal end of the arm over a sink and disconnect the fluid bag tubing set from the end of the arm. Remove the white cap and open the snap clamp on the short 6" piece of clear tubing that exits from the top of the chin to begin draining. 3. Once the fluid has stopped draining, pick up the model and rock side to side, as shown, to insure all fluid has been removed. Let air-dry and then return to the case for storage. Helpful Hints • Use the recommended distilled water...
Open the catalog to page 6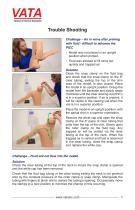
Trouble Shooting Challenge – Air in veins after priming with fluid - difficult to advance the PICC • Model was not placed in an upright position when primed. • Fluid was allowed to fill veins too quickly and trapped air. Solution Close the snap clamp on the fluid bag and check that the snap clamp on the 6” clear tubing, exiting the top of the chin area of the model, is also closed. Place the model in an upright position. Grasp the model from the backside and slowly rotate clockwise until the clear viewing vial (SVC) is in a superior position. If air is present, it will be visible in the viewing...
Open the catalog to page 7
Trouble Shooting, Cont. Challenge – Catheter tip does not appear in viewing window Solution Chin was not turned and held in place and catheter traveled into the jugular vein. Remove PICC and repeat the procedure with chin turned. Incorrect measurement of catheter length - remove PICC, re-measure, and repeat procedure Challenge – Translucent Arm Skin does not fit properly Solution Check to make sure the hole at the distal end of the arm skin is orientated to lineup where the blue arm vein exits the arm. Challenge – Leaking of the vein tubing Solution Check connection of the two arm vein tubings...
Open the catalog to page 8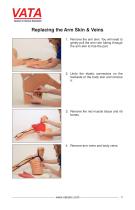
Replacing the Arm Skin & Veins 1. Remove the arm skin. You will need to gently pull the arm vein tubing through the arm skin to free the part. 2. Undo the elastic connectors on the backside of the body skin and remove it. 3. Remove the red muscle tissue and rib bones. 4. Remove arm veins and body veins.
Open the catalog to page 9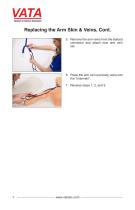
Replacing the Arm Skin & Veins, Cont. 5. Remove the arm veins from the barbed connector and attach new arm vein set. 6. Place the arm vein and body veins into the “channels”. 7. Reverse steps 1, 2, and 3.
Open the catalog to page 10
0600 Models & Parts The following items are available for purchase at www.vatainc.com. Arm Vein Tubing (contains natural rubber latex) Body Vein Tubing (contains natural rubber latex) Body Skin Muscle Tissue Viewing Vial Peter PICC Line™ Complete Model as Shown on Page 2
Open the catalog to page 11
You Might Also Like These Products... Two-Vein Venipuncture Training Aid - Dermalike II™ – 1352/1353 Four-Vein Venipuncture Training Aid - Dermalike II™ – 1354/1355 Port Body in a Box™ – 5010 Advanced Four-Vein Venipuncture™ Training Aid – 2365 Chester Chest™ with Standard Arm, Lightly Pigmented – 2400 Chester Chest™ with Standard Arm, Darkly Pigmented – 2402 308 South Sequoia Parkway, Canby, Oregon 97013 USA ph. 503.651.5050 | fax 503.651.5052 | email [email protected] | w
Open the catalog to page 12All VATA, Inc. catalogs and technical brochures
 2025 Product Catalog
32 Pages
 BonnieBone
12 Pages
 2365/2366
12 Pages
 Chester_Chest
16 Pages
Archived catalogs
 LF00999
6 Pages
 VATA Catalog
24 Pages
- Anatomy model
- Training anatomy model
- Teaching anatomical model
- Training medical simulator
- General care simulator
- Test phantom
- Upper body simulator
- Bone anatomy model
- Surgical phantom
- Suture thread
- Leg anatomical model
- Pad simulator
- Injection simulator
- Spinal anatomical model
- Female simulator
- Non-absorbable suture thread
- General purpose test phantom
- Lower body simulator
- Digestive system model
- Puncture simulator