OPERATING TECHNIQUE - BANKART LATARJET
1 /8Pages

OPERATING TECHNIQUE - BANKART LATARJET
1 /8Pages
Catalog excerpts

surgical technique Arthroscopic Bankart-Latarjet Specific guides and dual compressive self-locking fixation system
Open the catalog to page 1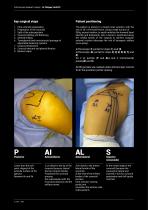
Arthroscopic Bankart Latarjet - Dr Philippe VALENTI key surgical steps 1. Intra-articular preparation 2. Preparationofthecoracoid 3. Split of the subscapularis 4. Coracoid drilling and flattening 5. Glenoid drilling 6. Transglenoid and transcoracoid passage of adjustable fastening systems 7. Coracoid Osteotomy 8. Coracoid descent and glenoid fixation 9. Bankart repair Patient positioning The patient is placed in a beach-chair position with the arm in 30° of forward flexion, using a weak traction of 500g, neutral rotation, to easily mobilize the humeral head laterally and backwards. Also a bump...
Open the catalog to page 2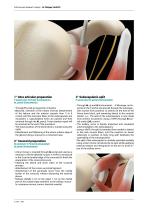
Arthroscopic Bankart Latarjet - Dr Philippe VALENTI 1° Intra articular preparation P portal (@)/ AI Portal (instruments) aL portal (instruments) • Through P portal @ inspection of lesions • AI portal, resection of the rotator interval; detachement of the labrum and the anterior capsule from 3 to 6 o'clock until the muscular fibers of the subscapularis are visualized. 2 capsulolabral wires are passed and then retrieved through the AL portal. Future bankart repair will be achieved at the end of the procedure. • The future position of the bone block is marked using the VAPR. • Debridement and flattening...
Open the catalog to page 3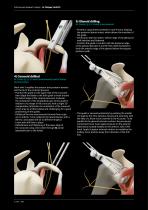
Arthroscopic Bankart Latarjet - Dr Philippe VALENTI 4) Coracoid drillind AL Portal (@ )/ S Protal (instrumental) and Al Portal (Instrumental) Mark with 3 needles the anterior and posterior borders and the tip of the coracoid process • Position the guide on the upper side of the coracoid, then adapt the blade to the drill-guide to hook around the lateral edge of the coracoid process. Evaluate the orientation of the longitudinal axis of the guide in relation to its shape of the coracoid, with a slight 3D manipulation (attention the orientation ofthe coracoid which may be a little twisted and challenging...
Open the catalog to page 4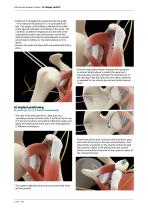
Arthroscopic Bankart Latarjet - Dr Philippe VALENTI ■ Drilling of 2 transglenoid tunnels through the guide, 7 mm medial to the glenoid rim 3.0 cannulated drill bits. The length of the drilling is defined by the width of the glenoid indicated on the blade of the guide. The 2 drill bits (2 different lengths) exit at the level of the subscapularis split under arthroscopic control (AL) without passing through the subscapularis to prevent any iatrogenic axillary, or musculocutaneous nerve lesion. • Remove the guide and leave both cannulated drill bits in place. 6) Implant positioning AL portal (@)...
Open the catalog to page 5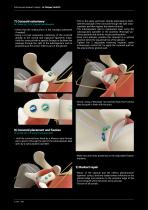
Arthroscopic Bankart Latarjet - Dr Philippe VALENTI 7) Coracoid osteotomy AL Portal (@) / Al, S portal instrumental ■ Check that the undersurface is flat (straight osteotome if needed) • Using a curved osteotome, osteotomy of the coracoid distally to the conoid and trapezoid ligaments origin. Hold this coracoid with a specific forceps to facilitate the passage through the split of the subscapularis and its positioning at the antero-inferior part of the glenoid. AL portal (@) / Al portal (instrumental) • Hold the coracoid bone block by a Museux-type forceps (Al) to direct it through the split...
Open the catalog to page 6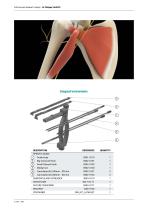
Arthroscopic Bankart Latarjet - Dr Philippe VALENTI SPECIFIC GUIDE (T) Guide body (?) Big Coracoid Hook (?) Small Glenoid Hook (?) Medial rod (?) Cannulated bit 240mm - 03 mm (?) Cannulated bit 200mm - 03 mm SUBSCAPULARIS SPREADER OSTEOTOME SUTURE TENSIONER GRASPER CONTAINER
Open the catalog to page 7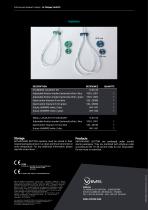
Arthroscopic Bankart Latarjet - Dr Philippe VALENTI description_reference quantite STANDARD LATARJET KIT VLSK-06 Open button titanium 8 mm blue VDL-2000B 1 Open button titanium 8 mm green VDL-2000G 1 Suture UHMWPE white / blue VHF-941 1 Suture UHMWPE white / green VHF-942 1 SMALL LATARJET KIT SHOULDER VLSS-03 Open button Titanium 10 mm blue VDL-2010B 1 Suture UHMWPE white / blue VHF-941 1 Storage ARTHROVIMS BUTTON systems must be stored in their original packaging intact, in a clean and dry environment at room temperature. For any additional information, please read the instructions. Products...
Open the catalog to page 8All VIMS catalogs and technical brochures
 BROCHURE - ARTHROTWIST
4 Pages
 BROCHURE - ARTHROSHARC
4 Pages
 BROCHURE - ARTHROBUTTON
4 Pages
 BROCHURE - ARTHROFIX
4 Pages
 BROCHURE - TITANIUM ANCHOR
4 Pages
 BROCHURE - PEEK ANCHOR
4 Pages
 BROCHURE - ARTHROLINK
4 Pages
 SOFT ANCHOR
4 Pages
 BROCHURE - ANCHOR TEXTILE
4 Pages


Archived catalogs
 ARTHROVIMS BR
4 Pages
 CATALOGUE - IMPLANTS
23 Pages
 CATALOGUE - TOWERS & CAMERAS
9 Pages

- Surgical system
- Cutting electrosurgical system
- Coagulation electrosurgical unit
- Orthopedic surgery instrument kit
- Suture thread
- Endoscope camera
- Suture anchor
- Non-absorbable suture thread
- Non-absorbable suture anchor
- 2 suture thread
- Digital camera head
- Endoscope camera head
- Orthopedic surgery suture thread
- Rotator cuff suture anchor
- Suture button
- CO2 insufflator
- Endoscopy column
- Interference screw
- Cruciate ligament interference screw
- Fluid management system