- Catalogs
- WishBone Medical
- Exact Osteotomy System SURGICAL TECHNIQUE
Exact Osteotomy System SURGICAL TECHNIQUE
1 /15Pages

Exact Osteotomy System SURGICAL TECHNIQUE
1 /15Pages
Catalog excerpts

SURGICAL TECHNIQUE
Open the catalog to page 1
Product The WishBone Medical Exact Osteotomy System (EOS) provides precise and repeatable osteotomies for many types of bunion correction surgery. Indications & Contraindications Guide Specifications Surgical Technique Sterile Kit Specifications Ordering Contact information WishBoneMedical.com Website: www.WishBoneMedical.com 100 Capital Drive Warsaw, IN 46582 Address: 100 Capital Dr Warsaw, IN 46582
Open the catalog to page 2
Indications & Contraindications Indications for use: 1. For correction of bunion deformity requiring either varus or valgus correction. 2. For correction of bunion deformity requiring joint decompression. 1. A general health problem that might pose a significant threat to the life of the patient if subjected to a major surgical procedure. An active infection or a previous infection of the lower extremity that has not been quiescent for at least six months. 2. A local or systemic infection. 3. Significant deficiency in the vascular supply to the extremity. 4. A condition of the toe which may lend...
Open the catalog to page 3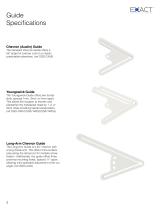
Guide Specifications Chevron (Austin) Guide The standard Chevron Guide offers a 55° angle for precise cuts on a classic, predictable osteotomy. (ref OGS-CA55) Youngswick Guide The Youngswick Guide offers two dorsal slots, spaced 1mm, 2mm, or 3mm apart. This allows the surgeon to shorten and plantarflex the metatarsal head by 1, 2, or 3mm while providing lateral transposition. (ref OGS-YWG1/OGS-YWG2/OGS-YWG3) Long-Arm Chevron Guide The Long-Arm Guide is a 45° chevron with a long dorsal arm. This offers more surface area along the dorsal cut for multiple screw fixation. Additionally, the guide...
Open the catalog to page 4
Guide Specifications Scarf Guide The Scarf Guide is a “Z” shaped guide to assist in the popular Scarf procedure. The system includes two guides, a large and a small, with each guide having multiple slots for the dorsal and plantar cuts. This allows for customization of the osteotomy based on the anatomy of the patient’s metatarsal. (ref OGS-SCZG) The 2-Stage Guide allows correction of PASA or DMAA, similar to the Reverdin-Gerbert procedure. The system includes a Stage-1 guide for a standard Chevron cut, along with three angled Stage-2 guides allowing 5°, 10°, or 15° of rotation along with lateral...
Open the catalog to page 5
Sterile kits EOS Guides are individually sterile packed and include (2) sterile saw blades and (2) .045” double trocar K-wires providing the surgeon with everything needed to perform the desired osteotomy. Depending on guide selection, you may receive more than one guide in your sterile packed instrument kit. It is important to only use the provided saw blades. The blades are universal and should fit most saw systems. Traditional saw blades have offset teeth, meaning the blade is thicker at the teeth than the rest of the blade. The provided blades have inline teeth, for a low-profile, uniform...
Open the catalog to page 6
Surgical Technique The following technique is performed with the Chevron Guide. The same basic principles apply to all of the EOS Guides. Step One: Resect a small wafer of medial eminence from the metatarsal head, thereby creating a flat medial surface. (Fig 1) Fig 1 Step Two: Drive one of the provided 0.045” doubletrocar K-wires into the metatarsal head at the desired apex point of the osteotomy, ensuring it passes through the lateral cortex. (Fig 2)
Open the catalog to page 7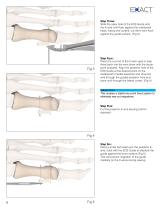
Step Three: Slide the apex hole of the EOS Guide onto the K-wire until flush against the metatarsal head. Using wire cutters, cut the K-wire flush against the guide surface. (Fig 3) Step Four: Place the cut end of the K-wire used in step three back into the wire driver with the trocar point exposed. Align the posterior hole of the EOS Guide at the desired point on the metatarsal’s medial bisection and drive the wire through the guides posterior hole and bone until through the lateral cortex. (Fig 4) Safety Point This creates a stable two-point fixed system to eliminate saw cut migrations. Step...
Open the catalog to page 8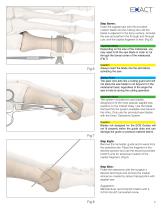
Step Seven: Insert the sagittal saw with the provided custom blade into the cutting slot until the blade is adjacent to the bony surface. Activate the saw and perform the through and through cuts until the capital fragment is free. (Fig 6) Important Note Depending on the size of the metatarsal, you may need to tilt the saw blade in order to cut through the dorsal cortex of the metatarsal. (Fig 7) Caution Always insert the blade into the slot before activating the saw. Safety Point The apex wire acts like a cutting guard and will not allow the saw blade to cut beyond it in the metatarsal head,...
Open the catalog to page 9
Youngswick Guide The Exact Osteotomy System also offers 1mm, 2mm, and 3mm dorsal wedge guides for performing the Youngswick-type modification (Y-type) in cases of long metatarsal, elevatus, or Hallux Limitus. The overall procedure is the same with the addition of a second dorsal-proximal cut to be performed prior to transposing the osteotomy. Be sure to make both dorsal cuts first and the plantar cut last. This will ensure all cuts are being made on a stable capital fragment with the guide securely attached to the metatarsal until the final cut is completed. The EOS saw blades create a 0.5mm...
Open the catalog to page 10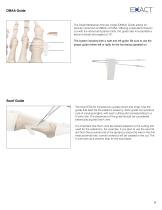
DMAA Guide The Distal Metatarsal Articular Angle (DMAA) Guide allows for precise correction of DMAA or PASA. Offering a standard Chevron cut with the dorsal and plantar slots, the guide also incorporates a second dorsal slot angled at 10°. The system includes both a right and left guide. Be sure to use the proper guide (either left or right) for the foot being operated on. Scarf Guide The Scarf EOS kit includes two guides (short and long). Use the guide that best fits the patient’s anatomy. Each guide can produce cuts of varying lengths, with each cutting slot corresponding to a K-wire hole....
Open the catalog to page 11
The 2-Stage Guide allows correction of PASA or DMAA, similar to the Reverdin-Gerbert procedure. The system includes a Stage-1 guide for a standard Chevron cut, along with three angled Stage-2 guides allowing 5°, 10°, or 15° of rotation along with lateral transposition. This procedure is different from the other EOS Guide procedures as it requires two guides. After performing stage 1, remove the guide and apex K-wire. Stage 1 Do NOT remove the two proximal K-wires. Choose the desired amount of correction; 5°, 10° or 15° and select the appropriate Stage-2 guide. Mount the chosen Stage-2 guide onto...
Open the catalog to page 12All WishBone Medical catalogs and technical brochures
 CLEFT PALATE CONVENIENCE KIT
2 Pages
 AlloMate SURGICAL TECHNIQUE
2 Pages
 PRODUCT CATALOG
22 Pages
 Smart Correction® System
2 Pages


- Bone plate
- Compression plate
- Metallic compression plate
- Locking compression plate
- Medical kit
- Titanium compression plate
- Distal compression plate
- Tablet computer software
- Tablet PC software
- Orthopedic surgery instrument kit
- Compression bone screw
- Metallic compression bone screw
- Emergency kit
- Proximal compression plate
- Planning software
- Cloud-based software
- Arthrodesis nail
- Forearm compression plate
- Medial compression plate
- Metal burr