- Catalogs
- Wright Medical Technology
- PRO?TOE? VO Surgical Technique ? FA196?410
PRO?TOE? VO Surgical Technique ? FA196?410

PRO?TOE? VO Surgical Technique ? FA196?410
The PRO-TOE® VO Hammertoe Fixation System is a surgical implant designed for correcting hammertoe deformities. It features a versatile "V"-shaped blade-screw implant available in five sizes, emphasizing simplicity, efficiency, and patient satisfaction with one-piece stainless steel implants and single-use sterile instruments.
The implant provides intramedullary stability and fixation for lesser proximal interphalangeal joints in hammertoe corrective procedures. It does not address soft tissue imbalances or other deformities, which may require additional procedures.
The system is indicated for osteotomy fixation and reconstruction of lesser toes following hammertoe, claw toe, and mallet toe correction procedures.
The system includes ten implant options in five sizes and two angle configurations (0° and 10°), catering to various anatomical needs and bone quality.
The PRO-TOE® VO system offers single-use sterile-packed and reusable instrument kits, with the single-use kit containing all necessary components for implantation.
- Incision: An elliptical or longitudinal incision is made over the PIP joint.
- Joint Preparation: The proximal phalanx joint surface is resected, and the middle phalanx is prepared using cannulated Planars.
- Implant Sizing: Implant size is selected based on the proximal phalanx size, desired plantar correction, and bone quality.
- Pre-Drilling: K-wire is used to pre-drill the proximal and middle phalanx.
- Broaching: Broaches prepare the middle phalanx for implant blade insertion.
- Loading the Driver: Implants are preloaded onto a Driver Tip for easy loading onto the Driver Shaft.
- Screw Insertion: The screw is positioned over the pre-drilled hole and advanced under fluoroscopic guidance.
The technique involves implanting a blade into the middle phalanx, leaving 1-2 screw threads slightly proud to optimize fixation. Proper alignment is achieved when the degree markings on the Driver Tip face dorsally.
The implant blade is inserted into the broached canal of the middle phalanx while manually distracting the distal phalanx. Longitudinal pressure is applied to engage the blade’s barbs for optimal fixation.
Fluoroscopic assessment is recommended to verify angular correction and implant positioning.
Contact Wright Medical Technology, Inc. for product availability and ordering details, including part numbers and specifications.
Contact details for Wright Medical Technology, Inc. in the USA and EMEA are provided for further inquiries.
Catalog excerpts

Hammertoe Fixation System SURGICAL TECHNIQUE
Open the catalog to page 1
Device Description Implant Options and Sizing Instrumentation Kits Surgical Technique Joint Preparation: Proximal Phalanx Joint Preparation: Middle Phalanx Implant Sizing Pre-Drilling: Proximal Phalanx Pre-Drilling: Middle Phalanx Broaching: Middle Phalanx Loading the Driver Screw Insertion: Proximal Phalanx Blade Insertion: Middle Phalanx Fluoroscopic Verification Ordering Information Proper surgical procedures and techniques are the responsibility of the medical professional. The following guidelines are furnished for information purposes only. Each surgeon must evaluate the appropriateness...
Open the catalog to page 3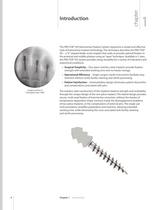
Introduction Chapter Contents Title The PRO-TOE® VO Hammertoe Fixation System represents a simple and effective style of hammertoe implant technology. This technique describes the PRO-TOE® VO – a “V”-shaped blade-screw implant that seeks to provide optimal fixation in the proximal and middle phalanx using an “open” technique. Available in 5 sizes, the PRO-TOE® VO system provides sizing versatility for a variety of indications and anatomical conditions. »» Surgical Simplicity – One-piece stainless steel implants provide fixation strength with extended working time and no freezer storage. »» Operational...
Open the catalog to page 4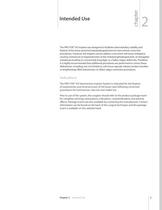
Intended Use Chapter Title The PRO-TOE® VO implant was designed to facilitate intermedullary stability and fixation of the lesser proximal interphalangeal joints for hammertoe corrective procedures. However, the implant cannot address concurrent soft tissue imbalance causing contracture or hyperextension at the metatarsophalangeal joint, an elongated metatarsal resulting in a excessively long digit, or a hallux valgus deformity. Therefore, it is highly recommended that additional procedures are performed to correct these deficiencies, including, but not limited to, soft tissue capsular release,...
Open the catalog to page 5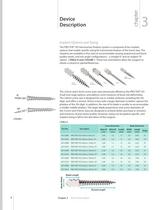
Device Description Implant Options and Sizing The PRO-TOE® VO Hammertoe Fixation System is composed of ten implant options that enable specific sizing for hammertoe fixation of the lesser toes. The implants are available in five sizes to accommodate varying anatomical and bone quality needs, and two angle configurations – a straight 0o and an angled 10o option. | TABLE A and | FIGURE 1 These two orientations allow the surgeon to obtain a neutral or plantarflexed toe. The 2.0mm and 2.4mm screw sizes were previously offered as the PRO-TOE® VO Small and Large options, and address most instances...
Open the catalog to page 6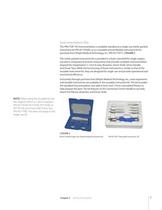
Instrumentation Kits The PRO-TOE® VO instrumentation is available standard as a single-use sterile-packed instrument kit (PN 45710500), or as a reusable and sterilizable instrument kit for purchase from Wright Medical Technology, Inc. (PN 4571KIT1). | FIGURE 2 The sterile-packed instrument kit is provided in a foam clamshell for single surgery use and is composed of several components that provide complete instrumentation required for implantation (1.1mm K-wire, Broaches, Driver Shaft, Driver Handle, and Driver Tips). While the functioning of these instruments is similar to that of the reusable...
Open the catalog to page 7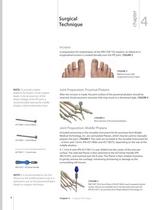
Surgical Technique Incision In preparation for implantation of the PRO-TOE® VO implant, an elliptical or longitudinal incision is created dorsally over the PIP joint. | FIGURE 3 | FIGURE 3 Elliptical incision (left) Longitudinal incision (right) NOTE: To provide a better platform for fixation of the implant blade, minimal resection of the distal cartilage of the PIP joint is recommended, leaving the middle phalanx subchondral plate intact. Joint Preparation: Proximal Phalanx After the incision is made, the joint surface of the proximal phalanx should be resected. Avoid excessive resection that...
Open the catalog to page 8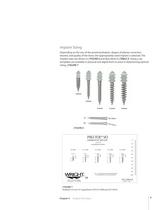
Implant Sizing Depending on the size of the proximal phalanx, degree of plantar correction desired, and quality of the bone, the appropriately sized implant is selected. The implant sizes are shown in | FIGURE 6 and described in | TABLE A. Sizing x-ray templates are available in physical and digital form to assist in determining optimal HAMMERTOE IMPLANT Chapter 4 Surgical Technique
Open the catalog to page 9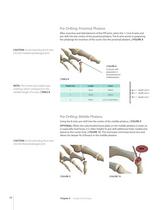
Pre-Drilling: Proximal Phalanx After resection and debridement of the PIP joint, select the 1.1mm K-wire and pre-drill into the center of the proximal phalanx. The K-wire assists in preparing the phalange for insertion of the screw into the proximal phalanx. | FIGURE 8 CAUTION: Avoid extending the K-wire into the metatarsophalangeal joint. | FIGURE 8 K-wire pre-drill preparation in the proximal and middle phalanx. NOTE: The K-wires have depth laser markings which correspond to the variable length of screws. | TABLE B Depth Line Depth Line 3 Depth Line 2 Depth Line 1 Pre-Drilling: Middle Phalanx...
Open the catalog to page 10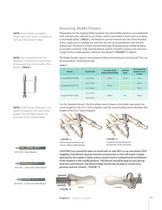
Broaching: Middle Phalanx NOTE: Broach blades are slightly longer and more narrow compared to corresponding implant blade. Preparation for the implant blade insertion into the middle phalanx is accomplished with a Broach (also referred to as a Rasp), which is provided in three sizes according to the blade width. | TABLE C The Broaches can be inserted into the Driver Handles of the single-use or reusable kit, and then the tip can be positioned over the predrilled hole. The Broach is then inserted while gently grasping the middle phalanx to provide resistance. Fully seat the Broach until its shoulder...
Open the catalog to page 11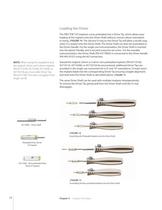
Loading the Driver The PRO-TOE® VO implants come preloaded into a Driver Tip, which allows easy loading of the implant onto the Driver Shaft without concern about orientation or sizing. | FIGURE 14 The silicone O-ring on the Driver Tip will allow a tactile snap when it is seated onto the Driver Shaft. The Driver Shaft can then be assembled to the Driver Handle. For the single-use instrumentation, the Driver Shaft is inserted into the plastic Handle, and is secured using the set screw. For the reusable instrumentation, the Driver Shaft (PN 45719002) is connected to the Driver Handle (PN 49510107)...
Open the catalog to page 12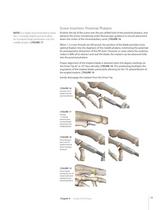
Screw Insertion: Proximal Phalanx NOTE: It is highly recommended to leave the 1-2 threads slightly proud to allow for increased blade penetration into the middle phalanx. | FIGURE 17 Position the tip of the screw over the pre-drilled hole of the proximal phalanx, and advance the screw, monitoring under fluoroscopic guidance to ensure placement down the center of the intramedullary canal. | FIGURE 16 When 1-2 screw threads are left proud, the position of the blade provides more optimal fixation into the diaphysis of the middle phalanx, minimizing the potential for postoperative distraction of...
Open the catalog to page 13All Wright Medical Technology catalogs and technical brochures
 Focused on Biologics
2 Pages
 Wright Code of Business Conduct
36 Pages
 FORCE FIBER
4 Pages
 BIOFOAM®
1 Page
 TENSIX
2 Pages
 ALLOPURE
6 Pages
 MEDIALMAX
2 Pages
 DARCO™
1 Page
 INVISION™
2 Pages
 PROPHECY
6 Pages
 css
css4 Pages
 CL AW ® II
20 Pages
 Hemi Phalangeal Implant
2 Pages
 EVOLVE PROLINE
2 Pages
 ALLOMATRIX C Brochure
2 Pages
 Darco MFS ? SO117?407
8 Pages
 Darco MRS ? SO118?407
8 Pages


- Bone plate
- Compression plate
- Metallic compression plate
- Locking compression plate
- Endoscope
- Distal compression plate
- Compression bone screw
- Metallic compression bone screw
- Proximal compression plate
- Bone substitute
- Arthrodesis nail
- Suture thread
- Forearm compression plate
- Lateral compression plate
- Tibia compression plate
- External fixation system
- Cannulated compression bone screw
- Radius compression plate
- Adult external fixation system
- Proximal fixation intramedullary nail