- Catalogs
- Zest Dental Solutions
- LOCATOR®
LOCATOR®
1 /36Pages

LOCATOR®
1 /36Pages
Catalog excerpts

LOCATOR® OVERDENTURE IMPLANT SYSTEM LOCATOR® OVERDENTURE IMPLANT SYSTEM TECHNIQUE MANUAL
Open the catalog to page 1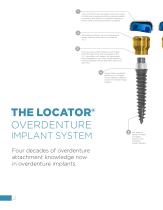
The LOCATOR Insert self-aligns and pivots inside the Denture Housing providing a genuine resilient connection that holds-up to patient mastication forces while providing attachment durability. Affordably bundled in all-in-one packaging makes ordering and inventory as easy as 1-2-3. This two piece system features a removable LOCATOR abutment that is available in 2.5, 3, 4, 5 and 6mm cuff heights for attachment interchangeability, soft tissue height flexibility and serviceability should abutment wear occur over time. Single 2.9mm prosthetic platform for all implant sizes enabling a platform switch...
Open the catalog to page 2
Custom tip design based on implant diameter for ease of placement. Progressive thread design that widens at the coronal portion providing primary stability when immediate loading may be indicated. Reduced neck diameter is designed to reduce stress on the crestal bone. The LOCATOR Overdenture Implant System is comprised of 2.4, 2.9, 3.5, 3.9, 4.4 and 4.9mm diameter dental implants (available in 8, 10, 12 and 14mm lengths) with a detachable LOCATOR Abutment that is available in a 2.5, 3, 4, 5, or 6mm cuff height. LOCATOR Implants are used to restore masticatory function for the patient and may...
Open the catalog to page 3
IMPORTANT: THIS DOCUMENT CONTAINS THE MOST CURRENT TECHNICAL GUIDELINES. PLEASE READ AND RETAIN.
Open the catalog to page 4
Connection Engagement Connection Engagement NOTE Single 2.9mm prosthetic platform fits all implants. Zest recommends 7mm between implants. 6
Open the catalog to page 6
Connection Engagement Connection Engagement NOTE Deduct 0.25mm for actual full implant length (A). Single 2.9mm prosthetic platform fits all implants. 7
Open the catalog to page 7
ALL-INCLUSIVE PACKAGE 1 Implant 1 LOCATOR® Abutment 1 Processing Pack Each Processing Pack has what you need to select retention levels and address draw correction; improving ease of denture placement and removal
Open the catalog to page 8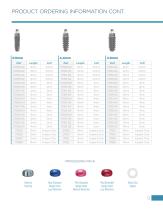
Block-Out Spacer Denture Housing Blue Standard Pink Standard Red Extended Range Insert Range Insert Range Insert Low Retention Medium Retention Low Retention
Open the catalog to page 9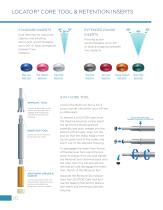
LOCATOR® CORE TOOL & RETENTION INSERTS STANDARD INSERTS EXTENDED RANGE INSERTS Dual retention to maximize stability and pivoting action that accommodates up to 20° of total divergence between two implants. Pink Medium Retention Pivoting action accommodates up to 40° of total divergence between two implants. Clear High Retention Gray Zero Retention Orange Medium Retention Green High Retention 3-IN-1 CORE TOOL REMOVAL TOOL Use the sharp edge on the end of the removal tool to engage and remove the insert from the Denture Housing. INSERTION TOOL Use the tip of the insertion tool to seat the insert....
Open the catalog to page 10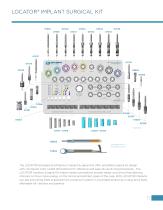
LOCATOR® IMPLANTS 07374 STANDARD KIT .. . sk, Q-Q-Q—Q The LOCATOR Standard and Premium Implant Surgical Kits offer simplified surgical kit design with convienent color coded drill protocol for reference and ease-of-use during procedures. The LOCATOR Implants Surgical Kit makes implant procedures simpler, easier, and worry-free allowing clinicians to focus more energy on the clinical and esthetic goals of the case. With LOCATOR Implants you get everything thats expected from a premium system in a bundled solution at a value price thats affordable for clincians and patients.
Open the catalog to page 11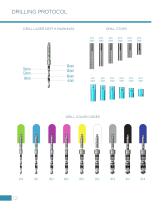
DRILLING PROTOCOL DRILL LASER DEPTH MARKINGS DRILL STOPS 4mm Depth DRILL COLOR CODES
Open the catalog to page 12
IMPLANT DIAMETER Full Circle Drill to full implant length. Half Circle Drill 4mm short of implant length. Implant Insertion - A LOCATOR Overdenture Implant can be placed with a torque indicating ratchet or a surgical hand piece. The speed of insertion should not exceed 50rpm. Implant insertion torque should not exceed 70Ncm. Follow the D2/D3/D4 drilling sequence prior to following the D1 drilling sequence. This offers the flexibility to adapt the drilling protocol to the patient's bone quality. For D1 bone density, an optional cortical drill may be used as the final drilling sequence step for...
Open the catalog to page 13
PRE-OPERATIVE TREATMENT PLANNING Evaluate available bone width at desired implant positions by using the index finger/thumb technique or a ridge mapping instrument (which can be purchased through most dental instrument companies). Measure gingiva height at each planned implant location using a periodontal probe to determine the proper LOCATOR® Abutment cuff height. A panoramic radiograph or CBCT with radiographic markers may be used to evaluate the bone topography and determine the appropriate implant positions.
Open the catalog to page 14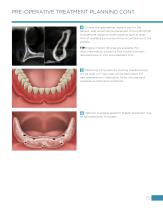
PRE-OPERATIVE TREATMENT PLANNING CONT. Choose the appropriate implant size for the patient. Zest recommends placement of the LOCATOR® Overdenture Implants where patients have at least 1mm of available bone around the circumference of the implant. TIP: Digital implant libraries are available. For more information, contact a Zest Dental Solutions representative or visit www.zestdent.com. Determine if the patient’s existing overdenture(s) will be used or if new ones will be fabricated. If a new overdenture is fabricated, follow the standard overdenture fabrication protocols. Optional: A surgical...
Open the catalog to page 15
MANDIBULAR IMPLANT PLACEMENT After patient selection and evaluation protocols have been completed, determine the number of implants required and discuss all treatment options with the patient. Zest Dental Solutions® recommends a minimum of four implants to be placed in the mandible (option of two implants when all standard ridge implants are placed) and up to six in the maxilla for optimal retention. It is recommended to follow the D2/D3/D4 drilling sequence prior to following the D1 drilling sequence. This offers the flexibility to adapt the drilling protocol to the patients bone quality. For...
Open the catalog to page 16
MANDIBULAR IMPLANT PLACEMENT CONT. Place the large diameter end of the Direction Indicator (07365) into the Starter Drill osteotomies to verify the proper alignment. Attach the proper lenght Drill Stop onto the Starter Drill according to the desire drilling depth. The recommended drilling speed is 8001200rpm. Continue osteotomy preparation to the desire depth at each implant site. Alternatively, drill to the proper laser depth marking on the drill calculated by adding the implant length plus the gingival tissue height. If divergence is shown to be undesirable based on the Direction Indicator,...
Open the catalog to page 17All Zest Dental Solutions catalogs and technical brochures
 CHAIRSIDE Product Portofolio
8 Pages
 LOCATOR F-Tx
6 Pages
 LOCATOR R-Tx
8 Pages
 FIXED-HYBRID EMERGENCY!
6 Pages
 za-narrow-diameter-L9700
6 Pages


- Dental material
- Dental restoration material
- Implant abutment
- Titanium implant abutment
- Straight implant abutment
- Titanium dental implant
- Internal implant abutment
- Angled implant abutment
- Screw implant abutment
- Impression tray dental material
- Silicone dental material
- External implant abutment
- Multi-unit implant abutment
- Narrow dental implant
- Dental impression tray
- Partial denture dental impression tray
- Acrylic dental material
- Dental laboratory dust suction unit
- Implant system material