
- Catalogs
- Zimmer Biomet
- Distal Femoral Replacement


Distal Femoral Replacement
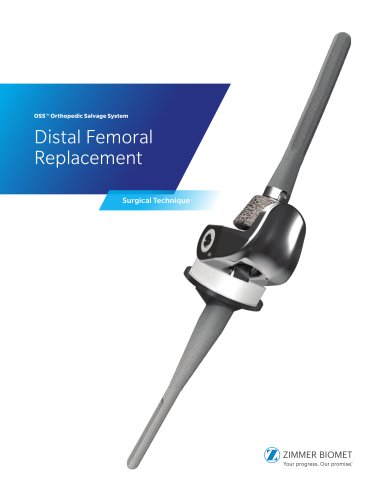
Distal Femoral Replacement
The OSS Orthopedic Salvage System is designed for patients with painful and disabled joints due to conditions like avascular necrosis, osteoarthritis, rheumatoid arthritis, traumatic arthritis, and more. It is also applicable for correcting deformities, revising unsuccessful surgeries, addressing ligament deficiencies, tumor resections, and trauma. The system is typically used with bone cement, except when specific conditions allow for the use of OsseoTi® titanium alloy.
Absolute contraindications include infection, sepsis, and osteomyelitis. Relative contraindications involve uncooperative patients, osteoporosis, metabolic disorders, osteomalacia, distant infections, rapid joint destruction, and vascular insufficiency.
This section outlines the steps for preparing the femur for implant insertion, including reaming the femoral canal, selecting appropriate stem trials, and making distal resections. It emphasizes the use of specific instruments to ensure correct alignment and depth for the implant.
Similar to primary preparation, this section details the steps for revising a femoral implant, including reaming and selecting flare reamers. It accounts for previous implant removal and requires precise adjustments for correct implant fit.
The document lists various instruments and components used in the surgical procedure, such as flexible reamers, stem trials, distal femoral resection towers, and cut blocks, each specified for its role in accurate preparation and implantation.
The procedure involves removing the distal femoral resection block and reinserting the stem trial/stem trial adapter. The A/P cut block is aligned with the anterior mark for precise cutting, using specified trays and tools.
The anterior and posterior portions of the distal femur are resected using standard or reduced size cut slots. The A/P resection block is secured with drills or threaded pins, with additional steps outlined if a femoral augment is required.
For a 3 cm resection without augment, a tapered boss reamer is used. The document details the use of OsseoTi Distal Femoral Augments, including evaluating bone void size and using femoral augment trials.
This section covers the procedure for tibial replacement of 20 mm or less, including reaming, proximal tibial resection, and the use of various guides and styluses for precise preparation.
The tibial resection guide is used to achieve the desired resection depth, with options for additional resection if needed. The guide is secured with drills or pins, and the cutting guide is removed after resection.
Four tibial options are outlined: short non-modular, modular without a stem, long non-modular, and modular with a stem. Detailed steps for canal preparation and the use of tibial sleds and centralizers are provided.
This section describes aligning and connecting the stem trial to the femoral component trial, including steps for trial reduction and the use of femoral and tibial impactors.
Insert the anterior flange augment trial if required, using specified augment trial components.
Attach the augment trial using a 3.5 mm driver and place the assembly into the prepared tibia.
Insert the 12 mm tibial bearing trial into the tibial baseplate and reduce the assembly into the trial femoral component.
If the distal femoral trial is difficult to remove, use the trial axle and a slide hammer for extraction.
Step 1: Augment Assembly Assemble the impactor onto the impaction base and impact the femoral component with the augment. Step 2: Stem Assembly Impact the femoral component with a stem and secure with a locking screw.
Use trial bearings to confirm tibial bearing thickness. Insert polyethylene bushings and assemble the components, ensuring proper alignment and engagement of lock pins.
This document is intended for healthcare professionals and includes important information about product use and legal disclaimers.
Catalog excerpts
OSS ™ Orthopedic Salvage System Distal Femoral Replacement Surgical Technique
Open the catalog to page 1
This brochure is presented to demonstrate the surgical technique utilized by John A. Abraham, MD; Prof. Lee M. Jeys; Jeffrey R. Kneisl, MD; Edward J. McPherson, MD, FACS; Michael D. Miller, MD; Robert J. Tait, MD.
Open the catalog to page 3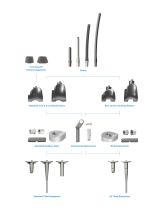
3 cm OsseoTi Femoral Augments Standard 3 cm & 5 cm Distal Femurs Standard Auxiliary Parts Standard Tibial Baseplates Universal Auxiliary Parts
Open the catalog to page 4
3 | OSS Orthopedic Salvage System Distal Femoral Replacement
Open the catalog to page 5
4 | OSS Orthopedic Salvage System Distal Femoral Replacement Indications and Contraindications Effective as of January 1,2016 1. Painful and disabled joint resulting from avascular necrosis, osteoarthritis, rheumatoid arthritis, or traumatic arthritis. 2. Correction of varus, valgus, or posttraumatic deformity. 3. Correction of revision of unsuccessful osteotomy, arthrodesis or previous joint replacement. 6. Treatment of non-unions, femoral neck fracture, and trochanteric fractures of the proximal femur with head involvement, unmanageable using other techniques.1 7. Revision of previously failed...
Open the catalog to page 6
5 | OSS Orthopedic Salvage System Distal Femoral Replacement Absolute contraindications include: infection, sepsis, and osteomyelitis. Relative contraindications include: 1) uncooperative patient or patient with neurologic disorders who are incapable of following directions, 2) osteoporosis, 3) metabolic disorders which may impair bone formation, 4) osteomalacia, 5) distant foci of infections which may spread to the implant site, 6) rapid joint destruction, marked bone loss or bone resorption apparent on roentgenogram, 7) vascular insufficiency, muscular atrophy, or neuromuscular disease.
Open the catalog to page 7
7 | OSS Orthopedic Salvage System Distal Femoral Replacement Primary Femoral Preparation
Open the catalog to page 9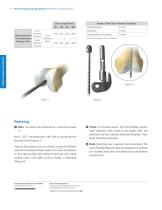
8 | OSS Orthopedic Salvage System Distal Femoral Replacement Reamer/Trial/Stem Diameter Example* *16 mm stem trials are 16 mm in diameter PRIMARY FEMORAL PREPARATION Reaming © Note: If revising the distal femur, continue to page 17. Use a .375" intramedullary (IM) drill to penetrate the femoral canal (Figure 1). Start at full power prior to contact using the flexible reamers and progressively ream in 0.5 mm increments to the appropriate laser-etched markings (see Stem Length chart) until light cortical chatter is obtained (Figure 2). © *Note: For bowed stems, the final flexible reamer shaft diameter...
Open the catalog to page 10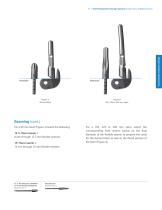
9 | OSS Orthopedic Salvage System Distal Femoral Replacement PRIMARY FEMORAL PREPARATION Reaming (cont.) For a 90 mm stem (Figure 3) select the following: 12.5- flare reamer = 8 mm through 12.5 mm flexible reamers 13+ flare reamer = 13 mm through 24 mm flexible reamers 12.5- Flare Reamer CP460477 13+ Flare Reamer CP460476 Reamers Tray 3 Flare Reamer Reamers Tray 3 For a 150, 225 or 300 mm stem, select the corresponding flare reamer based on the final diameter of the flexible reamer to prepare the canal for the femoral boss as well as the flared portion of the stem (Figure 4).
Open the catalog to page 11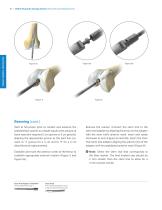
PRIMARY FEMORAL PREPARATION 10 | OSS Orthopedic Salvage System Distal Femoral Replacement Reaming (cont.) Start at full power prior to contact and advance the selected flare reamer to a depth equal to the amount of bone resection required (3 cm groove or 5 cm groove), aligning the appropriate groove to the joint line (i.e. ream to ‘3’ groove for a 3 cm and to ‘5’ for a 5 cm distal femoral replacements). Remove the reamer. Connect the stem trial to the stem trial adapter by aligning the arrow on the adapter with the stem trial’s anterior mark. Insert and rotate clockwise to lock (Figure 6a and...
Open the catalog to page 12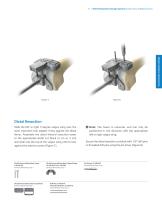
11 | OSS Orthopedic Salvage System Distal Femoral Replacement PRIMARY FEMORAL PREPARATION Distal Resection Slide the left or right 5 degree valgus wing over the stem trial/stem trial adapter firmly against the distal femur. Assemble the distal femoral resection tower to the appropriate distal cut block (3 cm or 5 cm) and slide into the top of the valgus wing until it rests against the anterior cortex (Figure 7). Distal Femoral Resection Tower 110018759 Femoral Bone Prep Tray 1 Distal Femoral Resection Cut Blocks Femoral Bone Prep Tray 1 Distal Femoral Resection Valgus Wings 32-487025 & 32-487005...
Open the catalog to page 13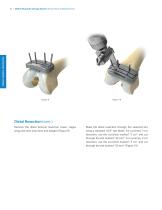
PRIMARY FEMORAL PREPARATION 12 | OSS Orthopedic Salvage System Distal Femoral Replacement Distal Resection (cont.) Remove the distal femoral resection tower, valgus wing and stem trial/stem trial adapter (Figure 9). Make the distal resection through the selected slot using a standard .054” saw blade. For a primary 3 cm resection, use the cut block marked “3 cm” and cut through the slot marked “30 mm”. For a primary 5 cm resection, use the cut block marked “5 cm” and cut through the slot marked “50 mm
Open the catalog to page 14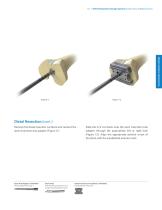
13 | OSS Orthopedic Salvage System Distal Femoral Replacement PRIMARY FEMORAL PREPARATION Distal Resection (cont.) Remove the distal resection cut block and reinsert the stem trial/stem trial adapter (Figure 11). Stem Trial Adapter 110030070 Femoral Bone Prep Tray 1 Stem Trials Short Provisional Stems Tray 7 Long Provisional Stems Tray 8 Slide the A/P cut block onto the stem trial/stem trial adapter through the appropriate left or right hole (Figure 12). Align the appropriate anterior arrow of the block with the established anterior mark. Distal Femoral A/P Cut Block 110018762 Femoral Bone Prep...
Open the catalog to page 15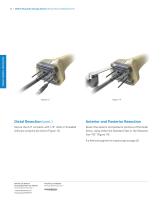
PRIMARY FEMORAL PREPARATION 14 | OSS Orthopedic Salvage System Distal Femoral Replacement Distal Resection (cont.) Anterior and Posterior Resection Secure the A/P cut block with 1/8” drills or threaded drill pins using the pin driver (Figure 13). Resect the anterior and posterior portions of the distal femur, using either the Standard Size or the Reduced Size “RS” (Figure 14). If a femoral augment is required go to page 26. Drill Pin 32-467619 Threaded Drill Pin 32-700379 Femoral Bone Prep Tray 1 Pin Driver 32-486261 Femoral Bone Prep Tra
Open the catalog to page 16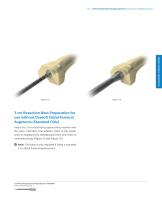
15 | OSS Orthopedic Salvage System Distal Femoral Replacement PRIMARY FEMORAL PREPARATION 3 cm Resection Boss Preparation for use without OsseoTi Distal Femoral Augments (Standard Only) Insert the 3 cm resurfacing tapered boss reamer over the stem trial/stem trial adapter. Start at full power prior to engaging the metaphyseal bone and ream to mechanical stop (Figure 15 and Figure 16). Note: This step is only required if using a standard 3 cm distal femoral replacement. 3 cm Resurfacing Tapered Boss Reamer 110018807 Femoral Bone Prep Tray 1
Open the catalog to page 17All Zimmer Biomet catalogs and technical brochures
 Oxford® Partial Kne
60 Pages
 ROSA ONE® Brain System
7 Pages
Archived catalogs
 MODULAR FEMORAL Revision System
14 Pages
 A.L.P.S.®
44 Pages
 Constrained Posterior Stabilized
12 Pages
 Persona PERSONALIZED KNEE
7 Pages
 Avenir® Femoral Hip System
12 Pages
 The CLS® Spotorno® Stem
16 Pages
 Alloclassic®Zweymüller®Stem
12 Pages
 ®Zimmer® Segmental System
6 Pages
 Zimmer Natural Nail System
8 Pages
 modern-cementing-technique
16 Pages
 CoAxial Spray Kit
8 Pages
 Biologics
24 Pages
 PowerPump DP System
2 Pages
 Sidus
Sidus40 Pages
 Ankle Fix System 4.0
8 Pages
 Anatomical Shoulder System
6 Pages
 NexGen® RH Knee
8 Pages
 tourniquet-systems-brochure
8 Pages
 Persona-Partial
12 Pages
 Fitmore Hip Stems
6 Pages
 NexGen High-Flex Implant
8 Pages
 Trabecular Metal ™Glenoid
4 Pages
 Anatomical Shoulder ™ System
6 Pages
 Zimmer ® PSI Shoulder
6 Pages
 Zimmer personna
12 Pages
 ZImmer iASSIST
44 Pages
 Fitmore ® Hip Stem
24 Pages
 Persona Knee
6 Pages
 Trauma Solutions
10 Pages
 Colagen Repair Patch
2 Pages
 Fitmore® Hip Stem
6 Pages
 Zimmer® Segmental System
6 Pages



- Detection kit
- ZIMMER BIOMET bone plate
- ZIMMER BIOMET compression plate
- ZIMMER BIOMET metallic compression plate
- Immunoassay detection kit
- ZIMMER BIOMET locking compression plate
- Infectious disease detection kit
- Titanium compression plate
- Surgical system
- Distal compression plate
- Cutting electrosurgical system
- Tablet computer software
- Cassette detection kit
- Chromatographic immunoassay test kit
- Coagulation surgical system
- Agitator
- ELISA detection kit
- Proximal compression plate
- Benchtop agitator
- Planning software