
- Catalogs
- Zimmer Biomet
- Phoenix Suprapatellar Approach Surgical Technique Addendum


Phoenix Suprapatellar Approach Surgical Technique Addendum

Phoenix Suprapatellar Approach Surgical Technique Addendum
This document serves as an addendum to the Phoenix Tibia Surgical Technique, providing detailed instructions for the suprapatellar approach. Biomet emphasizes personalized care, aiming to provide solutions tailored to individual patients through innovative surgical techniques and materials.
Use the Extended Working Channel Soft Tissue Sleeve and the 11.5 mm One-Step Reamer over the Guide Wire to enlarge the entry site. Alternatively, a Curved Cannulated Awl with a Modular T-Handle can be used. Protect the T-Handle with an Impactor Cap during insertion.
Attach the Suprapatellar Driver Handle to the tibial nail, ensuring proper alignment. Use the Connecting Bolt and a 5 mm Connecting Bolt Inserter to secure the assembly. For accurate proximal targeting, attach the Tibial Nail Targeting Arm and use the Soft Tissue Guide and Drill Sleeve.
Insert the tibial nail manually over the Bead Tip Guide Wire, ensuring fracture reduction and alignment. Use an image intensifier for monitoring. If needed, use a Slotted Mallet with a Cannulated Slap Hammer Adapter to seat the nail.
Assemble the Tibial Nail Targeting Arm to the Driver Handle and secure it with the Thumb Screw.
Static Screws: Use the Trocar and Drill Sleeve through the Static hole of the Targeting Arm to determine the entry point. Insert the 4.3 mm Calibrated Drill Bit to perforate the cortex and measure screw length. Insert the appropriate 5 mm screw and ensure radiographic visualization.
Oblique Screws: Follow a similar procedure for oblique screws, ensuring not to exceed 2 mm in the far cortex.
Compression (Optional): For compression, use the Dynamic hole and the preassembled setscrew/locking mechanism. Monitor screw position and fracture compression radiographically.
A comprehensive list of instruments and their catalog numbers is provided for ordering purposes.
Biomet does not practice medicine and the responsibility for surgical techniques lies with the surgeon. The document is protected by intellectual property rights and is intended for physicians and Biomet sales force only.
Catalog excerpts
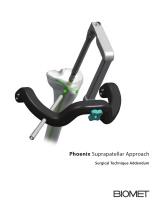
Phoenix Suprapatellar Approach Surgical Technique Addendum
Open the catalog to page 1
Over 1 million times per year, Biomet helps one surgeon provide personalized care to one patient. The science and art of medical care is to provide the right solution for each individual patient. This requires clinical mastery, a human connection between the surgeon and the patient, and the right tools for each situation. At Biomet, we strive to view our work through the eyes of one surgeon and one patient. We treat every solution we provide as if it’s meant for a family member. Our approach to innovation creates real solutions that assist each surgeon in the delivery of durable personalized...
Open the catalog to page 2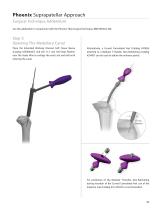
Phoenix Suprapatellar Approach Surgical Technique Addendum Use this addendum in conjunction with the Phoenix Tibia Surgical Technique, BMET0350.0-GBL Step 5. Opening The Medullary Canal Place the Extended Working Channel Soft Tissue Sleeve (Catalog #SSI000237) and the 11.5 mm One-Step Reamer over the Guide Wire to enlarge the entry site and drill until entering the canal. Alternatively, a Curved Cannulated Awl (Catalog #41026) attached to a Modular T-Handle, Non-Ratcheting (Catalog #29407) can be used to obtain the entrance portal. For protection of the Modular T-Handle, Non-Ratcheting during...
Open the catalog to page 3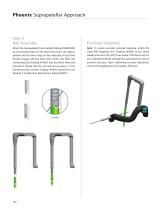
Phoenix Suprapatellar Approach Step 9. Nail Assembly Proximal Targeting Attach the Suprapatellar Driver Handle (Catalog #SSI000229) to the proximal aspect of the tibial nail, ensure the slope is anterior and the three tangs on the underside of the Driver Handle engage with the three slots of the nail. Place the Connecting Bolt (Catalog #41002) into the Driver Nose and proceed to thread into the nail and secure using a 5 mm Connecting Bolt Inserter (Catalog #41003) attached to the Modular T-Handle, Non-Ratcheting (Catalog #29407). Note: To ensure accurate proximal targeting, attach the Tibial...
Open the catalog to page 4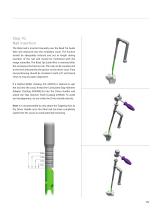
Step 10. Nail Insertion The tibial nail is inserted manually over the Bead Tip Guide Wire and advanced into the medullary canal. The fracture should be adequately reduced and out to length during insertion of the nail and should be monitored with the image intensifier. The Bead Tip Guide Wire is removed after the nail passes the fracture site. The nail can be countersunk to the level indicated by the groove on the driver nose. Final nail positioning should be checked in both A/P and lateral views to ensure proper alignment. If a Slotted Mallet (Catalog #14-442053) is desired to seat the nail...
Open the catalog to page 5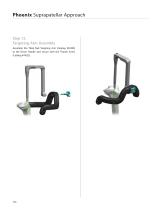
Step 12. Targeting Arm Assembly Assemble the Tibial Nail Targeting Arm (Catalog #41000) to the Driver Handle and secure with the Thumb Screw (Catalog #41023).
Open the catalog to page 6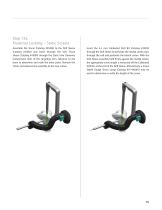
Step 13a. Proximal Locking – Static Screws Assemble the Trocar (Catalog #41006) to the Drill Sleeve (Catalog #41005) and insert through the Soft Tissue Sleeve (Catalog #41004) through the Static hole (Dynamic Compression Slot) of the Targeting Arm. Advance to the bone to determine and mark the entry point. Remove the Trocar and advance the assembly to the near cortex. Insert the 4.3 mm Calibrated Drill Bit (Catalog #41010) through the Drill Sleeve to perforate the medial cortex, pass through the nail and perforate the lateral cortex. With the Drill Sleeve assembly held firmly against the medial...
Open the catalog to page 7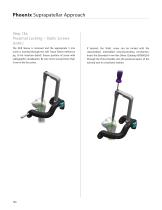
Phoenix Suprapatellar Approach Step 13a. Proximal Locking – Static Screws (cont.) The Drill Sleeve is removed and the appropriate 5 mm screw is inserted through the Soft Tissue Sleeve (reference pg. 16 for insertion detail). Ensure position of screw with radiographic visualization. Be sure not to exceed more than 2 mm in the far cortex. If desired, the Static screw can be locked with the reassembled, embedded setscrew/locking mechanism. Insert the Extended 4 mm Hex Driver (Catalog #SSI000234) through the Driver Handle, into the proximal aspect of the nail and turn in a clockwise motion.
Open the catalog to page 8
Step 13a. Proximal Locking – Static Screws (cont.) An additional screw can be inserted in a similar fashion through the Static hole of the Targeting Arm (reference page 21 of Phoenix Tibia Surgical Technique, BMET0350.0). To remove the targeting assembly, insert the 5 mm Connecting Bolt Inserter through the Driver Handle to engage the connecting bolt and turn counterclockwise to release attachment from the nail. Static Hole Slot
Open the catalog to page 9
Phoenix Suprapatellar Approach Step 13b. Proximal Locking – Oblique Screws Assemble the Trocar (Catalog #41006) to the Drill Sleeve (Catalog #41005) and insert through the Soft Tissue Sleeve (Catalog #41004) through either the Distal Oblique or the Proximal Oblique hole of the Targeting Arm. Advance to the bone to determine and mark the entry point. Remove the Trocar and advance the assembly to the near cortex. The Drill Sleeve is removed and the appropriate 5 mm screw is inserted through the Soft Tissue Sleeve (reference page 21 of Phoenix Tibia Surgical Technique, BMET0350.0 for insertion details)....
Open the catalog to page 10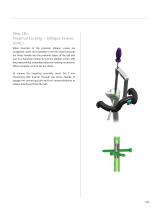
Step 13b. Proximal Locking - Oblique Screws (cont.) When insertion of the proximal oblique screws are completed, insert the Extended 4 mm Hex Driver through the Driver Handle into the proximal aspect of the nail and turn in a clockwise motion to lock the oblique screws with the preassembled, embedded setscrew/ locking mechanism. When complete, remove the hex driver. To remove the targeting assembly, insert the 5 mm Connecting Bolt Inserter through the Driver Handle to engage the connecting bolt and turn counterclockwise to release attachment from the nail.
Open the catalog to page 11
Phoenix Suprapatellar Approach Step 13c. Proximal Locking – Compression (Optional) The Phoenix Tibial Nail offers a preassembled, embedded setscrew/locking mechanism that can provide up to 5 mm of compression. Note: If compression is desired, first ensure distal locking has been completed. Prior to compressing, remove the sleeve assembly from bone. Assemble the Trocar (Catalog #41006) to the Drill Sleeve (Catalog #41005) and insert through the Soft Tissue Sleeve (Catalog #41004) through the Dynamic hole (Dynamic Compression Slot) of the Targeting Arm. Advance to the bone to determine and mark...
Open the catalog to page 12All Zimmer Biomet catalogs and technical brochures
 Oxford® Partial Kne
60 Pages
 Distal Femoral Replacement
72 Pages
 ROSA ONE® Brain System
7 Pages
Archived catalogs
 MODULAR FEMORAL Revision System
14 Pages
 A.L.P.S.®
44 Pages
 Constrained Posterior Stabilized
12 Pages
 Persona PERSONALIZED KNEE
7 Pages
 Avenir® Femoral Hip System
12 Pages
 The CLS® Spotorno® Stem
16 Pages
 Alloclassic®Zweymüller®Stem
12 Pages
 ®Zimmer® Segmental System
6 Pages
 Zimmer Natural Nail System
8 Pages
 modern-cementing-technique
16 Pages
 CoAxial Spray Kit
8 Pages
 Biologics
24 Pages
 PowerPump DP System
2 Pages
 Sidus
Sidus40 Pages
 Ankle Fix System 4.0
8 Pages
 Anatomical Shoulder System
6 Pages
 NexGen® RH Knee
8 Pages
 tourniquet-systems-brochure
8 Pages
 Persona-Partial
12 Pages
 Fitmore Hip Stems
6 Pages
 NexGen High-Flex Implant
8 Pages
 Trabecular Metal ™Glenoid
4 Pages
 Anatomical Shoulder ™ System
6 Pages
 Zimmer ® PSI Shoulder
6 Pages
 Zimmer personna
12 Pages
 ZImmer iASSIST
44 Pages
 Fitmore ® Hip Stem
24 Pages
 Persona Knee
6 Pages
 Trauma Solutions
10 Pages
 Colagen Repair Patch
2 Pages
 Fitmore® Hip Stem
6 Pages
 Zimmer® Segmental System
6 Pages



- Detection kit
- ZIMMER BIOMET bone plate
- ZIMMER BIOMET compression plate
- ZIMMER BIOMET metallic compression plate
- Immunoassay detection kit
- ZIMMER BIOMET locking compression plate
- Infectious disease detection kit
- Titanium compression plate
- Surgical system
- Distal compression plate
- Cutting electrosurgical system
- Tablet computer software
- Cassette detection kit
- Chromatographic immunoassay test kit
- Coagulation surgical system
- Agitator
- ELISA detection kit
- Proximal compression plate
- Benchtop agitator
- Planning software