- Catalogs
- Zimmer Biomet
- Zimmer® Nexel™ Total Elbow Surgical Technique
Zimmer® Nexel™ Total Elbow Surgical Technique
1 /34Pages

Zimmer® Nexel™ Total Elbow Surgical Technique
1 /34Pages
Catalog excerpts

Zimmer Nexel™ Total Elbow ® Surgical Technique
Open the catalog to page 1
Zimmer Nexel™ Total Elbow Surgical Technique ® Surgical Preparation and Exposure Humeral Preparation Ulnar Preparation Trial Reduction Component Implantation Final Assembly Postoperative Management Poly Revision
Open the catalog to page 2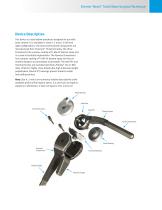
Zimmer Nexel™ Total Elbow Surgical Technique ® Device Description This device is a total elbow prosthesis designed for use with bone cement. It is available in sizes 4, 5 and 6, in left and right configurations. The Ulnar and Humeral Components are manufactured from Tivanium® (Ti-6Al-4V) alloy. The Ulnar Component has a porous coating of Ti-6Al-4V plasma spray and is curved to facilitate implantation. The Humeral Component has a porous coating of Ti-6Al-4V plasma spray and has an anterior flange to accommodate a bone graft. The Axle-Pin and Humeral Screws are manufactured from Zimaloy® (Co-Cr-Mo)...
Open the catalog to page 3
Zimmer Nexel™ Total Elbow Surgical Technique ® Indications / Contraindications INDICATIONS Use of the Zimmer® Nexel™ Total Elbow is contraindicated in patients with: • Elbow joint destruction which significantly compromises the activities of daily living • Post-traumatic lesions or bone loss contributing to elbow instability • Ankylosed joints, especially in cases of bilateral ankylosis from causes other than active sepsis • Currently active, or history of repeated, local infection at the surgical site • Paralysis or dysfunctional neuropathy involving the elbow joint • Significant ipsilateral...
Open the catalog to page 4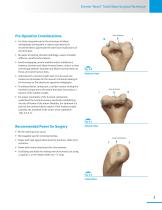
Zimmer Nexel™ Total Elbow Surgical Technique ® Pre-Operative Considerations • For those inexperienced in the technique of elbow arthroplasty, training with a cadaver specimen(s) is recommended to appreciate the soft tissue implications of the technique. • Be aware of existing shoulder pathology; assess shoulder stiffness, avoid forceful rotation. • Avoid overlapping cement mantles and/or interference between shoulder and elbow humeral stems, and/or a short cement gap between shoulder and elbow humeral stems as these are known fracture risks. • Understand if a revision length stem is to be used...
Open the catalog to page 5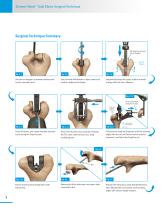
Zimmer Nexel™ Total Elbow Surgical Technique ® Surgical Technique Summary Dashed line denotes top of Implant Use saw or ronguers to remove trochlea and access humeral canal. Use Humeral Awl Reamer to open canal and confirm readiness for Rasps. Sequentially Rasp the canal; solid line needs to align with the axis of flexion. Fig. 2.13 Do not start drill until pin in hole. Fully seat Trephine Stabilizer Score the bone, and create rounded humeral cut by using the Trephine saw. Secure the Humeral Cut Guide by inserting the Pin, then make vertical cuts using oscillating saw. Create notch with rongeur...
Open the catalog to page 6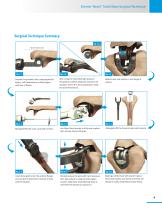
Zimmer Nexel™ Total Elbow Surgical Technique ® Surgical Technique Summary Fig. 3.11 Flat of the Olecranon Prepare the proximal ulna using sequential Rasps, until hole feature on Rasp aligns with axis of flexion. Retrograde fill the ulnar canal with cement. Insert bone graft under the anterior flange and use the Humeral Stem Inserter to fully seat the Implant. After using the Ulnar Bearing Clearance Template to confirm adequate clearance for Implant, assess the ulnar preparation using the Ulnar Provisional. Use Ulnar Stem Inserter to fully seat implant, then remove Cement Diverter. Partially reduce...
Open the catalog to page 7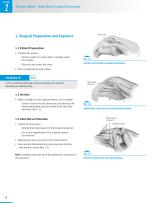
Zimmer Nexel™ Total Elbow Surgical Technique ® Ulnar Crest 1. Surgical Preparation and Exposure 1.1 Patient Preparation Ulnar Nerve • Position the patient. · Position patient in supine with a sandbag under the scapula. · Place the arm across the chest. Fig. 1.1 Incision just lateral to medial epicondyle. • Place a rolled towel under elbow. A more midline positioned incision decreases the need for elevating an extensive flap. Flexor carpi ulnaris m. Medial epicondyle 1.2 Incision • Make a straight incision approximately 15cm in length. · Center incision over the elbow joint just lateral to the...
Open the catalog to page 8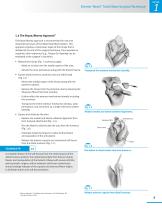
Zimmer Nexel Total Elbow Surgical Technique ® 1.4 The Bryan/Morrey Approach* The Bryan/Morrey approach is recommended for new and inexperienced users of the Nexel Total Elbow System. This approach employs a meticulous repair of the triceps that is detailed at the end of this surgical technique. Once experience is gained, other exposures (e.g., Triceps-On/Sparing) can be employed at the surgeon’s discretion. • Release the triceps (Fig. 1.3 previous page). · Make an incision over the medial aspect of the ulna. · Elevate the ulnar periosteum along with the forearm fascia. Transpose the extensor...
Open the catalog to page 9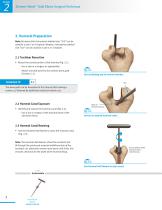
Zimmer Nexel™ Total Elbow Surgical Technique ® 2. Humeral Preparation Note: Be aware that instruments labeled size “5/6” can be used for a size 5 or 6 implant; likewise, instruments labeled size “4/5” can be used for a size 4 or 5 implant. 2.1 Trochlear Resection • Resect the central portion of the trochlea (Fig. 2.1). · Use a saw or a rongeur as appropriate. · Retain resected bone for the anterior bone graft (Section 5.1). TECHNIQUE TIP Fig. 2.1 Use oscillating saw to remove trochlea. The bone graft can be harvested at this time by first making a center cut, followed by additional medial or...
Open the catalog to page 10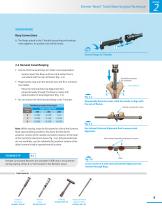
Zimmer Nexel Total Elbow Surgical Technique ® SCRUB NURSE Rasp Connections A. The Rasps attach to the T-Handle by pushing and twisting them together. An audible click will be heard. Fig. A Connect Rasps to T-Handle. 2.4 Humeral Canal Rasping • Use the Pilot Humeral Rasp to initiate canal preparation. · Gently impact the Rasp until the solid etched line is coincident with the axis of flexion (Fig. 2.4). Dashed line denotes top of Implant • Progressively rasp until the desired size and fit is achieved (see table). · Place the Internal/External Alignment Rod perpendicularly through the Rasp to assist...
Open the catalog to page 11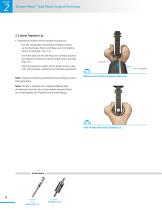
Zimmer Nexel™ Total Elbow Surgical Technique ® 2.5 Initial Trephine Cut • Identify the position of the rounded humeral cut. · Use the appropriate size-matched Trephine based on the final Rasp. (Size 5-100 Rasp and 5/6 Trephine shown for example - Fig. 2.7). · Insert the pilot pin into the Rasp and carefully advance the Trephine’s pilot pin until the depth stop is reached (Fig. 2.7). · Score the posterior surface of the distal humerus (Fig. 2.8). This provides a reference for the final preparation. Note: Irrigation should be employed during cutting to reduce heat generation. Pilot Pin Size 5/6...
Open the catalog to page 12All Zimmer Biomet catalogs and technical brochures
 ROSA ONE® Brain System
7 Pages
 MODULAR FEMORAL Revision System
14 Pages

Archived catalogs
 A.L.P.S.®
44 Pages
 Constrained Posterior Stabilized
12 Pages
 Persona PERSONALIZED KNEE
7 Pages
 Avenir® Femoral Hip System
12 Pages
 The CLS® Spotorno® Stem
16 Pages
 Alloclassic®Zweymüller®Stem
12 Pages
 ®Zimmer® Segmental System
6 Pages
 Zimmer Natural Nail System
8 Pages
 modern-cementing-technique
16 Pages
 CoAxial Spray Kit
8 Pages
 Biologics
24 Pages
 PowerPump DP System
2 Pages
 Sidus
Sidus40 Pages
 Ankle Fix System 4.0
8 Pages
 Anatomical Shoulder System
6 Pages
 NexGen® RH Knee
8 Pages
 tourniquet-systems-brochure
8 Pages
 Persona-Partial
12 Pages
 Fitmore Hip Stems
6 Pages
 NexGen High-Flex Implant
8 Pages
 Trabecular Metal ™Glenoid
4 Pages
 Anatomical Shoulder ™ System
6 Pages
 Zimmer ® PSI Shoulder
6 Pages
 Zimmer personna
12 Pages
 ZImmer iASSIST
44 Pages
 Fitmore ® Hip Stem
24 Pages
 Persona Knee
6 Pages
 Trauma Solutions
10 Pages
 Colagen Repair Patch
2 Pages
 Fitmore® Hip Stem
6 Pages
 Zimmer® Segmental System
6 Pages


- Detection kit
- ZIMMER BIOMET bone plate
- ZIMMER BIOMET compression plate
- ZIMMER BIOMET metallic compression plate
- Immunoassay detection kit
- ZIMMER BIOMET locking compression plate
- Infectious disease detection kit
- Titanium compression plate
- Surgical system
- Distal compression plate
- Chromatographic immunoassay test kit
- Cutting electrosurgical system
- Cassette detection kit
- Coagulation electrosurgical unit
- Agitator
- ELISA detection kit
- Proximal compression plate
- Benchtop agitator
- Arthrodesis nail
- Forearm compression plate