Catalog excerpts

Fitmore® Hip Stem Surgical Technique Draft 5.4, 14 september 2007 A New Concept in Bone Conservation
Open the catalog to page 1
Fitmore® Hip Stem – Surgical Technique Surgical Technique Fitmore Hip Stem Table of Contents Introduction/The Offset Options General Information/Indications/Contraindications Preoperative Planning The Primary Objectives of Preoperative Planning Planning Steps Acetabular Component Determination of the Stem Family Final Result Surgical Technique Osteotomy of the Femoral Neck Preparation of the Femoral Canal Trial Reduction Insertion of the Fitmore Hip Stem Intraoperative Extraction of the Fitmore Hip Stem Exchangeable Plastic Jaws Postoperative Treatment Fitmore Hip Stem Implants Fitmore Hip...
Open the catalog to page 3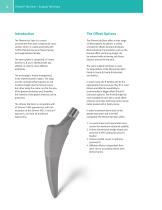
Fitmore® Hip Stem – Surgical Technique The Fitmore Hip Stem is a curved uncemented stem with a trapezoidal crosssection, which is coated proximally with Ti-VPS (Titanium Vacuum Plasma Spray) and rough-blasted distally. The Fitmore Hip Stem offers a wide range of offset options to address a variety of anatomic offsets among individuals. Biomechanical characteristics such as the femoral offset and the leg length can be restored while achieving soft tissue balance around the hip joint. The stem system is comprised of 3 stem families A, B and C (family B with two offsets), in order to cover...
Open the catalog to page 4
Fitmore® Hip Stem – Surgical Technique General Information • Indications and contraindications for the • This femoral stem is for total or hemi use of these components may be relative hip arthroplasty and is indicated for the or absolute and must be carefully following conditions: Patient conditions weighed against the patient’s entire of noninflammatory degenerative joint evaluation and the prognosis for possible disease (NIDJD), e.g., avascular necrosis, alternative procedures osteoarthritis and inflammatory degenerative joint disease (IJD), e.g., rheumatoid arthritis; those patients with...
Open the catalog to page 5
Fitmore® Hip Stem – Surgical Technique Preoperative Planning The Primary Objectives of Preoperative Planning are to It is important that the preoperative planning is made with the necessary accuracy and that the individual steps of the operation are followed exactly. 1. Determine preoperative leg length 2. Determine acetabular component size and position 3. Choose the family of the Fitmore Hip Stem by restoring offset, center of rotation and by matching the medial contour of the stem with the calcar arch 4. Determine femoral component size, position and fit Although X-ray quality may vary,...
Open the catalog to page 6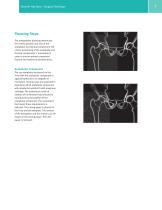
Fitmore® Hip Stem – Surgical Technique Planning Steps The preoperative planning determines the correct position and size of the acetabular and femoral component. The correct positioning of the acetabular and femoral components is mandatory in order to ensure optimal component fixation and restore hip biomechanics. Acetabular Component The cup templates are placed on the X-ray with the acetabular component in approximately 40 to 45 degrees of inclination. Several sizes are assessed to determine which acetabular component will provide the optimal fit with maximum coverage. The anatomical...
Open the catalog to page 7
Fitmore® Hip Stem – Surgical Technique Determination of the Stem Family Place the overview template on the pelvis X-ray. In the overview template, the three stem families are displayed with their smallest and biggest sizes. The correct family is chosen primarily based on the correct offset. To choose the correct stem family, position the overview template of the family that seems most appropriate into the medullary canal so that the reference line of the femoral axis is parallel to the femur and that the medial contour of the prosthesis is aligned with the cortex. Now move the template up-...
Open the catalog to page 8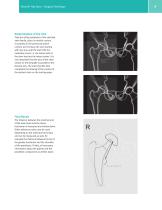
Fitmore® Hip Stem – Surgical Technique Determination of the Size Take the sizing templates of the selected stem family, place its medial contour accurately on the previously drawn contour and increase the size starting with size one until the stem fills the medullary canal, i.e. the lateral side of the stem touches the lateral cortex. It is very important that the axis of the stem shown on the template is parallel to the femoral axis. The stem that fits best completes the drawing of the contour of the optimal stem on the tracing paper. Final Result The distance between the proximal end of...
Open the catalog to page 9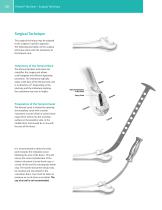
Fitmore® Hip Stem – Surgical Technique Surgical Technique This surgical technique may be adapted to the surgeon’s specific approach. The following description of the surgical technique starts with the osteotomy of the femoral neck. Osteotomy of the Femoral Neck The Fitmore Hip Stem instrument set simplifies the surgery and allows a well-targeted and efficient operating procedure. The osteotomy typically starts at the base of the femoral neck and is inclined by 45°. Depending on the planning and the individual anatomy the osteotomy may vary in height. Preparation of the Femoral Canal The...
Open the catalog to page 10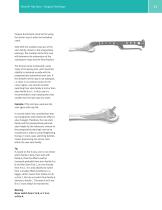
Fitmore® Hip Stem – Surgical Technique Prepare the femoral canal by first using the starter rasp to enter the medullary canal. Start with the smallest rasp size of the stem family chosen in the preoperative planning. The insertion of the first rasp will determine the anteversion of the subsequent rasps and the final implant. The femoral canal is prepared, using rasps of increasing size, until maximum stability is obtained usually with the preoperatively determined stem size. If the medial fit of the rasp is not adequate, i.e. there is no cortical contact in the calcar region, one should...
Open the catalog to page 11
Fitmore® Hip Stem – Surgical Technique Trial Reduction Remove the rasp handle and leave the rasp in the femoral canal. Choose the appropriate trial neck following the stem family concept, i.e. A, B, B-Ext. or C. The stem families are indicated on the top of the trial necks. Each rasp family has a specific design coding feature to prevent incorrect rasp body and trial neck mating. Please be aware that only stem family B has two different offset options (B and B-Ext.) on the same rasp body. Once the trial neck is inserted, check the distance between lesser trochanter and taper compared with...
Open the catalog to page 12All Zimmer Biomet catalogs and technical brochures
-
MODULAR FEMORAL Revision System
14 Pages
-
A.L.P.S.®
44 Pages
-
Constrained Posterior Stabilized
12 Pages
-
Persona PERSONALIZED KNEE
7 Pages
-
Avenir® Femoral Hip System
12 Pages
-
The CLS® Spotorno® Stem
16 Pages
-
Alloclassic®Zweymüller®Stem
12 Pages
-
®Zimmer® Segmental System
6 Pages
-
NexGen® RH Knee
8 Pages
-
Persona-Partial
12 Pages
-
Zimmer Natural Nail System
8 Pages
-
tourniquet-systems-brochure
8 Pages
-
modern-cementing-technique
16 Pages
-
CoAxial Spray Kit
8 Pages
-
Biologics
24 Pages
-
PowerPump DP System
2 Pages
-
Sidus
40 Pages
-
Ankle Fix System 4.0
8 Pages
-
Anatomical Shoulder System
6 Pages
-
Fitmore Hip Stems
6 Pages
-
NexGen High-Flex Implant
8 Pages
-
Trabecular Metal ™Glenoid
4 Pages
-
Anatomical Shoulder ™ System
6 Pages
-
Zimmer ® PSI Shoulder
6 Pages
-
Zimmer personna
12 Pages
-
ZImmer iASSIST
44 Pages
-
Persona Knee
6 Pages
-
Trauma Solutions
10 Pages
-
Colagen Repair Patch
2 Pages
Archived catalogs
-
Fitmore® Hip Stem
6 Pages
-
Zimmer® Segmental System
6 Pages


