
Excertos do catálogo

Implants trauma High Tibia Osteotomy Plate
Abrir o catálogo na página 1
All ITS plates are preformed anatomically as a matter of principle. If adjustment of the plate to the shape of the bone is required, this is possible by carefully bending gently in one direction once. Particular care is required when bending in the region of a plate hole, as deformation of the plate may lead to a failure of the locking mechanism. The plate must not be buckled or bent several times. This is particularly important in the case of titanium implants, to prevent material fatigue and subsequent failure. The method of bending is the conscious responsibility of the operating doctor;...
Abrir o catálogo na página 2
1. Introduction P. 5 Preface P. 6 Screws P. 7 Properties P. 7 Instruments P. 8 Advantages of the „Closed Wedge“ Technique P. 8 Indications & Contraindications 2. Surgical Technique P. 10 Pre-operative patient preparation P. 10 Access P. 11 Exposure P. 12 Implantation P. 13 Compression instrument P. 15 Postoperative treatment P. 15 Explantation P. 15 Summary 3. Information P. 17 Locking P. 17 Dotize® P. 18 Order list P. 20 Reconditioning Manual P. 22 Notes
Abrir o catálogo na página 3
Preface The locking Tibia Head Plate is anatomically preshaped and is fixed laterally. The preshaping leads to reduced operation times since an intraoperative anatomical contouring no longer needs to be performed. All holes are occupied in a locking way thus ensuring an early ability to bear weight without any loss of correction.
Abrir o catálogo na página 5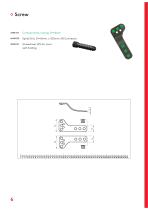
37451-xx Cortical Screw, Locking, D=4.8mm 61408-225 Spiral DriLL, D=4.0mm, L=225mm, AO Connector Mill Mill MM lllllllllllllllllllllll III Mill Mill MM lllll III lllllllllllllll llll Mil MM lllllll^
Abrir o catálogo na página 6
Properties Properties of the material: • Plate material: Titanium • Material of screws: TiAl6V4 ELI • Easier removal of the implant after the fracture has healed • Improved fatigue strength of the implant • Reduced risk of cold welding • Reduced risk of inflammation and allergy Locking Anatomically contoured Left/right version Stable plate with ability to bear weight early on without loss of correction • Plate lenght: 6-hole Instruments Tension bolts: • Tension bolt A is fixed on the tibia slightly ventral to the plate • Tension bolt B is fixed in one of the two plate holes Compression...
Abrir o catálogo na página 7
Advantages of the „Closed Wedge“ Technique • • • • Fast osseous restoration times - 2 planar bony areas are apposed under compression Immediate load stability - 3 weeks partial weight bearing - then full weight bearing Adjusted correction angle and adjusted tibial slope are held exactly No loss of correction due to worse bone quality Indications & Contraindications Indications: • Tibia-head osteotomy with valgus („Closed Wedge“ Technique) • Femoral osteotomy with varus („Closed Wedge“ Technique) Existing infections in the fracture zone and operation area Common situations that do not allow...
Abrir o catálogo na página 8
Surgical Technique
Abrir o catálogo na página 9
Pre-operative patient preparation • Body position is the same as for arthroscopy, which is routinely performed before the osteotomy • Additionally, a roll is pushed under the bone in order to bend the knee to about 20° in order to protect the neurovascular structures in the hollow of the knee. Access • Lateral approach of about 6cm length at the height of the proximal tibia, viewed laterally at the centre of the lower leg, between tub. tibiae and palpable head of the fibula. • First, the lig. patellae is displayed, the anterior musculature of the tibia is transversely separated from the...
Abrir o catálogo na página 10
Exposure • Next, the guide wires for the osteotomy are drilled (check using fluoroscopy). • For this purpose an angle gauge (6820202-1) is used to display an accurate guidance for the D=3.2mm guide wire • First of all, the guide wire, steel, D=3.2mm, L=170mm (35324-170) is attached and fastened in the blind hole with the 0 mark using the appropriate fixation screw (6820202-2). • The second long guide wire, steel, D=3.2mm, L=228mm (35324-228) is subsequently drilled in, in such a way that both wires meet each other at the medial cortex of the tibia. • After checking the angle of the planned...
Abrir o catálogo na página 11
Implantation The locking plate is positioned laterally and then fastened to the head of the shin bone using the three screws running parallel to the articular surface. Use the drill guide, D=4.0mm (62401-88) to bore holes with the spiral drill, D=4.0mm, L=225mm, AO Connector (61408-225) into the proximal plate holes. Read off the required screw length at the calibrated spiral drill and insert D=4.8mm locking cortial screws (37481-XX), using the screwdriver, WS 3.5, conic, self-holding (56352-SH). Then fix the tension bolt, 4x13 (70102-40/13) in one of the two plate holes (see picture...
Abrir o catálogo na página 12
Compression instrument For the closure of the osteotomy, a compression device (70100) has been developed which engages two tension bolts. Through rotation of the T-handpiece the osteotomy can be closed tightly without any problems.
Abrir o catálogo na página 13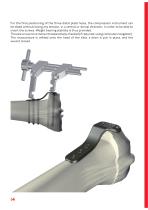
For the final positioning of the three distal plate holes, the compression instrument can be tilted without losing any tension, in a ventral or dorsal direction, in order to be able to insert the screws. Weight bearing stability is thus provided. The axis is now once more intraoperatively checked (if required, using computer navigation). The musculature is refixed onto the head of the tibia, a drain is put in place, and the wound closed.
Abrir o catálogo na página 14
Postoperative treatment • The drain is removed on the first postoperative day, and mobilisation is started with the patient. • After exposure to partial weight bearing for three weeks and in case of an uneventful course, the patient can start walking with full weight. • Osseous restoration is achieved after 4 - 6 weeks according to radiography. • Patients are discharged from treatment on average 6 - 7 weeks after the osteotomy has healed. • Thrombosis prophylaxis is carried out for 4 - 6 weeks. Explantation If desired by the patient, the implant can be removed. Removal should be performed...
Abrir o catálogo na página 15Todos os catálogos e folhetos técnicos I.T.S.
-
 ufs
ufs1 Páginas
-
 DHL
DHL2 Páginas
-
 ITS
ITS2 Páginas
-
 DHL - Distal Humeral Locking Plates
20 Páginas
-
 PHL
PHL24 Páginas
-
 ACLS
ACLS20 Páginas
-
 CFN
CFN32 Páginas
-
 OLS
OLS24 Páginas
-
 PHLs
PHLs20 Páginas
-
 CTN - Cannulated Tibia Nail
28 Páginas
-
 UOL - Ulna Osteotomy Locking Plate
32 Páginas
-
 SR Sacral Rods
20 Páginas
-
 HCS
HCS24 Páginas
-
 TOS Twist-Off Screw
20 Páginas
-
 TLS
TLS20 Páginas
-
 PRS-RX
32 Páginas
-
 HLS
HLS20 Páginas
-
 PLS - Pilon Locking Plates System
24 Páginas
-
 ES
ES20 Páginas
-
 SR
SR20 Páginas
-
 FL
FL24 Páginas
-
 PL - Pilon Locking Plate small
12 Páginas
-
 PRS - Pelvic Reconstruction System
28 Páginas
-
 PRL - PROlock Radius Locking Plate
20 Páginas
-
 OHL - Olecranon Hook Locking Plate
24 Páginas
-
 OL - Olecranon Locking Plate
24 Páginas
-
 PHL - Proximal Humeral Locking Plate
28 Páginas
-
 CAS
CAS40 Páginas
-
 FCN
FCN20 Páginas
-
 HOL
HOL24 Páginas
-
 FLS
FLS24 Páginas
-
 PFL
PFL20 Páginas
-
 DTL
DTL24 Páginas
-
 PTL
PTL32 Páginas
-
 DFL
DFL32 Páginas
-
 SCL
SCL32 Páginas
-
 SLS
SLS24 Páginas
-
 CAL
CAL20 Páginas
-
 DUL
DUL24 Páginas
-
 CLS
CLS28 Páginas


