
Excertos do catálogo

PRL PROlock RADIUS LOCKING PLATE 2.0 emergency team for broken bones®
Abrir o catálogo na página 1
CONTENT Introduction 3 Properties 4 Indication & Contraindication 8 Time of Operation Surgical Technique Preface 8 Positioning of the Patient 9 Access Implantation 10 Postoperative Treatment 18 Explantation 18 Summary Information 10 18 Order Information 20 Locking 22 Dotize® 23 Sterilization Guidelines 24 Notes 26
Abrir o catálogo na página 2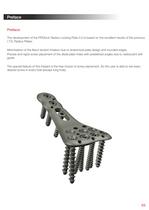
Preface Preface: The development of the PROlock Radius Locking Plate 2.0 is based on the excellent results of the previous I.T.S. Radius Plates. Minimisation of the flexor tendon irritation due to anatomical plate design and rounded edges. Precise and rapid screw placement of the distal plate holes with predefined angles due to radiolucent drill guide. The special feature of this implant is the free choice of screw placement. So the user is able to set every desired screw in every hole (except long hole). 03
Abrir o catálogo na página 3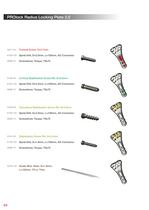
PROlock Radius Locking Plate 2.0 32271-XX Cortical Screw, D=2.7mm 61203-100 Spiral Drill, D=2.0mm, L=100mm, AO Connector 56095-70 Screwdriver, Torque, T9x70 37304-XX Cortical Stabilization Screw RH, D=3.0mm 61243-100 Spiral Drill, D=2.4mm, L=100mm, AO Connector 56095-70 Screwdriver, Torque, T9x70 37303-XX Cancellous Stabilization Screw RH, D=3.0mm 61203-100 Spiral Drill, D=2.0mm, L=100mm, AO Connector 56095-70 Screwdriver, Torque, T9x70 37241-XX Stabilization Screw RH, D=2.4mm 61183-100 Spiral Drill, D=1.8mm, L=100mm, AO Connector 56095-70 Screwdriver, Torque, T9x70 35164-150 Guide Wire,...
Abrir o catálogo na página 4
• Multidirectional Locking • Version left/right • Minimisation of the flexor tendon irritation due to anatomical plate design • K-Wire holes for preliminary plate fixation • Long hole for optimal positioning and adjustment of radius length • Optionally drill block • Plate material: Titanium • Easier removal after fracture has healed • Improved fatigue strength of Implant • Reduced risk of cold bonding • Reduced risk of Inflammation and allergy All ITS locking plates are anatomically pre-ccrtcurco. n- the unlikely oven: tra: :rc- cla:c "as to be formed to the bone please no:;cc :nat slight...
Abrir o catálogo na página 5
Advanced Properties PROlock 2.0: • Predefined angles of the distal holes 4 Version left 3 5 6 2 7 1 1 Version right 7 2 3 4 6 5 Hole number 1 2 3 4 5 6 7 06 Proximal/distal direction distal 15° proximal 5° proximal 5° proximal 5° distal 5° distal 5° distal 10° Ulnar/radial direction radial 8° radial 8° radial 3° ulnar 3° 0° radial 7° radial 13°
Abrir o catálogo na página 6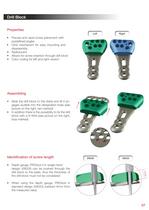
Drill Block Properties Left Right • Precise and rapid screw placement with predefined angles • Click mechanism for easy mounting and disassembly • Radiolucent • Allows for screw insertion through drill block • Color coding for left and right version Assembling • Slide the drill block to the distal end till it engages audible into the designated holes (see picture on the right, red marked) • In addition there is the possibility to fix the drill block with a K-Wire (see picture on the right, blue marked) • Depth gauge, PROlock II in single-hand design (59026) can be pushed through the drill...
Abrir o catálogo na página 7
Indication & Contraindication Indication: • Complex intra-articular fractures of the distal radius with comminuted zone • Complex extra-articular fractures of the distal radius with comminuted zone • Corrective osteotomy of the distal radius Contraindication: • Very advanced osteoporosis with soft bones • Disintegration of the radius-joint surfaces to the extent that there is no support for screws Time of Operation Time of Operation: • Acut, on the day of the accident • After swelling has subsided (5-10 days) In the case of additional questions concerning the wrist surface, a CT scan can be...
Abrir o catálogo na página 8
Positioning of the Patient Positioning of the Patient: • The patient is placed in the supine position with pneumatic partial deprivation of blood supply • The hand is positioned on a X-ray transparent surgical hand table 09
Abrir o catálogo na página 9
Access The skin incision is performed volarly on the distal forearm above the tendon of the flexor carpi radialis and reaching to the crease of the wrist (FCR-approach). Splitting of the deep fascia of the forearm, releasing the pronator quadratus muscle from the distal radius beginning at the radial edge. Implantation Suspending the thumb with a counterpoise, the fracture is loosened and the length restored. The individual fragments are positioned using the raspatory, and, if necessary, the comminuted zones are filled with bone substitute to achieve a provisional reduction in position and...
Abrir o catálogo na página 10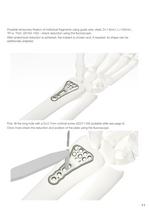
Possible temporary fixation of individual fragments using guide wire, steel, D=1.6mm, L=150mm, TR w. Thrd. (35164-150) - check reduction using the fluoroscope. After anatomical reduction is achieved, the implant is chosen and, if required, its shape can be additionally adapted. First, fill the long hole with a D=2.7mm cortical screw (32271-XX) (suitable drills see page 4). Once more check the reduction and position of the plate using the fluoroscope. 11
Abrir o catálogo na página 11
Due to the longhole it is possible to adjust the plate position either distal or proximal. 12
Abrir o catálogo na página 12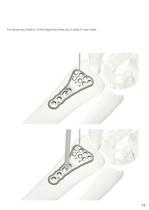
For temporary fixation of the fragments there are 3 distal K-wire holes. 13
Abrir o catálogo na página 13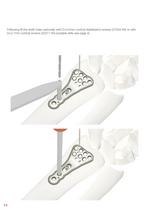
Following fill the shaft holes optionally with D=3.0mm cortical stabilization screws (37304-XX) or with D=2.7mm cortical screws (32271-XX) (suitable drills see page 4). 14
Abrir o catálogo na página 14
After re-checking the reduction 4 or more D=2.4mm stabilization screws (37241-XX) or D=3.0mm cancellous stabilization screws (37303-XX) should be used for the relevant fragments (suitable drills see page 4). Pay attention that the distal locking screws are placed as closely to the wrist surface as possible in order to take advantage of the hard subchondral bone. Two rows of screws are recommended to provide optimal support to the articular surface especially if only the D=2.4mm stabilization screw is used. Final checking using the fluoroscope. 15
Abrir o catálogo na página 15Todos os catálogos e folhetos técnicos I.T.S.
-
 ufs
ufs1 Páginas
-
 DHL
DHL2 Páginas
-
 ITS
ITS2 Páginas
-
 DHL - Distal Humeral Locking Plates
20 Páginas
-
 PHL
PHL24 Páginas
-
 ACLS
ACLS20 Páginas
-
 CFN
CFN32 Páginas
-
 OLS
OLS24 Páginas
-
 PHLs
PHLs20 Páginas
-
 CTN - Cannulated Tibia Nail
28 Páginas
-
 UOL - Ulna Osteotomy Locking Plate
32 Páginas
-
 SR Sacral Rods
20 Páginas
-
 HCS
HCS24 Páginas
-
 TOS Twist-Off Screw
20 Páginas
-
 TLS
TLS20 Páginas
-
 PRS-RX
32 Páginas
-
 HLS
HLS20 Páginas
-
 PLS - Pilon Locking Plates System
24 Páginas
-
 ES
ES20 Páginas
-
 SR
SR20 Páginas
-
 FL
FL24 Páginas
-
 PL - Pilon Locking Plate small
12 Páginas
-
 PRS - Pelvic Reconstruction System
28 Páginas
-
 PRL - PROlock Radius Locking Plate
20 Páginas
-
 OHL - Olecranon Hook Locking Plate
24 Páginas
-
 OL - Olecranon Locking Plate
24 Páginas
-
 PHL - Proximal Humeral Locking Plate
28 Páginas
-
 CAS
CAS40 Páginas
-
 FCN
FCN20 Páginas
-
 HOL
HOL24 Páginas
-
 FLS
FLS24 Páginas
-
 PFL
PFL20 Páginas
-
 DTL
DTL24 Páginas
-
 HTO
HTO24 Páginas
-
 PTL
PTL32 Páginas
-
 DFL
DFL32 Páginas
-
 SCL
SCL32 Páginas
-
 SLS
SLS24 Páginas
-
 CAL
CAL20 Páginas
-
 DUL
DUL24 Páginas
-
 CLS
CLS28 Páginas


