
Excertos do catálogo

OPERATION AND SERVICE MANUAL CE-certified according to the directive for medical products 93/42/EEG incl. addition and EMC-directive 89/336/EQF according to standard EN606011-2:1993. NOTE! This chassis may ONLY be used together with CE certified portable couches mounted on the chassis according to the description found in this owner’s manual. The chassis and couch should be used for treatments and examinations, with the patient sitting or lying down. To achieve maximum life length of the table, do not overload. NOTE! To avoid unnecessary risks for both the patient and the operator, the operator MUST read through the Operation and Service Manual thoroughly before using the product. Postal address Tarsus Myrängsvägen 8 SE- 891 50 Örnsköldsvik SWEDEN Webb www.tarsus.eu Email info@tarsus
Abrir o catálogo na página 1
Contents Preface Warranty Important information Specification of accessories Function descriptions Adjusting the height of the chassis Castors Maintenance and cleaning Lubrication Description, technical documentation Change of components • The hydraulic pump • The electric motor
Abrir o catálogo na página 2
Preface Welcome as owner of a Tarsus chassis, produced by our production company Sjöbloms/Tarsus. We hope that you will be pleased with this quality product. Your satisfaction is our goal. If a problem arises, you are of course always welcome to contact our service department, and our expert staff will assist you to solve the problem in every way needed. This Operation and Service Manual contains all needed information for usage, maintenance and service of the product, as well as instructions on how to exchange spare parts. The Operation and Service Manual is being up-dated on a regular...
Abrir o catálogo na página 3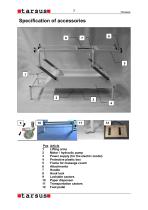
Article Lifting arms Motor / hydraulic pump Power supply (for the electric model) Protective plastic box Frame for massage couch Attachments Handle Hook lock Lockable castors Paper dispenser Transportation castors Foot pedal
Abrir o catálogo na página 4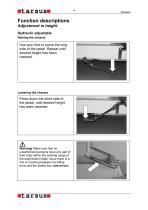
Function descriptions Adjustment in height Hydraulic adjustable Raising the chassis Use your foot to pump the long side of the pedal. Repeat until desired height has been reached. Press down the short side of the pedal, until desired height has been reached. Warning! Make sure that no unauthorized persons have any part of their body within the working range of the examination table, since there is a risk of crushing between the lifting arms and the plastic box (see arrow).
Abrir o catálogo na página 5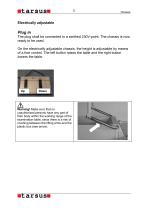
Electrically adjustable Plug in The plug shall be connected to a earthed 230V-point. The chassis is now ready to be used. On the electrically adjustable chassis, the height is adjustable by means of a foot control. The left button raises the table and the right button lowers the table. Warning! Make sure that no unauthorized persons have any part of their body within the working range of the examination table, since there is a risk of crushing between the lifting arms and the plastic box (see arrow).
Abrir o catálogo na página 6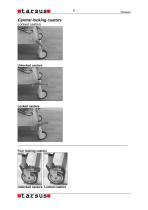
Central locking castors Locked castors Unlocked castors Locked castors Four locking castors Unlocked castors Locked castors
Abrir o catálogo na página 7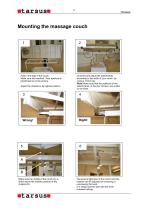
Mounting the massage couch 1 Fold in the legs of the couch. Make sure the headrest / face aperture is positioned as on the picture. Adjust the chassis to its highest position. Unscrew and adjust the attachments according to the width of your couch, by using a 13mm key. Note! Make sure that the positions of the attachments, in the four corners, are similar on all sides. A B Make sure the middle of the couch (A) is direct above the middle crossbar of the chassis (B) The level of tightness of the couch onto the chassis can be adjusted by screwing or unscrewing the hook. It is always best to...
Abrir o catálogo na página 8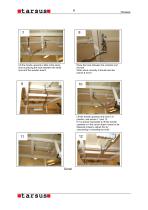
Lift the handle upwards a little at the same time as placing the hook between the white strut and the wooden board. Place the hook between the crossbar and the bolt. When done correctly it should look like picture 8 and 9 Lift the handle upwards and hook it in position, see picture 11 and 12. If it is almost impossible to lift the handle upwards or it the couch doesn’t seem to be fastened properly; adjust this by unscrewing or screwing the hook
Abrir o catálogo na página 9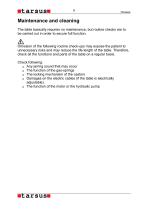
Maintenance and cleaning The table basically requires no maintenance, but routine checks are to be carried out in order to secure full function. Omission of the following routine check-ups may expose the patient to unnecessary risks and may reduce the life length of the table. Therefore, check all the functions and parts of the table on a regular basis. Check following: Any jarring sound that may occur The function of the gas-springs The locking mechanism of the castors Damages on the electric cables (if the table is electrically adjustable). The function of the motor or the hydraulic pump
Abrir o catálogo na página 10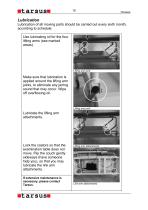
Lubrication Lubrication of all moving parts should be carried out every sixth month, according to schedule Use lubricating oil for the four lifting arms (see marked areas). Make sure that lubrication is applied around the lifting arm joints, to eliminate any jarring sound that may occur. Wipe off overflowing oil. Lubricate the lifting arm attachments. Lock the castors so that the examination table does not move. Flip the couch gently sideways (have someone help you), so that you may lubricate the link arm attachments. If extensive maintenance is necessary, please contact Tarsus.
Abrir o catálogo na página 11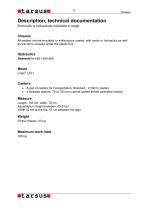
Description, technical documentation Electrically or hydraulically adjustable in height. Chassis All-welded chromium-plated or white epoxy coated, with motor or hydraulics as well as link arms covered under the plastic box. A pair of castors for transportation. Standard.: 2 50mm castors. 4 lockable castors, 75 or 150 mm central looked thread protected castors Measure Length: 195 cm, width: 70 cm. Adjustable in height between: 45-81cm. Width 42 cm at the top, 61 cm between the legs. Maximum work load 180 k
Abrir o catálogo na página 12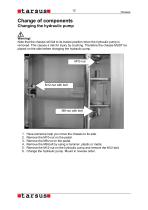
Change of components Changing the hydraulic pump Warning! Note that the chassis will fall to its lowest position when the hydraulic pump is removed. This causes a risk for injury by crushing. Therefore the chassis MUST be placed on the side before changing the hydraulic pump. Have someone help you move the chassis to its side. Remove the M10-nut on the pedal. Remove the M8-nut on the pedal. Remove the M8-bolt by using a hammer, plastic or metal. Remove the M12-nut on the hydraulic pump and remove the M12-bolt. Change the hydraulic pump. Mount in reverse order.
Abrir o catálogo na página 13Todos os catálogos e folhetos técnicos Tarsus
-
Ultrasound table
1 Páginas
-
X-ray table for lung x-ray
1 Páginas
-
3-sectioned examination table
1 Páginas
-
Physiotherapy tables
1 Páginas
-
Physio 2 stationary table
8 Páginas
-
Physio 1 stationary table
9 Páginas
-
Portable tables
12 Páginas
-
Portable massage couches
4 Páginas
-
Accessories - Physio
1 Páginas
-
IV Stands
1 Páginas
-
Chassis
1 Páginas
-
Steering handle
1 Páginas
-
Violetta
2 Páginas
-
Instrument table with fixed shelves
1 Páginas
-
Trolley for pathology
1 Páginas
-
Motorized blood sample chair
1 Páginas
-
Heart ultrasound table
1 Páginas
-
Examination table Lifts 300 kg
1 Páginas
-
Three-sectioned examination table
1 Páginas
-
2-sectioned examination table
4 Páginas
-
Combi-Gynaecology
1 Páginas
-
Examination table for gynaecology
4 Páginas
-
Chiropody chair
1 Páginas
-
X-ray Table
1 Páginas
-
Examination Table
4 Páginas
-
Blood Sample Chairs
1 Páginas
-
Sack- and laundry-bag holder
1 Páginas
Catálogos arquivados
-
Chassis
1 Páginas


