
Excertos do catálogo

OWNERS MANUAL the portable models NOTE! Do NOT use this product without first CAREFULLY reviewing this manual and the instructions for its correct usage! In the manual we inform you of for example: MAKE SURE that you don’t pinch any finger in the joints or between the diagonal struts! MAKE SURE that the locking rings are in its right position at all times, when using the table! MAKE SURE that the frames - metal and wood - are not overloaded! MAKE SURE that bolts and nuts are tight at all times! MAKE SURE that no sharp object cut the fabric! (Pads) Use warm water and a soap solution or a special solution sold by Tarsus. Make sure to wipe dry properly afterwards. If disinfection is needed, use ONLY on cleaned surfaces and ONLY a diluted alcoholbased solution. After disinfecting, use the soap solution again. Wipe dry. Tarsus - Myrängsvägen 8 - 891 50 Örnsköldsvik SWEDEN - Tel 0660 8425
Abrir o catálogo na página 1
WELCOME AS OWNER OF THIS TARSUS MASSAGE TABLE! We’re convinced that you will be pleased with this high quality product. You’re not alone. Tens of thousands of therapists around the globe own a portable table from Tarsus, many use them daily. Our goal is that our products will help you reach your professional goals. If ever a problem occurs, you’re always welcome to contact us, so that we may help you solve the problem. Please read through the manual thoroughly, so that the table is being used as intended, both for your sake and the sake of the table. RANGE OF USE Treatment and examination...
Abrir o catálogo na página 2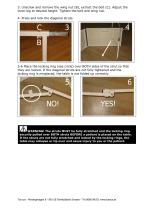
3. Unscrew and remove the wing nut (B), extract the bolt (C). Adjust the inner leg to desired height. Tighten the bolt and wing nut. 4. Press and lock the diagonal struts. B 5-6 Place the locking ring (see circle) over BOTH sides of the strut so that they are locked. If the diagonal struts are not fully tightened and the locking ring is misplaced, the table is not folded up correctly. WARNING! The struts MUST be fully stretched and the locking ring securily pulled over BOTH struts BEFORE a patient is placed on the table. If the struts are not fully stretched and locked by the locking rings,...
Abrir o catálogo na página 3
FOLDING A TABLE WITH NO HEADREST 7-8 Fold the diagonal struts and the legs (in opposite order compared to images 3-6). Make sure that the handle is folded in between the chassis and the leg as shown in image 8, otherwise you may not carry the table. Fold the table. Make sure that the locking rings are not pinched in between the struts and the under-side of the pad, so that the locking ring and/or the pad is not damaged. 9. Fold up the table. 10. Lock the hook (A). WARNING! Make sure you don’t get the fingers caught in the joints and/or between the diagonal struts. D Tarsus - Myrängsvägen 8...
Abrir o catálogo na página 4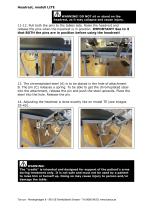
Headrest, modell LITE WARNING! DO NOT sit or stand on the headrest, as it may collapse and cause injury. 11-12. Pull both the pins to the tables side. Raise the headrest and release the pins when the headrest is in position. IMPORTANT! See to it that BOTH the pins are in position before using the headrest! 13. The chromeplated steel (A) is to be placed in the hole of attachment B. The pin (C) releases a spring. To be able to get the chromeplated steel into the attachment, release the pin and push the steel upwards. Place the steel into the hole. Release the pin. 14. Adjusting the headrest...
Abrir o catálogo na página 5
ADJUSTING THE BACKREST, model ZON 15. The backrest is adjustable in 7 steps, 0-48º (A). 16. To raise the headrest from horisontal position, grip the face aperture and pull upwards. A 17-18. NOTE! It is very important for the steel (B) to come in position before anyone leans on the backrest, so that damage may be avoided. 19. NOTE! Never place your hand in between the backrest and the top when lowering the backrest. Risk for pinching! 20. Do not let the patient rest against the backrest when lowering it. Make sure that the steel is in place first. To lower fully down, lift the steel with one...
Abrir o catálogo na página 6
EXTENSION FOR MODEL LITE (optional) Remove the plastic ends. Place the aluminum struts into the chassis of the couch. DONE! NOTE! Never sit or stand on the extension. It is not intended for this purpose. The couch may tip over and the extension may break. Mis-use may cause damage to patient or couch. HEADREST AND ARMREST FOR TE, MA, LITE AND ZON A headrest is included with model TE and LITE, and is available as an accessory with models MA och ZON. WARNING! DO NOT sit or stand on the headrest, as it may collapse and cause injury. 24-25. The headrest is mounted in pre-drilled holes on the...
Abrir o catálogo na página 7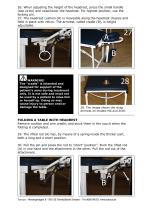
26. When adjusting the height of the headrest, press the small handle (see circle) and raise/lower the headrest. For highest position, use the locking pin. 27. The headrest cushion (A) is moveable along the headrest chassis and held in place with velcro. The armrest, called cradle (B), is height adjustable. WARNING! The "cradle" is intended and designed for support of the patient’s arms during treatment only. It is not safe and must not be used by a patient to raise him or herself up. Doing so may cause injury to person and/or damage the table. 28. The image shows the strap armrest on...
Abrir o catálogo na página 8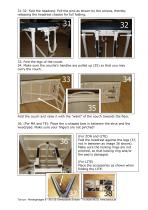
31-32. Fold the headrest. Pull the pins as shown by the arrows, thereby releasing the headrest chassis for full folding. 33. Fold the legs of the couch. 34. Make sure the couche’s handles are pulled up (35) so that you may carry the couch. 35 Fold the couch and raise it with the ”waist” of the couch towards the floor. 36. (For MA and TE): Place the u-shaped bow in between the strut and the wood/pad. Make sure your fingers are not pinched! (For ZON and LITE) Fold the headrest against the legs (37, not in between as image 36 shows). Make sure the locking rings are not pinched, so that locking...
Abrir o catálogo na página 9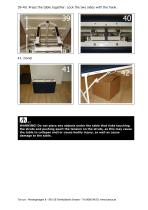
39-40. Press the table together. Lock the two sides with the hook. 42 WARNING! Do not place any objects under the table that risks touching the struts and pushing apart the tension on the struts, as this may cause the table to collapse and/or cause bodily injury, as well as cause damage to the table. Tarsus - Myrängsvägen 8 - 891 50 Örnsköldsvik SWEDEN - Tel 0660 84251 www.tarsus.s
Abrir o catálogo na página 10Todos os catálogos e folhetos técnicos Tarsus
-
Ultrasound table
1 Páginas
-
X-ray table for lung x-ray
1 Páginas
-
3-sectioned examination table
1 Páginas
-
Physiotherapy tables
1 Páginas
-
Physio 2 stationary table
8 Páginas
-
Physio 1 stationary table
9 Páginas
-
Chassis
14 Páginas
-
Portable massage couches
4 Páginas
-
Accessories - Physio
1 Páginas
-
IV Stands
1 Páginas
-
Chassis
1 Páginas
-
Steering handle
1 Páginas
-
Violetta
2 Páginas
-
Instrument table with fixed shelves
1 Páginas
-
Trolley for pathology
1 Páginas
-
Motorized blood sample chair
1 Páginas
-
Heart ultrasound table
1 Páginas
-
Examination table Lifts 300 kg
1 Páginas
-
Three-sectioned examination table
1 Páginas
-
2-sectioned examination table
4 Páginas
-
Combi-Gynaecology
1 Páginas
-
Examination table for gynaecology
4 Páginas
-
Chiropody chair
1 Páginas
-
X-ray Table
1 Páginas
-
Examination Table
4 Páginas
-
Blood Sample Chairs
1 Páginas
-
Sack- and laundry-bag holder
1 Páginas
Catálogos arquivados
-
Chassis
1 Páginas


